1960s Kitchen Cabinet Makeover: A Guide to Modernizing a Classic
The 1960s were a time of bold colors, geometric patterns, and a distinct departure from the traditional. This era's influence can be seen in many aspects of design, including kitchen cabinetry. While cherished for their vintage appeal, 1960s kitchen cabinets often present a challenge for modern homeowners. The dated finishes, lack of storage space, and sometimes limited functionality can make updating these cabinets a worthwhile endeavor. This article explores the key steps involved in a 1960s kitchen cabinet makeover, transforming these nostalgic elements into a stylish and practical focal point of your kitchen.
1. Assess and Plan: Defining the Scope of the Makeover
Before diving into any renovations, a thorough assessment of the existing cabinets is crucial. This involves considering the cabinets' structural integrity, their current condition, and your desired outcome. A meticulous evaluation helps determine the extent of the makeover - a simple refresh or a complete overhaul. Here are some key factors to consider:
Structural Integrity:
Evaluate the cabinets' frames, doors, and drawers for any signs of damage, warping, or instability. This assessment will determine whether repairs or replacements are necessary.Cabinet Condition:
Assess the condition of the cabinet finishes. Are they chipped, peeling, or discolored? Consider the extent of the damage and whether repainting, refinishing, or replacement is the best course of action.Storage Needs:
Determine if the current cabinet layout meets your storage needs. Identify areas where additional storage space is desired, such as pull-out shelves, lazy Susans, or pantry organizers.
Based on this assessment, you can create a detailed plan outlining the specific tasks involved in the makeover. This plan will serve as a roadmap, ensuring a smooth and successful transformation. Factors like budget, timeline, and available resources should also be factored into your plan.
2. Revitalizing the Cabinetry: Repainting, Refinishing, or Replacing?
Once you've assessed the cabinets, you can begin to choose the best approach for revitalizing them. Depending on the condition and desired aesthetic, you can opt for repainting, refinishing, or replacing the cabinets. Each option presents a unique set of considerations:
Repainting:
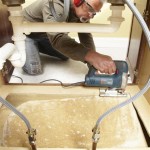
This is the most budget-friendly option and allows for a significant visual change. To achieve a successful repaint, proper preparation is key. This involves sanding, cleaning, and priming the surfaces to ensure a smooth and long-lasting finish.Refinishing:
This option involves stripping the existing finish and applying a new stain or paint. Refinishing can enhance the cabinets' natural beauty and create a more nuanced appearance. It is a more involved process than repainting and may require professional assistance.Replacing:
If the cabinets are beyond repair, replacement might be necessary. This option offers the most flexibility in terms of style, functionality, and material choices. However, it is the most expensive option and can be a significant undertaking.
The choice ultimately depends on the overall condition of the cabinets, your desired aesthetic, and your budget. A well-planned approach ensures that the chosen method aligns with your goals and elevates the kitchen's visual appeal.
3. Enhancing Functionality: Modernizing Storage Solutions
Beyond aesthetics, modernizing 1960s kitchen cabinets involves enhancing their functionality to meet contemporary needs. Consider incorporating features that increase storage capacity and maximize space utilization.
Pull-out Shelves:
These shelves maximize accessibility and allow for easy viewing and retrieval of items. They are particularly beneficial in lower cabinets, preventing the need to crouch or bend over.Lazy Susans:
These rotating shelves optimize corner cabinet space, making every inch accessible. They are ideal for storing spices, jars, and other frequently used items.Pantry Organizers:
For larger pantries, organizers like pull-out drawers, wire baskets, and tiered shelves create a system for efficient storage and prevent items from getting lost in the back.Drawer Dividers and Inserts:
These help organize and compartmentalize drawers, keeping utensils, cutlery, and other items neatly arranged and easily accessible.
By incorporating these functional upgrades, you can transform your 1960s kitchen cabinets into a space that is not only visually appealing but also practical and user-friendly.

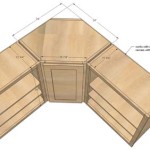
1960 S Kitchen Remodel Plans The Stonybrook House

1960 S Kitchen Gets A Dramatic Makeover Cabinets Home Kitchens 1960s Remodel

Updated 1960 S Kitchen Reveal Little Vintage Cottage

Updated 1960 S Kitchen Reveal Little Vintage Cottage

Our Diy Kitchen Remodel Before And After Tackling A Farmhouse Makeover On Budget Part 1 Joyfully Treasured

My Kitchen Needs A Makeover The D I Y Dreamer

1960 S Kitchen Makeover Remodel Before And After Hardwood Flooring Painted White Cab Cabinets Diy Refacing

1960 S Kitchen Remodel Plans The Stonybrook House

How To Paint Kitchen Cabinets Budget Friendly Makeover

Flip House 1960s Kitchen Before And After A Major Renovation Ranch Remodel Inexpensive Cost
Related Posts