How to Build a Bar With Cabinets: A Comprehensive Guide
Building a bar with cabinets can elevate any home, providing a stylish and functional space for entertaining and relaxing. Whether you're a seasoned DIYer or a novice eager to tackle a new project, this comprehensive guide will equip you with the essential knowledge to create a stunning bar that meets your specific needs.
Materials Required
- Cabinet carcasses (base and wall cabinets)
- Cabinet doors and drawer fronts
- Countertop material (e.g., wood, laminate, granite)
- Bar sink and faucet
- Backsplash material (e.g., tile, glass)
- Hardware (hinges, drawer slides, handles)
- Wood filler and wood glue
- Saw, drill, and other necessary tools
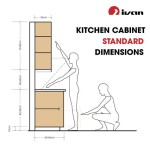
Step 1: Plan Your Bar Layout
Before purchasing any materials, determine the ideal layout for your bar. Consider the available space, the desired number of cabinets and drawers, and the overall design aesthetic you want to achieve. Measure the area carefully and sketch out a floor plan to visualize the final layout.
Step 2: Assemble the Cabinets
Follow the manufacturer's instructions to assemble the cabinet carcasses. Use wood glue and screws to secure the pieces together. Next, attach the cabinet doors and drawer fronts using hinges or drawer slides. Ensure that all components are aligned correctly and operate smoothly.
Step 3: Install the Countertop
Place the countertop on top of the assembled cabinets and secure it using screws or adhesive. If necessary, cut the countertop to fit the desired shape and size. Seal the edges of the countertop with a matching caulk to prevent moisture damage.
Step 4: Mount the Sink and Faucet
Cut a hole in the countertop for the sink and insert the sink into the opening. Use plumbers' putty or a mounting kit to secure the sink in place. Attach the faucet to the countertop and connect the water supply lines.
Step 5: Add a Backsplash
Apply a thin layer of thin-set mortar to the wall behind the countertop and press the backsplash tiles into place. Use spacers to ensure even spacing between the tiles. Allow the mortar to dry completely and then grout the joints to create a seamless finish.
Step 6: Finishing Touches
Install lighting fixtures under the wall cabinets to illuminate the work area. Add shelves or wine racks to provide additional storage and display space. Decorate the bar with bar stools, placemats, and other accessories to personalize the space.
Tips for Success
- Use a level to ensure that the cabinets are perfectly aligned.
- Drill pilot holes before inserting screws to prevent splitting the wood.
- Measure twice and cut once to avoid costly mistakes.
- Protect your work surface with drop cloths or cardboard.
- Consider hiring a professional plumber or electrician if you're not confident with the installation of fixtures.
Conclusion
Building a bar with cabinets is a rewarding project that can transform your living space. By following these steps and incorporating these tips, you can create a custom bar that not only complements your home but also provides a functional and stylish focal point for entertaining and relaxation.

Diy Basement Bar Build Start To Finish Renovation Time Lapse

How To Build The Perfect Home Bar With Cabinets

More Like Home Raising The Bar

Diy Coffee Bar Cabinet Kitchen Renovation The Inspired Work

Cabinet Install Day Basement Bar Build Part 5

Bar Cabinets Crafted Work

How To Build A Diy Dry Bar House On Longwood Lane

Diy Home Bar Ideas For Every Space

Kitchen Chronicles Building A Bar Jenna Sue Design Diy Home Cabinet

Diy A Built In Bar With Me
Related Posts