How to Fasten Kitchen Cabinets Together for an Island
Creating a kitchen island from stock or semi-custom cabinets can significantly enhance the functionality and aesthetics of a kitchen. A crucial step in this process involves securely fastening the cabinets together, ensuring the island is stable, durable, and visually appealing. Improper fastening can lead to instability, misalignment, and ultimately, a compromised kitchen island. This article provides a comprehensive guide on how to properly fasten kitchen cabinets together to form a solid and lasting island structure.
Before beginning, gather all necessary tools and materials. Essential tools include a drill with various bits (including a countersinking bit), a level, clamps (both bar clamps and quick-grip clamps are useful), screws of appropriate lengths (cabinet screws are specifically designed for this purpose), wood glue, shims, and a measuring tape. Materials will consist primarily of the cabinets themselves, along with any decorative panels or supports needed for the island's final design.
The initial step involves planning the island's layout and ensuring the floor is level where the cabinets will be placed. An uneven floor will complicate the fastening process and can lead to an unstable island. Use shims to level each cabinet individually before proceeding with the fastening process. This ensures that when the cabinets are joined, they sit flush and create a seamless surface.
Key Point 1: Prepping the Cabinets for Fastening
Preparing the cabinets properly is crucial for a strong and lasting bond. Begin by ensuring that all cabinet surfaces that will be in contact are clean and free of dust, debris, or any existing finish that might inhibit adhesion. Lightly sanding the surfaces to be joined can also improve the grip of the wood glue. This step is often overlooked but contributes significantly to the overall strength of the connection.
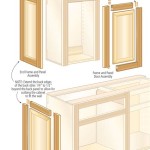
Next, determine the points where the cabinets will be fastened together. Typically, cabinets are fastened along the face frames, as these provide a solid, structural surface for screws. Mark these points carefully, ensuring they are evenly spaced and aligned with the corresponding points on the adjacent cabinet. Using a measuring tape and a straight edge will help ensure accuracy.
Pre-drilling pilot holes is an essential step to prevent the wood from splitting when screws are inserted. Use a drill bit slightly smaller than the diameter of the screws being used. Consider using a countersinking drill bit to create a recess for the screw heads, allowing them to sit flush with the surface of the face frame. This will create a cleaner, more professional look and prevent the screw heads from interfering with the placement of any decorative panels or countertops.
Apply a thin, even layer of wood glue to the surfaces that will be joined. Wood glue provides a much stronger bond than screws alone and is critical for creating a solid, long-lasting connection. Be careful not to apply too much glue, as excess glue can squeeze out and create a mess. If excess glue does squeeze out, wipe it away immediately with a damp cloth.
Key Point 2: The Fastening Process
With the cabinets prepped and the glue applied, the next step is to physically fasten the cabinets together. This requires careful alignment and the use of clamps to hold the cabinets securely in place while the screws are being inserted. Begin by aligning the cabinets precisely, ensuring that the face frames are flush and that there are no gaps between the cabinets. Use a level to double-check that the cabinets are still level after applying the glue.
Once the cabinets are aligned, use clamps to hold them firmly together. Bar clamps are ideal for this purpose, as they can apply even pressure across the entire face frame. Place padding between the clamps and the cabinet surfaces to prevent damage. Tighten the clamps gradually, ensuring that the cabinets remain aligned. Quick-grip clamps can be used to further secure specific areas where needed.
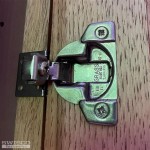
With the cabinets clamped, insert screws through the pre-drilled pilot holes. Use cabinet screws that are long enough to penetrate deeply into both cabinet frames but not so long that they poke through the other side. Tighten the screws firmly, but be careful not to overtighten them, as this can strip the screw holes or damage the wood. The screw heads should sit flush with the surface of the face frame, or ideally, slightly recessed due to the countersinking.
After all the screws have been inserted and tightened, allow the wood glue to dry completely. The drying time will vary depending on the type of glue used and the ambient temperature and humidity. Refer to the glue manufacturer's instructions for specific drying times. It is generally recommended to leave the clamps in place for at least 24 hours to ensure a strong and secure bond.
Key Point 3: Additional Support and Strengthening
Depending on the size and design of the kitchen island, additional support and strengthening may be necessary. This is particularly important for larger islands or islands that will have heavy countertops. Reinforcement can be achieved through several methods, including adding corner braces, installing wood cleats, or applying metal brackets.
Corner braces can be installed inside the cabinet corners to provide additional support and prevent racking. These braces are typically made of metal or heavy-duty plastic and are fastened to the inside of the cabinet frame with screws. Corner braces are particularly useful for cabinets that will be subjected to heavy loads or frequent use.
Wood cleats can be installed along the interior edges of the cabinets to provide a solid surface for attaching the countertop. These cleats are typically made of 1x4 or 1x6 lumber and are fastened to the cabinet frame with screws and glue. The cleats should be installed flush with the top edge of the cabinet frame, creating a level surface for the countertop to rest on. Ensure that the cleats are wide enough to provide adequate support for the countertop material being used.
Metal brackets can be used to reinforce the connection between the cabinets and the floor. These brackets are typically L-shaped and are fastened to the bottom of the cabinet frame and the floor with screws. Metal brackets provide a strong and secure connection that can help prevent the island from shifting or tipping over. When using metal brackets, ensure that they are properly sized and rated for the weight and dimensions of the island.
Furthermore, consider the placement of any appliances within the island. If the island will house a sink, dishwasher, or cooktop, ensure that the cabinet structure is adequately reinforced to support the weight of the appliance and any associated plumbing or electrical fixtures. Additional bracing and support may be required in these areas to prevent sagging or damage to the cabinets.
Finally, after the glue has dried and any additional reinforcement has been added, inspect the island for any signs of weakness or instability. Check that all screws are tight and that there are no gaps or misalignments between the cabinets. If any issues are identified, address them promptly to ensure the long-term stability and durability of the kitchen island.
Careful planning, precise execution, and attention to detail are essential for successfully fastening kitchen cabinets together to create a functional and aesthetically pleasing kitchen island. By following these guidelines, homeowners can achieve a professional-quality result that will enhance their kitchen for years to come.

How To Build A Diy Kitchen Island House By The Bay Design

Setting Kitchen Cabinets Sanford Hawley Unionville Avon Manchester Ct West Springfield Ma

How To Build A Kitchen Island Get Detailed Insights From Experts Cliqstudios

Build Your Dream Kitchen Island S Surprising Floor Mounting Solution Ep 15

Turning Base Cabinets Into A Kitchen Island Just Call Me Homegirl

How To Build A Kitchen Island With Wickes

How To Install Cabinets Like A Pro

How To Build A Diy Kitchen Island House By The Bay Design

How To Install Kitchen Cabinets Diy Family Handyman

Turning Base Cabinets Into A Kitchen Island Just Call Me Homegirl