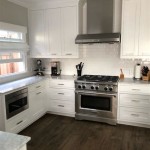
Adding Decorative Trim to the Bottom of Kitchen Cabinets
Adding trim to the bottom of kitchen cabinets is a simple yet effective way to elevate the overall aesthetic of a kitchen. This project can refresh the look of existing cabinetry, add a touch of personalized style, and create a more polished and finished appearance. This article explores various aspects of adding trim, from choosing the right materials to the installation process.
Choosing the Right Trim Material
The selection of trim material depends on several factors, including the existing cabinet style, desired aesthetic, and budget. Several options offer varying degrees of durability and visual appeal.
1. Wood Trim: A classic choice, wood trim offers versatility and can be stained or painted to match or complement existing cabinetry. Different wood species, like oak, maple, or cherry, offer varying grain patterns and colors.
2. MDF (Medium-Density Fiberboard): A cost-effective alternative to solid wood, MDF is a composite material that provides a smooth, paintable surface. It's less susceptible to warping than solid wood but requires careful handling to avoid chipping.
3. PVC Trim: PVC trim is a durable and moisture-resistant option, making it suitable for areas prone to spills or humidity. It's available in various profiles and can be easily cut and installed.
4. Polyurethane Trim: Lightweight and easy to work with, polyurethane trim offers intricate detailing and design flexibility. It's also resistant to moisture and insects.
Measuring and Cutting the Trim
Accurate measurements are crucial for achieving a professional-looking finish. Careful planning and precise cutting ensure the trim pieces fit seamlessly.
1. Measure Carefully: Use a tape measure to determine the length of each cabinet section requiring trim. Double-check measurements to avoid errors.
2. Mark the Trim: Transfer the measurements onto the chosen trim material using a pencil or marking tool. Clearly mark cut lines for accurate cutting.
3. Cutting Techniques: Use a miter saw for angled cuts and a fine-tooth saw for straight cuts. Ensure the saw blade is appropriate for the trim material being used. A coping saw is useful for intricate cuts around corners or curves.
Preparing the Cabinets for Trim Installation
Proper preparation ensures a smooth and secure attachment of the trim. Cleaning the surface and addressing any imperfections will contribute to a professional-looking result.
1. Clean the Cabinet Surface: Use a degreaser or mild detergent to remove any grease, dirt, or residue from the cabinet surface where the trim will be attached.
2. Sanding (if necessary): Lightly sand any uneven surfaces to create a smooth and level surface for the trim. This step is particularly important for older cabinets with imperfections.
3. Fill Gaps or Holes: Use wood filler to fill any gaps or holes in the cabinet surface. This creates a more uniform and finished appearance.
Installing the Trim
The installation process varies slightly depending on the type of trim and the desired finish. Proper adhesion is vital for long-lasting results.
1. Apply Adhesive: Use construction adhesive or wood glue to attach the trim to the cabinet bottom. Apply a consistent bead of adhesive to the back of the trim.
2. Secure the Trim: Press the trim firmly against the cabinet bottom, ensuring proper alignment. Use clamps or painter's tape to hold the trim in place while the adhesive dries.
3. Finishing Nails (optional): For added security, especially with heavier trim materials, finishing nails can be used. Pre-drill pilot holes to prevent the wood from splitting. Countersink the nails and fill the holes with wood putty for a seamless finish.
Finishing Touches
The finishing touches complete the project and enhance the overall appearance of the newly installed trim. Careful attention to detail ensures a polished look.
1. Caulking (optional): Apply caulk along the top edge of the trim where it meets the cabinet bottom to create a seamless transition and prevent moisture from seeping in. Smooth the caulk with a wet finger or caulk tool.
2. Sanding and Filling: After the caulk and wood putty have dried, lightly sand any imperfections. This creates a smooth surface for painting or staining.
3. Painting or Staining: Apply paint or stain to match or complement the existing cabinetry. Multiple coats may be required for optimal coverage and a uniform finish. Allow sufficient drying time between coats.
Choosing the Right Trim Style
The chosen trim style significantly impacts the overall aesthetic of the kitchen. Consider the existing cabinet style and the desired design theme when selecting a trim profile.
1. Simple Trim Styles: A simple, flat trim provides a clean and modern look. This style works well in contemporary kitchens.
2. Decorative Trim Styles: More ornate trim styles, such as beaded, ogee, or dentil molding, add a touch of traditional elegance. These styles complement classic or transitional kitchen designs.
3. Matching Existing Molding: If other molding exists in the kitchen, consider using a similar profile for the cabinet trim to create a cohesive and harmonious look.
Maintaining the Trim
Maintaining the trim ensures its longevity and preserves its appearance. Regular cleaning and minor touch-ups can prevent significant issues.
1. Regular Cleaning: Dust and wipe the trim regularly using a damp cloth and mild detergent. Avoid abrasive cleaners that can damage the finish.
2. Touch-Ups: Address any chips or scratches promptly with touch-up paint or stain to prevent further damage. This helps maintain the trim's appearance and protects it from moisture.

Adding Moldings To Your Kitchen Cabinets Remodelando La Casa

Easy And Inexpensive Cabinet Updates The 15 Minute Fix Adding Trim To Bottom Of Cabinets Rozy Home Kitchen Update

Easy And Inexpensive Cabinet Updates The 15 Minute Fix Adding Trim To Bottom Of Cabinets Rozy Home

How To Get A Custom Cabinet Look Using Trim Sincerely Marie Designs

Moldings Finish And Trim With Gary Striegler Part 14

Adding Molding To Cabinets Make Them Look Built In Young House Love

Diy Cabinet End Panels With Shaker Style Trim Average But Inspired

Adding Molding To Cabinets Make Them Look Built In Young House Love

Adding Moldings To Your Kitchen Cabinets Remodelando La Casa

How To Add Molding Cabinets For A Gorgeous Finish Inspiration Moms
Related Posts