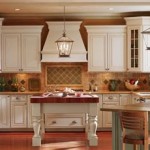
Elevate Your Kitchen's Aesthetics with Trim for Kitchen Cupboards
Kitchen cupboards are the unsung heroes of any culinary space, providing ample storage and organizing essentials. However, over time, they can start to look dated or lackluster. Adding trim to your kitchen cupboards is a simple and effective way to transform their appearance, giving them a touch of elegance or a modern facelift.
Types of Cupboard Trim
There is a wide variety of trim options available to suit different styles and preferences. Here are some of the most popular choices:
- Crown Molding: A decorative trim that sits at the top of the cupboards, adding a sophisticated touch.
- Rope Molding: A twisted rope-shaped trim that creates a subtle accent.
- Valance Molding: A wide, flat trim typically used at the bottom of the cupboards to conceal any unsightly gaps.
- Baseboard Molding: A trim that covers the space between the cupboards and the floor, enhancing durability and aesthetics.
Choosing the Right Trim
When selecting trim for your kitchen cupboards, consider the following factors:
- Cupboard Style: Match the trim style to the design of your cupboards. Classic cupboards look best with traditional moldings, while modern cupboards can handle more contemporary options.
- Kitchen Theme: Consider the overall theme of your kitchen. If you have a rustic kitchen, for example, opt for wooden trim with a distressed finish.
- Material: Trim can be made from various materials, including wood, MDF, and PVC. Choose a material that complements your cupboards and is durable enough to withstand kitchen conditions.
Installing Cupboard Trim
Installing cupboard trim is a relatively straightforward task that can be completed in a few hours with the right tools. Here are the steps you'll need to follow:
- Measure and Cut: Measure the length of the trim you need and cut it to size using a miter saw.
- Attach to Cupboard: Apply wood glue to the trim and press it firmly into place on the cupboard. Secure it with nails or screws.
- Miter Joints: When joining two pieces of trim at a corner, create a miter joint by cutting both pieces at a 45-degree angle. Fit them together and secure them with adhesive.
- Finish: Once installed, paint or stain the trim to match the cupboards or create a contrasting effect.
Transform Your Kitchen
Adding trim to your kitchen cupboards is a cost-effective and rewarding project that can transform the look and feel of your space. Whether you choose a simple molding or a more elaborate design, the right trim can enhance the functionality and beauty of your kitchen for years to come.

From Drab To Fab Adding Trim Cabinets

How To Add Trim And Paint Your Laminate Cabinets

From Drab To Fab Adding Trim Cabinets

Easy And Inexpensive Cabinet Updates Adding Trim To Cabinets Drawers The Rozy Home

Adding Shaker Trim To Flat Panel Cabinets Hometalk

Adding Moldings To Your Kitchen Cabinets Remodelando La Casa

How To Add Trim And Paint Your Laminate Cabinets

Kitchen Diy Shaker Style Cabinets Cherished Bliss

Add Moulding To Flat Cabinet Doors Home Kitchens Cabinets Kitchen

Diy Kitchen Cabinet Upgrade With Paint And Crown Molding
Related Posts