Essential Aspects of Adding Beading to Kitchen Cabinets
Enhancing the aesthetics and functionality of kitchen cabinets is crucial, and adding beading is an effective way to achieve these goals. Beading provides intricate details, adds texture, and improves cabinet durability. Understanding the essential aspects of adding beading to kitchen cabinets ensures a successful outcome.
In this article, we will explore the critical aspects that contribute to effective beading installation, including material selection, measurement, and attachment methods. By considering these elements, homeowners and DIY enthusiasts can achieve stunning results that enhance the overall appearance and functionality of their kitchen cabinets.
Material Selection
The type of beading material plays a significant role in determining its durability, aesthetics, and compatibility with your kitchen cabinets. Common options include:
- Wood: Provides a classic and natural look, but requires regular maintenance.
- Polyurethane: Durable and moisture-resistant, available in various shapes and sizes.
- PVC: Lightweight and inexpensive, but less durable than other materials.
Measurement
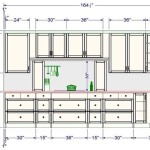
Accurate measurements are essential to ensure a precise fit and avoid gaps or overlaps. Measure the length of the cabinet doors and drawer fronts where the beading will be installed. Add an extra inch to account for miter cuts or end caps.
Attachment Methods
There are several methods to attach beading to cabinets, each with its advantages and requirements:
- Nails: Cost-effective and easy to use, but can leave visible nail holes.
- Glue: Provides a strong hold and eliminates nail holes, but requires a precise application.
- Clips: Designed specifically for beading installation, providing a concealed and durable attachment.
Other Essential Considerations
In addition to these primary aspects, consider these additional factors for a successful beading project:
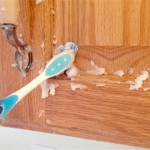
- Prepare the cabinet surface by cleaning and sanding it for better adhesion.
- Cut the beading at 45-degree angles for a professional-looking mitered corner.
- Use a brad nailer or finish nails to secure the beading without splitting the wood.
Conclusion
By understanding these essential aspects of adding beading to kitchen cabinets, homeowners and DIY enthusiasts can enhance the beauty and functionality of their kitchen spaces. With careful material selection, precise measurement, and appropriate attachment methods, adding beading to kitchen cabinets is a rewarding project that can elevate the overall design and improve the durability of your kitchen.

How To Add Trim And Paint Your Laminate Cabinets

From Drab To Fab Adding Trim Cabinets

From Drab To Fab Adding Trim Cabinets

Add Moulding To Flat Cabinet Doors Home Kitchens Cabinets Diy Kitchen

Adding Molding To Old Cabinets Diy Tutorial Cabinet Doors Kitchen

Adding Moldings To Your Kitchen Cabinets Remodelando La Casa

How To Add Trim And Paint Your Laminate Cabinets

From Drab To Fab Adding Trim Cabinets

Easy And Inexpensive Cabinet Updates Adding Trim To Cabinets Drawers The Rozy Home Bathroom Diy Doors Kitchen Upgrade

How To Add Trim And Paint Your Laminate Cabinets
Related Posts