Adding Trim to Existing Kitchen Cabinets: A Comprehensive Guide
Kitchen cabinets are integral components of any kitchen's design and functionality. Over time, however, the initial appeal of cabinets may diminish, or a homeowner might desire a more customized and sophisticated look. While a complete cabinet replacement can be costly and disruptive, adding trim to existing cabinets offers a cost-effective and less invasive method to enhance their aesthetic value and complement the overall kitchen design.
This article provides a comprehensive guide to adding trim to existing kitchen cabinets, covering various trim styles, materials, tools, and step-by-step instructions. Homeowners and DIY enthusiasts can use this information to transform their kitchen cabinets and achieve a personalized and refined look without the expense and hassle of a full-scale renovation.
Choosing the Right Trim Style
Selecting the appropriate trim style is crucial for achieving the desired aesthetic. The trim should complement the existing cabinet design, the overall kitchen style, and the homeowner's personal preferences. Several trim styles are commonly used to enhance kitchen cabinets, each offering a distinct visual appeal:
1. Shaker Trim: Characterized by its clean lines and minimalist design, shaker trim is a versatile option that suits various kitchen styles, particularly those with a modern or transitional aesthetic. It typically consists of a simple, rectangular profile that is applied to the cabinet doors and drawer fronts, creating a recessed panel effect. The shaker trim's simplicity allows it to blend seamlessly with existing cabinet styles while adding a subtle layer of visual interest.
2. Beadboard Trim: Beadboard trim features vertical grooves separated by rounded beads, creating a textured and visually appealing surface. This trim style is often associated with traditional and cottage-style kitchens, adding a touch of rustic charm and warmth. Beadboard can be applied to the cabinet doors, drawer fronts, or even the sides of the cabinets, creating a cohesive and textured design element.
3. Crown Molding: Crown molding is a decorative trim that is installed at the top of the cabinets, where they meet the ceiling. It adds a sense of elegance and sophistication to the kitchen, creating a more finished and polished look. Crown molding comes in various styles and profiles, ranging from simple and understated to ornate and elaborate. The choice of crown molding should complement the overall kitchen style and the existing cabinet design.
4. Dentil Molding: Dentil molding features small, rectangular blocks evenly spaced along the trim, resembling a row of teeth. This trim style is often associated with classical and formal kitchen designs, adding a touch of architectural detail and visual interest. Dentil molding can be used in conjunction with crown molding or as a standalone trim element, depending on the desired aesthetic.
5. Edge Banding: Edge banding is a thin strip of material that is applied to the exposed edges of cabinet doors, drawer fronts, and cabinet sides. It provides a clean and finished look, concealing the raw edges of the underlying material. Edge banding is available in various materials, including wood veneer, PVC, and melamine, and can be matched to the cabinet's finish or used to create a contrasting accent.
Before making a final decision, it is recommended to gather samples of different trim styles and compare them to the existing cabinets. Consider the overall kitchen design and the desired aesthetic to ensure that the chosen trim style complements the existing elements and achieves the desired look.
Selecting the Right Materials and Tools
The choice of materials and tools is crucial for a successful trim installation. The materials should be durable, compatible with the existing cabinets, and capable of achieving the desired finish. Similarly, the tools should be appropriate for the task and ensure accurate and professional results.
1. Trim Material: Wood is the most common material for trim, offering a natural look and feel and the ability to be stained or painted to match the existing cabinets. Popular wood species for trim include pine, poplar, and oak. MDF (Medium Density Fiberboard) is another option, offering a smooth surface for painting and being less prone to warping or cracking than solid wood. PVC trim is a durable and moisture-resistant option, ideal for kitchens with high humidity levels. The choice of material should consider the budget, the desired finish, and the kitchen's environment.
2. Adhesive: Construction adhesive is essential for attaching the trim to the cabinets. Choose a high-quality adhesive that is compatible with the chosen trim material and the cabinet surface. Ensure the adhesive provides a strong and permanent bond, preventing the trim from detaching over time.
3. Fasteners: In addition to adhesive, small finishing nails or brad nails can be used to secure the trim in place while the adhesive cures. Choose nails that are appropriate for the trim material and the cabinet surface. Ensure the nails are long enough to penetrate both the trim and the cabinet but not so long that they protrude through the back of the cabinet.
4. Measuring Tools: Accurate measurements are crucial for a professional-looking trim installation. A measuring tape, a combination square, and a level are essential tools for ensuring precise cuts and alignments. A miter saw is recommended for cutting trim at precise angles, particularly for corner installations. A jigsaw can be used for cutting curves or intricate shapes.
5. Cutting Tools: A miter saw is ideal for making accurate angled cuts for corners. A hand saw or jigsaw can be used for making straight cuts or more complex shapes. Ensure the cutting tools are sharp and appropriate for the chosen trim material.
6. Sanding Tools: Sandpaper or a sanding block is used to smooth the edges of the trim and prepare the surface for painting or staining. Use a fine-grit sandpaper to avoid scratching the trim. A sanding sponge is useful for sanding contoured surfaces. For larger projects, an orbital sander can expedite the sanding process.
7. Finishing Tools: If painting or staining the trim, gather the necessary finishing tools, including primer, paint or stain, brushes, rollers, and a paint tray. Choose high-quality paints or stains that are durable and compatible with the trim material. Consider using a sealant to protect the finish from moisture and wear.
8. Safety Equipment: Safety glasses, gloves, and a dust mask are essential for protecting yourself during the trim installation process. Wear safety glasses to protect your eyes from debris, gloves to protect your hands from adhesive and sharp edges, and a dust mask to protect your lungs from dust particles.
Careful planning and preparation are essential for a successful trim installation. Gather all the necessary materials and tools before starting the project, and ensure they are in good working order. This will help to streamline the process and minimize delays.
Step-by-Step Installation Guide
The following step-by-step guide provides a detailed procedure for adding trim to existing kitchen cabinets. It is important to follow these instructions carefully to ensure a professional and durable installation.
1. Preparation: Begin by thoroughly cleaning the cabinet surfaces where the trim will be applied. Remove any dirt, grease, or old finish. Lightly sand the surface to create a better bond for the adhesive. Wipe away any sanding dust with a tack cloth. If painting or staining the cabinets, apply a primer coat and allow it to dry completely. Consider lightly sanding the primer coat for an even smoother finish.
2. Measuring and Cutting: Accurately measure the areas where the trim will be applied. Use a measuring tape and a combination square to ensure precise measurements. Transfer the measurements to the trim material, marking the cutting lines clearly. Use a miter saw to cut the trim at the appropriate angles for corners. For straight cuts, use a hand saw or jigsaw. For curved cuts, use a jigsaw with a fine-tooth blade.
3. Dry Fitting: Before applying adhesive, dry-fit the trim pieces to ensure they fit properly. Check for any gaps or misalignments. Make any necessary adjustments to the cuts. The dry-fit process is crucial for identifying and correcting any errors before the adhesive is applied.
4. Applying Adhesive: Apply a bead of construction adhesive to the back of the trim pieces. Be generous with the adhesive, but avoid applying too much, which could squeeze out from the edges when the trim is pressed into place. Use a caulking gun for a controlled and even application of the adhesive. Ensure the adhesive is applied to the entire surface of the trim that will be in contact with the cabinet.
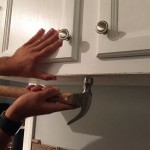
5. Attaching the Trim: Carefully position the trim pieces onto the cabinet surfaces, aligning them with the marked guidelines. Press the trim firmly against the cabinet, holding it in place for a few seconds while the adhesive begins to set. Use small finishing nails or brad nails to secure the trim in place while the adhesive cures. Space the nails evenly along the trim to provide consistent pressure. Wipe away any excess adhesive that squeezes out from the edges with a damp cloth.
6. Clamping (If Necessary): For larger trim pieces or areas with complex shapes, use clamps to hold the trim in place while the adhesive cures. Choose clamps that are appropriate for the size and shape of the trim. Protect the cabinet surfaces from the clamps by placing a soft cloth or padding between the clamps and the cabinets. Allow the adhesive to cure completely according to the manufacturer's instructions. This may take several hours or even overnight.
7. Filling Nail Holes: Once the adhesive has cured and the nails have secured the trim, fill any nail holes with wood filler. Choose a wood filler that matches the trim material. Apply the wood filler with a putty knife, pressing it firmly into the nail holes. Allow the wood filler to dry completely. Sand the wood filler smooth with fine-grit sandpaper. Wipe away any sanding dust with a tack cloth.
8. Finishing: If the trim is unfinished, paint or stain it to match the existing cabinets. Apply a primer coat and allow it to dry completely. Lightly sand the primer coat for an even smoother finish. Apply two or three coats of paint or stain, allowing each coat to dry completely before applying the next. Use a high-quality brush or roller for a smooth and even finish. Consider applying a sealant to protect the finish from moisture and wear.
9. Final Inspection: After the finish has dried completely, inspect the trim installation for any imperfections. Touch up any areas that need attention. Clean the cabinets and the surrounding area. Enjoy the newly enhanced look of your kitchen cabinets.
By following these steps carefully, homeowners can successfully add trim to their existing kitchen cabinets, achieving a customized and refined look without the expense and hassle of a full-scale renovation.

From Drab To Fab Adding Trim Cabinets

From Drab To Fab Adding Trim Cabinets

How To Add Trim And Paint Your Laminate Cabinets

Adding Molding To Old Cabinets Diy Tutorial Kitchen Cabinet Doors

How To Add Trim And Paint Your Laminate Cabinets

Adding Moldings To Your Kitchen Cabinets Remodelando La Casa

How To Add Trim And Paint Your Laminate Cabinets

Kitchen Diy Shaker Style Cabinets Cherished Bliss

Diy Kitchen Cabinet Upgrade With Paint And Crown Molding

How To Add Molding Cabinets For A Gorgeous Finish Inspiration Moms
Related Posts