Adding Trim to Flat Kitchen Cabinets: A Guide to Transforming Your Space
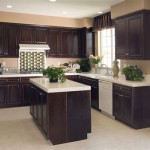
Flat-front kitchen cabinets offer a clean, modern aesthetic, but they can sometimes appear stark or lack visual interest. Adding trim to these cabinets is a simple and cost-effective way to elevate their appearance, adding dimension, detail, and a touch of elegance to your kitchen. This transformation can enhance the overall style of the space, whether you prefer a traditional, contemporary, or farmhouse look. With a little planning and the right tools, you can create a personalized and sophisticated kitchen design that reflects your unique taste.
1. Choosing the Right Trim
The first step is selecting the appropriate trim for your cabinets. The type of trim will significantly impact the final look, so consider the following factors:
-
Cabinet Style:
The trim should complement the overall style of your cabinets. For modern kitchens, consider clean lines and minimalist trims like flat molding or simple crown molding. Traditional kitchens may benefit from more ornate trims like dentil molding or raised paneling. -
Cabinet Material:
The material of your cabinets will influence the trim selection. If your cabinets are made of wood, you can choose from a wide range of wood trim options. For painted cabinets, painted MDF or primed wood trim will provide a seamless finish. -
Desired Look:
Consider the effect you want to achieve. Do you want to create a more formal, traditional feel? Or a more contemporary, minimalist look? The trim type will play a significant role in achieving the desired aesthetic.
Popular trim options include:
-
Crown Molding:
Adds elegance and a finished look to the top of cabinets. -
Casing:
Enhances the visual appeal of cabinet doors and drawers. -
Base Molding:
Adds a finishing touch to cabinet bases. -
Chair Rail:
Adds a decorative element to the wall above the lower cabinets. -
Applied Molding:
Can be used to create raised panels or decorative accents on cabinet doors.
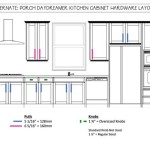
2. Measuring and Cutting
Once you've selected the trim, you'll need to measure your cabinets accurately and cut the trim pieces to size. This step demands precision to ensure a neat and professional finish.
The following tools are essential for accurate measurements and cuts:
-
Tape Measure:
For measuring the length and width of the trim pieces. -
Level:
To ensure the trim is installed straight and even. -
Miter Saw:
A miter saw is ideal for making precise miter cuts, creating clean corners for the trim. -
Pencil:
To mark the cut lines on the trim.
Always double-check your measurements before cutting the trim. It's better to cut a piece slightly longer than needed and trim it to fit later than to cut it too short and have to start over. Remember to factor in the thickness of the trim when measuring and cutting for mitered corners.
3. Installing the Trim
The final step is installing the trim onto the cabinets. This process usually involves using adhesive, nails, or a combination of both.
Here are some tips for installing trim effectively:
-
Clean Surfaces:
Ensure the cabinet surfaces are clean and free of dust or debris before applying adhesive or nailing the trim. -
Adhesive:
Use a strong adhesive specifically designed for attaching trim to cabinets. Follow the adhesive manufacturer's instructions for application and drying time. -
Nailing:
When using nails, use a finish nailer or brad nailer to minimize damage to the trim and cabinets. Drive the nails at an angle to prevent them from popping out. -
Caulking:
Once the trim is installed, use caulk to fill any gaps or spaces between the trim and the cabinets for a seamless look. -
Painting:
After the caulk has dried, you can paint or stain the trim to match your cabinet finishes or create a contrasting accent.
By following these steps and taking your time, you can successfully transform your flat-front kitchen cabinets with trim. The result will be a more visually appealing and customized kitchen that reflects your personal style.

From Drab To Fab Adding Trim Cabinets

Adding Shaker Trim To Flat Panel Cabinets Hometalk

From Drab To Fab Adding Trim Cabinets

How To Add Trim And Paint Your Laminate Cabinets

Adding Trim To Cabinets For Shaker Style Look Crazy Life With Littles

Adding Shaker Trim To Flat Panel Cabinets Hometalk

How To Add Trim And Paint Your Laminate Cabinets

Easy And Inexpensive Cabinet Updates Adding Trim To Cabinets Drawers The Rozy Home

How To Add Trim And Paint Your Laminate Cabinets

From Drab To Fab Adding Trim Cabinets
Related Posts