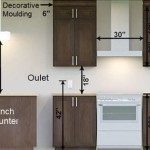
Adding Trim to Kitchen Cabinet Doors
Adding trim to kitchen cabinet doors is a relatively easy and inexpensive way to update the look of your kitchen. It can also help to protect the doors from damage and wear. There are many different types of trim available, so you can find a style that fits your kitchen's decor. Here are some of the essential aspects of adding trim to kitchen cabinet doors:
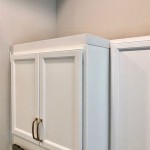
1. Choose the Right Trim
The first step is to choose the right trim for your kitchen cabinet doors. There are many different types of trim available, so you can find a style that fits your kitchen's decor. Some of the most popular types of trim include:
- Flat trim: Flat trim is a simple, clean-lined trim that is perfect for modern kitchens.
- Raised trim: Raised trim has a raised edge that gives it a more traditional look.
- Beaded trim: Beaded trim has a small bead along the edge that adds a touch of detail to your kitchen cabinets.
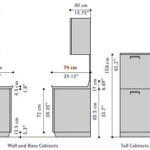
2. Measure and Cut the Trim
Once you have chosen the trim, you need to measure and cut it to fit the cabinet doors. To do this, you will need a measuring tape, a miter saw, and a nail gun. First, measure the height and width of the cabinet door. Then, cut the trim to the desired length using a miter saw. You will need to cut the trim at a 45-degree angle so that the pieces will fit together properly.
3. Attach the Trim
Once the trim is cut, you can attach it to the cabinet doors using a nail gun. Start by nailing the trim to the top of the door. Then, nail the trim to the sides and bottom of the door. Be sure to use a brad nailer or a finish nailer to avoid splitting the trim.
4. Fill the Nail Holes
Once the trim is attached, you need to fill the nail holes. You can do this using a wood filler or a caulk. If you are using a wood filler, apply it to the nail holes using a putty knife. Then, wipe away the excess wood filler with a damp cloth. If you are using caulk, apply it to the nail holes using a caulk gun. Then, smooth out the caulk with your finger.
5. Paint or Stain the Trim
If you want to change the color of the trim, you can paint or stain it. To paint the trim, use a latex paint that is designed for wood. To stain the trim, use a wood stain that is the desired color. Be sure to apply the paint or stain evenly to avoid streaks or blotches.
Conclusion
Adding trim to kitchen cabinet doors is a relatively easy and inexpensive way to update the look of your kitchen. It can also help to protect the doors from damage and wear. By following these essential steps, you can add trim to your kitchen cabinet doors like a pro.

From Drab To Fab Adding Trim Cabinets

From Drab To Fab Adding Trim Cabinets

Adding Shaker Trim To Flat Panel Cabinets Hometalk

Adding Molding To Old Cabinets Diy Tutorial Cabinet Doors Kitchen

From Drab To Fab Adding Trim Cabinets

Easy And Inexpensive Cabinet Updates Adding Trim To Cabinets Drawers The Rozy Home

Adding Moldings To Your Kitchen Cabinets Remodelando La Casa

Easy And Inexpensive Cabinet Updates Adding Trim To Cabinets Drawers The Rozy Home

Add Moulding To Flat Cabinet Doors Home Kitchens Cabinets Diy Kitchen

Adding Trim To Cabinets For Shaker Style Look Crazy Life With Littles
Related Posts