Essential Aspects of Baxton Studio Kitchen Cabinet Assembly Instructions
Undertaking a kitchen cabinet assembly project requires careful planning and adherence to the manufacturer's instructions. Baxton Studio provides detailed instructions to ensure a successful assembly process. This article highlights the essential aspects of Baxton Studio kitchen cabinet assembly instructions, empowering you to achieve a professional-looking end result.
1. Gather Necessary Materials and Tools
Before embarking on the assembly process, ensure you have all the necessary materials and tools. Carefully review the instruction manual to identify the components and hardware required. Common materials include cabinet panels, doors, shelves, and drawer boxes. Essential tools include a power drill, screwdriver, measuring tape, and level.
2. Prepare the Assembly Area
Choose a spacious and well-lit assembly area with ample space to maneuver. Protect your work surface by spreading out a drop cloth or cardboard. Organize the cabinet components and hardware to ensure easy access during assembly.
3. Review the Assembly Instructions Carefully
Thoroughly read the Baxton Studio assembly instructions before starting the assembly process. Pay attention to each step and study the diagrams provided. Familiarize yourself with the order of assembly and the specific parts and hardware required for each stage.
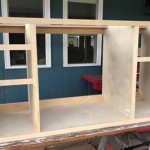
4. Assemble the Cabinet Frame
The first step involves assembling the cabinet frame. Lay out the side panels, top, and bottom, and align them using the pre-drilled holes. Secure the components using the provided screws or nails. Ensure the frame is square and level using a measuring tape and level.
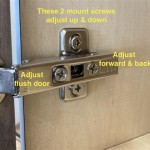
5. Install the Cabinet Doors
Attach the cabinet doors to the frame using the hinges provided. Adjust the hinges to ensure the doors open and close smoothly and align properly. Secure the doors firmly with screws or nails.
6. Install the Shelves and Drawers
Insert the shelves into the cabinet frame, aligning them with the shelf supports. Secure the shelves using screws or pegs. Install the drawer boxes by sliding them into the cabinet frame on the drawer glides.
7. Mount the Cabinet
Once the cabinet is assembled, it's time to mount it in the desired location. Use a level to ensure the cabinet is installed straight and securely. Use the provided mounting hardware and follow the installation instructions carefully.
8. Final Adjustments and Finishing Touches
After mounting the cabinet, make any necessary final adjustments. Ensure all screws are tightened securely, and the doors and drawers operate smoothly. Add decorative handles or knobs to enhance the aesthetic appeal.
Tips for Success
* Take your time and follow the instructions meticulously. * Use the correct tools and hardware for each step. * Check for squareness and levelness throughout the assembly process. * If you encounter any difficulties, refer to the instruction manual or consult with a professional. * Be patient and don't hesitate to ask for assistance if needed. By adhering to these essential aspects of Baxton Studio kitchen cabinet assembly instructions, you can achieve a well-assembled and visually appealing kitchen. Remember, a well-crafted kitchen can enhance the functionality and beauty of your home..JPG?strip=all "Assembly Instructions")
Assembly Instructions
.JPG?strip=all "Assembly Instructions")
Assembly Instructions
.JPG?strip=all "Assembly Instructions")
Assembly Instructions

Tannis Finished Kitchen Cabinet Brown Baxton Studio Target

Assembly Instructions

Baxton Studio Laurana White And Cherry Brown Kitchen Cabinet With Hutch 147 8317 Hd The Home Depot

Baxton Studio Laurana Modern And Contemporary Oak Brown Finished Wood Kitchen Cabinet Hutch Com

Baxton Studio Charmain White And Oak Brown Kitchen Cart 146 8272 Hd The Home Depot

Laurana Walnut Finished Kitchen Cabinet And Hutch Brown Baxton Studio Target

Baxton Studio Fabian Dark Gray And Oak Brown Kitchen Cabinet 147 8667 Hd The Home Depot
Related Posts