Transforming Your Kitchen: A Before and After Look at Cabinet Painting
Kitchen cabinets often serve as the visual anchor of the entire kitchen space. Worn, outdated, or simply undesirable cabinet colors can significantly detract from the overall aesthetic and perceived value of a home. Rather than investing in completely new cabinets, which can be a costly and disruptive undertaking, painting offers a viable and transformative solution. This article will explore the dramatic impact achievable through cabinet painting, demonstrating the potential to revitalize a kitchen through careful preparation, execution, and color selection. The scope will encompass the necessary steps, considerations, and benefits associated with this cost-effective renovation strategy.
The visual difference between a kitchen before and after cabinet painting can be astounding. Cabinets suffering from years of grease, grime, and faded finishes can be restored to a vibrant and contemporary appearance. The process not only improves the look of the cabinets but can also increase their lifespan by providing a protective layer against moisture and wear. Furthermore, cabinet painting allows homeowners to personalize their kitchen to reflect their individual style and preferences without the significant expense of replacement.
Key Point 1: Preparation is Paramount for a Lasting Finish
The success of any cabinet painting project hinges on the thoroughness of the preparation phase. Neglecting this crucial step can lead to a substandard finish, characterized by peeling, chipping, and uneven paint adhesion. Proper preparation involves several key sub-steps, each contributing to the overall durability and aesthetic appeal of the finished product.
First, meticulous cleaning is essential. Cabinets accumulate grease, cooking splatters, and dust over time, all of which can impede paint adhesion. Using a degreasing cleaner specifically designed for kitchen surfaces is crucial. This cleaner should be applied liberally, allowed to dwell for the recommended time, and then thoroughly rinsed with clean water. For stubborn grease, a second application may be necessary. The goal is to remove all traces of contaminants, leaving a clean and receptive surface for priming and painting.
Following cleaning, the next step is sanding. Sanding serves two primary purposes: it creates a slightly roughened surface that promotes paint adhesion, and it smooths out any existing imperfections, such as scratches or dents. The appropriate grit of sandpaper will depend on the condition of the cabinets. For cabinets in good condition, a fine-grit sandpaper (around 220-grit) is typically sufficient. For cabinets with more significant imperfections, a medium-grit sandpaper (around 120-grit) may be needed initially, followed by a finer grit for smoothing. Dust created by sanding should be thoroughly removed with a tack cloth or vacuum cleaner.
Priming is the final preparatory step before painting. A high-quality primer provides a uniform base for the paint, ensuring even color coverage and enhanced adhesion. Primer also helps to seal any remaining imperfections and prevent tannins from bleeding through the paint, particularly in cabinets made of wood such as oak or cherry. An oil-based primer is often recommended for its superior sealing properties, but latex primers are also suitable for many applications. The primer should be applied in thin, even coats, following the manufacturer's instructions. Complete drying time, as specified by the manufacturer, should be allowed before proceeding to painting.
Removal of hardware (knobs, pulls, hinges) is also a critical element of preparation. This step prevents paint from getting on the hardware and ensures a clean, professional finish. If hinges are to be painted, they should be carefully masked off or removed entirely. Labeling the hardware and its corresponding cabinet location is highly recommended to facilitate reassembly.
Key Point 2: Paint Selection Impacts Durability and Aesthetics
Choosing the right paint is just as vital as proper preparation. The type of paint, its sheen, and its color all contribute to the final look and longevity of the painted cabinets. Selecting a paint specifically formulated for cabinets and trim is crucial for achieving a durable and attractive finish.
Acrylic latex paint is a popular choice for kitchen cabinets due to its durability, ease of application, and availability in a wide range of colors. Acrylic latex paint is also low in volatile organic compounds (VOCs), making it a more environmentally friendly option. However, some professional painters prefer oil-based paints for their superior hardness and resistance to chipping and scratching. Oil-based paints typically require more skill to apply and require mineral spirits for cleanup, but they can provide a longer-lasting finish in high-use areas.
The sheen of the paint also plays a significant role in both aesthetics and functionality. Higher-sheen paints (such as semi-gloss or gloss) are more durable and easier to clean, making them ideal for kitchen cabinets that are subjected to frequent use and potential spills. However, high-sheen paints also tend to highlight imperfections, so proper surface preparation is even more critical. Lower-sheen paints (such as eggshell or satin) provide a softer, more subtle look and are more forgiving of imperfections, but they may not be as durable or easy to clean. A satin or semi-gloss finish is generally recommended for kitchen cabinets, striking a balance between durability and aesthetics.
Color selection is a matter of personal preference, but it should also be considered in the context of the overall kitchen design. Light colors can brighten a small or dark kitchen, making it feel more spacious and airy. Dark colors can add drama and sophistication, but they may also make a kitchen feel smaller. Neutral colors, such as white, gray, or beige, are versatile and can complement a wide range of styles. Consider the existing countertops, backsplash, and flooring when selecting a cabinet color to ensure a cohesive and harmonious look.
The application method also influences the final appearance. While paint can be applied with a brush and roller, using a paint sprayer offers a smoother, more professional finish, especially on detailed cabinet doors. A sprayer allows for even distribution of paint and minimizes brushstrokes or roller marks. However, spray painting requires careful masking of surrounding areas to protect them from overspray. Whether brushing, rolling, or spraying, multiple thin coats are always preferable to a single thick coat, which can lead to drips, runs, and uneven drying.
Key Point 3: The Transformative Impact on Kitchen Aesthetics
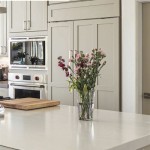
The "before and after" visual transformation achieved through cabinet painting can dramatically alter the entire kitchen environment. Old, tired cabinets can be brought back to life with a fresh coat of paint, instantly updating the space and creating a more inviting atmosphere. The change can be as subtle as refreshing a dated color palette or as dramatic as completely changing the style of the kitchen.
Consider a kitchen with dark, stained oak cabinets that feel heavy and outdated. Painting these cabinets a light, neutral color, such as white or gray, can instantly brighten the space and create a more modern and airy feel. The lighter color reflects more light, making the kitchen feel larger and more open. Replacing the old hardware with sleek, modern pulls can further enhance the transformation.
Alternatively, a kitchen with plain, builder-grade cabinets can be transformed with a bold color choice. Painting the cabinets a vibrant color, such as navy blue or emerald green, can add personality and character to the space. This approach is particularly effective in kitchens with neutral countertops and backsplashes, allowing the cabinets to become the focal point of the room.
Cabinet painting can also be used to create a two-toned kitchen, where the upper and lower cabinets are painted in different colors. This technique adds visual interest and depth to the kitchen. For example, painting the upper cabinets a light color and the lower cabinets a darker color can ground the space and prevent it from feeling too top-heavy. Incorporating open shelving painted in a complementary color can further enhance the design.
Beyond aesthetics, cabinet painting can also improve the functionality of the kitchen. A fresh coat of paint can protect the cabinets from moisture and wear, extending their lifespan. Properly painted cabinets are also easier to clean and maintain, making them more resistant to stains and spills.
The cost-effectiveness of cabinet painting compared to cabinet replacement is a significant advantage. Replacing cabinets can be a major expense, involving demolition, installation, and potentially plumbing and electrical work. Cabinet painting, on the other hand, is a relatively inexpensive and less disruptive project that can achieve similar results. The cost of cabinet painting will vary depending on the size of the kitchen, the condition of the cabinets, and the type of paint used, but it is typically a fraction of the cost of replacement.

15 Diy Kitchen Cabinet Makeovers Before After Photos Of Cabinets

Diy Painting Your Kitchen Cabinets The Right Way

9 Inspiring Kitchen Cabinet Makeovers Before And After Remodel Small Builder Grade Renovation

Update On Our Diy White Painted Kitchen Cabinets 2 Years Later

Kitchen Cabinet Colors Before After The Inspired Room

Painted Kitchen Cabinet Ideas And Makeover Reveal The Polka Dot Chair

Painted Cabinets Nashville Tn Before And After Photos

How To Paint Laminate Kitchen Cabinets Perfect Finish Tips

Pa Wedding Photographer Diy Painted Kitchen Cabinets Before After

How To Paint Kitchen Cabinets A Step By Guide Confessions Of Serial Do It Yourselfer
Related Posts