Using transition words is necessary to make the article flow naturally. ## Before and After: The Transformative Power of Painted Kitchen Cabinets
Kitchen cabinets often serve as the focal point of the room, significantly impacting the overall aesthetic and perceived value of a home. Over time, cabinets can become outdated, worn, or simply no longer align with evolving design preferences. Rather than undertaking a full kitchen remodel, painting existing cabinets offers a cost-effective and impactful solution to revitalize the space. A fresh coat of paint can dramatically alter the look and feel of a kitchen, making it appear brighter, more modern, and more inviting. The "before and after" transformation achieved through painting can be truly remarkable, offering a significant return on investment, both financially and aesthetically.
This article will delve into the process of painting kitchen cabinets, exploring the key steps involved, the importance of proper preparation, the selection of appropriate materials, and the techniques required for achieving a professional-looking finish. Furthermore, it will highlight the various design options available and showcase examples of successful "before and after" kitchen cabinet transformations.
Key Point 1: The Importance of Preparation for a Flawless Finish
Achieving a professional-looking finish on painted kitchen cabinets hinges heavily on the initial preparation stages. Rushing or skipping steps can lead to subpar results, including peeling paint, uneven coverage, and visible imperfections. Therefore, meticulous preparation is not just recommended; it is essential.
The first step involves removing all cabinet doors and drawers. Thoroughly label each component to ensure proper reinstallation later. Remove all hardware, such as knobs, pulls, and hinges. It is highly recommended to store these components in clearly labeled bags to prevent loss or confusion. Inspect the hardware; consider replacing it with new hardware for a more modern look or clean and polish the existing hardware.
Next, clean the cabinet doors, drawer fronts, and cabinet frames. Use a degreaser specifically designed for kitchen surfaces to remove grease, grime, and food residue. This is a crucial step, as paint will not adhere properly to a dirty or greasy surface. Rinse the surfaces thoroughly with clean water and allow them to dry completely.
Once the cabinets are clean and dry, inspect them for any damage, such as chips, dents, or scratches. Fill these imperfections with wood filler and allow it to dry completely according to the manufacturer's instructions. Sand the wood filler smooth, ensuring it is flush with the surrounding surface.
Sanding is perhaps the most critical step in the preparation process. Sanding creates a slightly roughened surface, providing the paint with something to grip onto. Use a medium-grit sandpaper (around 120-150 grit) to sand the entire surface of the cabinets. Pay particular attention to areas with existing finishes or glossy surfaces. After sanding, use a fine-grit sandpaper (around 220 grit) to smooth out any remaining imperfections and create a uniform surface. Vacuum up all sanding dust and wipe down the surfaces with a tack cloth to remove any remaining particles. This step is crucial for an even paint application.
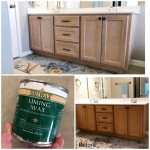
Priming is the final step in the preparation process. Apply a coat of high-quality primer specifically designed for cabinets. Primer seals the surface, prevents the paint from soaking into the wood, and provides a uniform base for the paint to adhere to. Use a brush or roller to apply the primer evenly, ensuring complete coverage. Allow the primer to dry completely according to the manufacturer's instructions. Lightly sand the primed surface with fine-grit sandpaper to remove any imperfections and create a smooth surface for painting.
By dedicating sufficient time and effort to preparation, individuals can significantly improve the outcome of their cabinet painting project, resulting in a professional-looking and long-lasting finish. A properly prepared surface is the foundation for a successful paint job, minimizing the risk of issues such as peeling, chipping, and uneven coverage.
Key Point 2: Selecting the Right Paint and Supplies for Durability and Aesthetics
Choosing the right paint and supplies is paramount to achieving a durable and aesthetically pleasing finish on kitchen cabinets. The type of paint, the application tools, and the overall color scheme all contribute to the final result. Selecting high-quality materials, while potentially more expensive upfront, will ultimately lead to a longer-lasting and more visually appealing outcome.
For kitchen cabinets, durable paints specifically formulated for high-traffic areas are recommended. Oil-based paints were traditionally favored for their durability and smooth finish. However, they contain high levels of volatile organic compounds (VOCs) and require mineral spirits for cleanup. Furthermore, oil-based paints tend to yellow over time. Modern water-based acrylic paints offer comparable durability, lower VOCs, and easier cleanup with soap and water. Acrylic paints also resist yellowing, making them a popular choice for kitchen cabinets.
Within the acrylic paint category, consider paints labeled as "cabinet and trim enamel" or "furniture paint." These paints are formulated to withstand the rigors of daily use and provide a hard, durable finish that resists chipping and scratching. Selecting a paint with a satin or semi-gloss sheen is generally recommended for kitchen cabinets. These sheens are durable, easy to clean, and reflect light, making the kitchen appear brighter. Avoid using flat paints, as they are more difficult to clean and tend to show smudges and fingerprints.
In addition to selecting the right type of paint, choosing the appropriate application tools is also crucial. High-quality brushes and rollers will ensure a smooth and even finish. Use a brush with synthetic bristles for water-based paints, as natural bristles tend to absorb water and become limp. A small, angled brush is ideal for painting corners and edges. Use a foam roller or a short-nap roller for painting larger surfaces, such as cabinet doors. Avoid using cheap brushes or rollers, as they can leave brush marks or roller stipple on the surface.
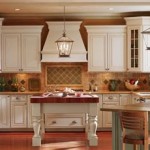
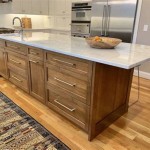
Furthermore, the color selection of the paint will greatly impact the overall aesthetic of the kitchen. Consider the existing color scheme of the kitchen, including the countertops, backsplash, and flooring. Neutral colors, such as white, gray, and beige, are popular choices for kitchen cabinets, as they are versatile and complement a wide range of design styles. However, bolder colors, such as navy blue, green, or black, can also be used to create a more dramatic look. Sample paints should be tested in the kitchen to ensure the color works well with the existing lighting and décor.
Beyond paint and brushes, other essential supplies include painter's tape, drop cloths, sandpaper, wood filler, primer, a tack cloth, and cleaning supplies. Investing in high-quality supplies will not only make the painting process easier but will also contribute to a more professional-looking and long-lasting finish.
Key Point 3: Techniques for Achieving a Professional-Looking Painted Cabinet Finish
Proper painting techniques are crucial to achieving a professional-looking finish on kitchen cabinets. Mastering these techniques, along with careful preparation and the selection of quality materials, is essential for a successful cabinet painting project. Applying multiple thin coats of paint, sanding between coats, and paying attention to detail are key elements of a professional-quality finish.
Before beginning to paint, protect the surrounding areas with drop cloths and painter's tape. Tape off any areas that should not be painted, such as walls, countertops, and appliances. Use a high-quality painter's tape that will not leave residue or damage the surface underneath. Ensure the tape is applied securely to prevent paint from bleeding underneath.
Begin by painting the cabinet doors and drawer fronts. Apply the paint in thin, even coats, using a brush or roller. Avoid applying too much paint at once, as this can lead to drips and runs. Work in the direction of the wood grain to create a smooth and uniform finish. Use a brush to paint corners and edges, and then use a roller to smooth out the paint on the larger surfaces. Allow the first coat of paint to dry completely according to the manufacturer's instructions.
Once the first coat of paint is dry, lightly sand the surface with fine-grit sandpaper (around 320 grit). This will remove any imperfections and create a smooth surface for the second coat of paint. Vacuum up all sanding dust and wipe down the surfaces with a tack cloth to remove any remaining particles. This step is crucial for a smooth and even finish.
Apply a second coat of paint, using the same techniques as the first coat. Again, apply the paint in thin, even coats, working in the direction of the wood grain. Allow the second coat of paint to dry completely according to the manufacturer's instructions. For a more durable finish, consider applying a third coat of paint.
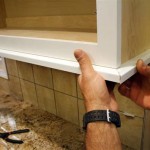
After the final coat of paint has dried, carefully remove the painter's tape. Use a utility knife to score along the edge of the tape before removing it, to prevent the paint from peeling off. Reinstall the hardware, such as knobs, pulls, and hinges. Ensure the hardware is securely attached to the cabinets. Reinstall the cabinet doors and drawers, ensuring they are properly aligned and functioning smoothly.
For a truly professional-looking finish, consider using a paint sprayer. Paint sprayers provide a smooth and even finish, with minimal brush marks or roller stipple. However, paint sprayers require some practice to use effectively. It is important to read and follow the manufacturer's instructions carefully. When using a paint sprayer, thin the paint according to the manufacturer's instructions. Apply the paint in thin, even coats, overlapping each pass slightly. Wear a respirator to protect yourself from inhaling paint fumes.
By following these techniques, individuals can achieve a professional-looking finish on their painted kitchen cabinets. Patience, attention to detail, and the use of quality materials are key to success. The "before and after" transformation achieved through painting can be truly remarkable, adding value and beauty to the kitchen.

9 Inspiring Kitchen Cabinet Makeovers Before And After Remodel Small Builder Grade Renovation

Our Painted Cabinets Five Years Later Nina Hendrick Home

Update On Our Diy White Painted Kitchen Cabinets 2 Years Later

Kitchen Painting Projects Before And After Paper Moon

Diy Painting Your Kitchen Cabinets The Right Way

15 Diy Kitchen Cabinet Makeovers Before After Photos Of Cabinets

Should I Paint My Kitchen Cabinets

Painted Cabinets Nashville Tn Before And After Photos

Kitchen Cabinet Colors Before After The Inspired Room

Painted Cabinets Nashville Tn Before And After Photos Brown Kitchen Painting White
Related Posts