Transform Your Kitchen with Before and After Pictures: Painted Kitchen Cabinets with White Walls
Are you tired of your outdated kitchen and dreaming of a fresh, modern look? Painting your kitchen cabinets and adding white walls can dramatically transform the space, bringing a touch of elegance and timelessness to your home. Here's a comprehensive guide to help you achieve stunning results with before and after pictures that will inspire you:
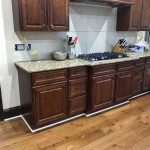
Before: Assessing the Current State
Before making any changes, it's crucial to assess the existing condition of your kitchen. Take detailed pictures of the cabinets, noting any areas that require repair or replacement. Check for loose hinges, chipped paint, or water damage that may need attention before painting.
Planning the Color Scheme: White Walls and Painted Cabinets
White walls are a classic choice for creating a bright and airy space, while painted cabinets can add warmth and character. Decide on the desired color for your cabinets, considering the overall style of your kitchen and the existing décor. Lighter shades such as white, cream, or beige can create a spacious and inviting atmosphere, while darker hues like navy or emerald green can add depth and sophistication.
Choosing the Right Paint: Quality Matters
The quality of paint you select will significantly impact the durability and appearance of your painted cabinets. Opt for high-quality cabinet-specific paint that is designed to adhere well to surfaces and resist chipping or fading. Consider using a primer to ensure optimal adhesion and coverage.
Preparing the Cabinets for Painting
Thoroughly clean the cabinets to remove any dirt, grease, or debris that could interfere with paint adhesion. Remove hardware, including handles, knobs, and hinges. Lightly sand the cabinet surfaces with fine-grit sandpaper to create a smooth base for the paint.
Applying the Paint with Care and Attention
Use a brush or roller to apply the paint, following the manufacturer's instructions for the specific paint you're using. For best results, apply thin, even coats, allowing each layer to dry completely before applying the next. If multiple coats are required, lightly sand between coats to ensure a smooth finish.
Reinstalling Hardware and Finishing Touches
Once the paint has dried thoroughly, carefully reinstall the hardware. Add finishing touches like new drawer knobs, cabinet pulls, or backsplash tiles to enhance the overall aesthetic and complete the transformation.
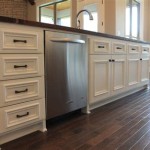
After: Enjoying the Stunning Results
With the painting complete, step back and admire the dramatic difference in your kitchen. The white walls will brighten and enlarge the space, while the painted cabinets will add a fresh and inviting feel. Compare your before and after pictures to witness the remarkable transformation and enjoy the new, updated look of your kitchen.

Painted White Cabinets Before And After Reveal Photos Renovated Faith

Painting Kitchen Cabinets White Beneath My Heart

Pin Page

Dover White Kitchen Cabinets Lighten Up Your Refresh Restyle

Pin Page

Pa Wedding Photographer Diy Painted Kitchen Cabinets Before After

Kitchen Makeover Using Ballet White By Benjamin Moore Funcycled Interior Design Cabinet Painting Furniture Repurposing In Upstate Ny

How I Transformed My Kitchen With Paint House Mix

Kitchen Painting Projects Before And After Paper Moon

Painting Oak Cabinets White Best Diy Tutorial 2025
Related Posts