Essential Aspects of Painting Kitchen Cabinets Without Sanding
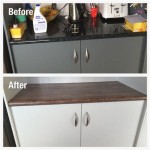
Rejuvenating your kitchen cabinets without the hassle of sanding is a practical and rewarding home improvement project. With proper preparation and the right techniques, you can achieve a professional-looking finish that transforms your kitchen's aesthetics.
Step 1: Choosing the Right Cleaner and Primer
Thoroughly clean your cabinets with a degreaser to remove dirt, grease, and dust. Use a brush or sponge to scrub the surface, ensuring no residue remains. For a primer, opt for an oil-based or latex-based stain-blocking primer that adheres well to the cabinet's surface and prevents stains from bleeding through the paint.
Step 2: Surface Preparation
Inspect the cabinet doors and drawers for any imperfections. Fill in dents and holes with a wood filler, ensuring it matches the surface color. Use painter's tape to protect hardware, such as handles and hinges, and lay down drop cloths to minimize paint splatter.
Step 3: Brush Painting for Small Areas and Details
For smaller areas, such as the edges of doors and drawers or intricate moldings, use a high-quality brush with soft bristles. Load the brush with a small amount of paint and apply it in thin, even strokes, starting from the center towards the edges. Allow the first coat to dry thoroughly before applying the next.
Step 4: Roller Painting for Larger Areas
For larger surfaces, use a microfiber roller with a 3/8-inch nap. Apply the paint in a "W" pattern, ensuring even coverage. Roll in one direction first, then perpendicularly to create a crosshatch pattern. For corners and tight spaces, use a smaller roller or a brush.
Step 5: Applying Multiple Coats
Most surfaces require at least two coats of paint. Allow each coat to dry completely before applying the next. Lightly sand the surface between coats with a fine-grit sandpaper to remove any imperfections or brush marks. This ensures a smooth, professional finish.
Step 6: Protective Finish
Once the final coat of paint has dried, apply a polyurethane finish to protect the surface from scratches and wear. Use a brush or roller to apply the finish in a thin, even layer. Allow the finish to cure for the recommended time before reinstalling the hardware.
Tips for a Flawless Finish
- Use high-quality paint and primer designed for kitchen cabinets.
- Allow ample drying time between coats to prevent peeling or bubbling.
- Use a paint sprayer for a smoother, more consistent finish.
- Consider using a paint brush with natural bristles for a more durable finish.
- Clean your painting tools thoroughly after each use to prevent paint buildup.
- Ventilate the area well during and after painting to avoid fumes.

How To Paint Kitchen Cabinets Without Sanding Sustain My Craft Habit

How To Paint Kitchen Cabinets Without Sanding Sustain My Craft Habit

How To Paint Kitchen Cabinets Without Sanding The Budget Decorator

Can You Paint Kitchen Cabinets Without Sanding

How To Paint Your Cabinets In A Weekend Without Sanding Them Chris Loves Julia

Painting Over Oak Cabinets Without Sanding Or Priming Hometalk

How To Paint Fake Wood Kitchen Cabinets Simple Made Pretty 2024

Can You Paint Cabinets Without Sanding Trusted Coatings

How To Paint Cabinets Without Sanding A Fresh Squeezed Life

Diy How To Paint Cabinets Without Sanding Vlog
Related Posts

