Best Way to Paint Over Stained Wood Cabinets
Painting stained wood cabinets can significantly transform a kitchen or bathroom, offering a fresh, updated aesthetic without the expense of replacing the cabinetry entirely. However, achieving a professional-looking finish requires meticulous preparation and the correct techniques. The process differs substantially from painting previously painted surfaces. This article details the optimal methods for painting over stained wood cabinets, focusing on achieving a durable, beautiful, and long-lasting finish.
Key Point 1: Thorough Preparation is Paramount
The foundation of any successful paint job on stained wood lies in diligent preparation. Stained wood inherently possesses a sealed surface, often achieved through varnish, lacquer, or polyurethane. Paint will not adhere correctly to these coatings without proper preparation. This involves cleaning, degreasing, sanding, and priming.
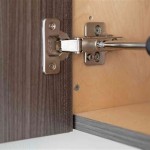
The initial step is to remove all cabinet doors and drawers. Label each component clearly, noting its corresponding location within the cabinet framework. This ensures easy reassembly after the painting process is complete. Remove all hardware, including knobs, pulls, hinges, and any decorative elements. Store these items safely to prevent loss or damage. Consider replacing old hardware with new fixtures to further enhance the updated look.
Once the cabinet components are disassembled, comprehensive cleaning is essential. Use a strong degreasing cleaner to remove accumulated grease, dirt, and grime. Kitchen cabinets, in particular, are susceptible to grease buildup from cooking. A solution of trisodium phosphate (TSP) diluted in water is an effective degreaser, but it necessitates wearing appropriate safety gear, including gloves and eye protection, due to its caustic nature. Alternatively, commercially available degreasers specifically designed for kitchen surfaces can be used.
After degreasing, rinse all surfaces thoroughly with clean water to remove any cleaner residue. Allow the cabinets to dry completely before proceeding to the next step. Rushing this drying process can compromise the adhesion of subsequent coatings.
Sanding is the next crucial step. The goal of sanding is not to remove the existing stain entirely, but rather to create a slightly roughened surface, or "tooth," that will allow the primer to bond effectively. Use a medium-grit sandpaper (around 120-150 grit) for the initial sanding pass. Focus on scuffing the entire surface of the cabinets, paying particular attention to edges, corners, and areas where the existing finish is glossy. Avoid applying excessive pressure, as this can lead to uneven sanding and potential damage to the wood.
After the initial sanding, use a finer-grit sandpaper (around 220 grit) to smooth out any scratches left by the coarser grit. This will create a smoother surface for the primer and paint. After sanding, remove all sanding dust thoroughly. A vacuum cleaner with a brush attachment is effective for removing the majority of the dust. Follow up with a tack cloth to remove any remaining fine particles. A clean, dust-free surface is critical for optimal primer adhesion.
Priming is the final, and perhaps most important, step in preparing stained wood for painting. A high-quality bonding primer is essential. Bonding primers are specifically formulated to adhere to challenging surfaces, such as glossy finishes and stained wood. Opt for a primer labeled as "stain-blocking" if the stain is particularly dark or if there are concerns about bleed-through. Oil-based primers and shellac-based primers are often preferred for their superior adhesion and stain-blocking properties, but they require proper ventilation and cleanup with mineral spirits. Water-based primers are a more environmentally friendly option and offer easy cleanup with soap and water, but they may not provide the same level of adhesion or stain-blocking as oil-based or shellac-based primers.
Apply the primer in thin, even coats, using a high-quality brush or roller. Avoid applying the primer too thickly, as this can lead to drips and runs. Allow the primer to dry completely according to the manufacturer's instructions. Once dry, lightly sand the primed surface with fine-grit sandpaper (around 320 grit) to create an even smoother surface for the paint. Remove any sanding dust before proceeding to the painting stage.
Key Point 2: Selecting the Right Paint and Application Techniques
Choosing the appropriate paint is just as crucial as meticulous preparation. The durability and appearance of the painted cabinets depend heavily on the quality and type of paint selected. Consider the environment in which the cabinets will be used, such as a kitchen or bathroom, and choose a paint that is specifically formulated for these conditions. Paints designed for cabinets should be durable, washable, and resistant to moisture and grease.
Acrylic latex paint is a popular choice for painting cabinets due to its durability, ease of application, and low odor. It is also water-based, making cleanup simple. However, some acrylic latex paints may not provide the same level of hardness and durability as other options. Alkyd paint, which is oil-based, offers superior hardness and durability, making it a good choice for high-traffic areas. However, alkyd paint has a stronger odor and requires mineral spirits for cleanup. Hybrid paints, which combine the benefits of both acrylic and alkyd paints, are also available. These paints offer good durability, low odor, and easy cleanup.
The sheen of the paint is another important consideration. Semi-gloss and gloss finishes are typically recommended for cabinets, as they are durable, washable, and resistant to moisture. Semi-gloss is a popular choice, as it offers a good balance between durability and sheen. Gloss finishes are even more durable and easier to clean, but they can also highlight imperfections in the surface. Satin finishes are less durable and more difficult to clean, but they offer a softer, more subtle look.
Proper application techniques are essential for achieving a smooth, professional-looking finish. Use high-quality brushes and rollers designed for fine finishing. Foam rollers are often preferred for their ability to create a smooth, even finish without leaving brush marks. Apply the paint in thin, even coats, avoiding drips and runs. Allow each coat to dry completely according to the manufacturer's instructions before applying the next coat. Two to three coats of paint are typically required for adequate coverage and durability.
For larger, flat surfaces, consider using a paint sprayer. Paint sprayers can provide a smooth, even finish with minimal effort. However, they require careful setup and masking to prevent overspray. If using a paint sprayer, practice on a scrap piece of wood before applying paint to the cabinets. Follow the manufacturer's instructions for proper sprayer settings and techniques.
Between coats of paint, lightly sand the surface with fine-grit sandpaper (around 320 grit) to remove any imperfections and create a smoother surface for the next coat. Remove any sanding dust before applying the next coat of paint. This step is crucial for achieving a flawless finish.
Key Point 3: Curing and Reassembly
Once the final coat of paint has been applied, allow the cabinets to cure completely before reassembling them. Curing is the process by which the paint hardens and reaches its full durability. The curing time can vary depending on the type of paint used, but it typically takes several days or even weeks for the paint to fully cure. Avoid using the cabinets during the curing period to prevent damage to the painted surface.
Before reassembling the cabinets, inspect the painted surfaces carefully for any imperfections. Touch up any areas that need attention with a small brush. Once the paint has fully cured, reattach the hardware, including knobs, pulls, and hinges. Ensure that all hardware is securely fastened.
Reinstall the cabinet doors and drawers, paying attention to the labels that were created during the disassembly process. Adjust the hinges as needed to ensure that the doors and drawers align properly and close smoothly. Clean the painted surfaces with a mild soap and water solution to remove any dust or fingerprints.
Protect the newly painted cabinets from damage by avoiding harsh chemicals and abrasive cleaners. Use a soft cloth to wipe down the cabinets regularly. Consider using felt pads on the inside of cabinet doors and drawers to prevent scratching. With proper care and maintenance, the painted cabinets will provide years of beauty and functionality.
By following these detailed steps, homeowners can successfully paint over stained wood cabinets, achieving a professional-looking and durable finish. The transformation can significantly enhance the aesthetics of a kitchen or bathroom, providing a cost-effective alternative to replacing the entire cabinetry.

Can I Paint Over Stained Wood Williams Painting

Yes Paint Over Stained Wood Without Sanding Porch Daydreamer

Cabinet Refinishing Guide

How To Paint Grainy Oak Cabinets And Get A Smooth Finish

Can I Paint Over Stained Wood Williams Painting

How To Paint Laminate Cabinets Without Sanding The Palette Muse

Avoid These Mistakes How To Paint Cabinets That Are Already Painted Grace In My Space

Yes Paint Over Stained Wood Without Sanding Porch Daydreamer

How To Stain Your Wood Cabinets Darker Young House Love

The Best Way To Paint Over Dark Stained Furniture Little House Of Four Creating A Beautiful Home One Thrifty Project At Time
Related Posts