Best Ways to Refinish Kitchen Cabinet Doors
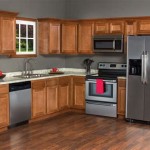
Refinishing kitchen cabinet doors is a transformative home improvement project that can significantly update the look and feel of a kitchen without the expense of a full remodel. Choosing the best approach for refinishing depends on several factors, including the type of material the doors are made from, the existing finish, and the desired final result. This article explores various methods and considerations to help determine the most effective way to refinish kitchen cabinet doors.
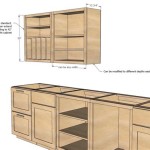
Before commencing any refinishing project, thorough preparation is crucial. This involves removing the doors from their frames, detaching all hardware such as hinges and knobs, and carefully cleaning the doors to remove grease, grime, and any loose paint or varnish. A degreasing solution is often necessary for removing kitchen residue. Once clean, the doors should be thoroughly dried before moving on to the next stage.
Surface Preparation: The Foundation of a Successful Refinishing Project
The condition of the existing surface dictates the degree of preparation required. For surfaces with intact, but glossy, finishes, scuff sanding is often sufficient. This involves using fine-grit sandpaper (typically between 220 and 320 grit) to create a slightly roughened surface that will allow the new finish to adhere properly. The goal is not to remove the existing finish, but rather to provide “tooth” for the new coating.
If the existing finish is peeling, cracked, or heavily damaged, more extensive removal is necessary. Several methods can be employed for complete finish removal. Chemical strippers are effective at dissolving the existing finish, but they require careful application and ventilation due to their potentially hazardous fumes. It's crucial to follow the manufacturer's instructions and wear appropriate personal protective equipment (PPE), including gloves and eye protection. After applying the stripper, the softened finish can be scraped away, and the surface should be cleaned thoroughly with a solvent recommended by the stripper manufacturer.
Another option for removing old finishes is sanding. Power sanders, such as orbital sanders, can expedite the process, but they require careful control to avoid damaging the underlying wood. Start with a coarser grit sandpaper (around 80-120 grit) to remove the bulk of the finish, then gradually move to finer grits (180-220 grit) to smooth the surface. Ensure that all traces of the old finish are removed, particularly in corners and crevices. Dust extraction is vital during sanding to maintain visibility and prevent the dust from settling back onto the surface. A vacuum cleaner with a brush attachment is useful for this purpose.
For intricate door designs with raised panels or decorative moldings, hand sanding may be necessary to reach areas inaccessible to power sanders. A sanding block can help maintain a flat surface and prevent uneven sanding. After sanding, a tack cloth should be used to remove any remaining dust particles before applying the new finish.
Wood filler may be required to repair any dents, scratches, or imperfections in the door surface. Apply the filler according to the manufacturer's instructions, allowing it to dry completely before sanding it smooth and flush with the surrounding surface. Proper surface preparation is labor-intensive but fundamentally important for achieving a professional and durable refinished result.
Selecting the Right Finish: Paint vs. Stain
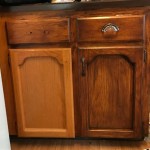
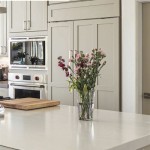
The choice between paint and stain is a significant decision that impacts the final appearance of the cabinet doors. Paint offers a wide range of color options and provides a more opaque finish, concealing the wood grain. This is often preferred for a more modern or contemporary aesthetic. Stain, on the other hand, enhances the natural beauty of the wood grain and allows it to remain visible. Stain is typically chosen for a more traditional or rustic look.
When choosing paint, consider the type of paint and its suitability for kitchen cabinets. Oil-based paints offer excellent durability and a smooth finish, but they require more effort to clean up and can have stronger odors. Water-based acrylic or latex paints are easier to clean, have lower VOCs (volatile organic compounds), and dry faster. When selecting a water-based paint, look for formulations specifically designed for cabinets and trim, as these tend to be more durable and resistant to chipping and scratching.
For optimal results with paint, priming is highly recommended. A primer creates a uniform surface, improves adhesion, and helps prevent the existing finish from bleeding through the new paint. Choose a primer that is compatible with both the existing surface and the selected paint. Apply the primer in thin, even coats, allowing it to dry completely before sanding lightly to create a smooth surface for the topcoat.
When choosing a stain, consider the wood species of the cabinet doors and how it will react to the stain color. Different wood species absorb stain differently, resulting in variations in color intensity. It's always advisable to test the stain on an inconspicuous area of the door or on a scrap piece of the same wood to ensure that the desired color is achieved. Wood conditioner can be applied before staining to help achieve a more even color absorption, especially on woods that are prone to blotching.
Once the stain is applied, allow it to penetrate the wood for the recommended time, then wipe off any excess stain with a clean cloth. The longer the stain remains on the wood, the darker the color will be. After the stain is completely dry, apply a clear topcoat to protect the stained surface and enhance its durability. Polyurethane is a popular choice for topcoats, providing a durable and water-resistant finish. Apply the topcoat in thin, even coats, allowing each coat to dry completely before applying the next.
Application Techniques: Achieving a Professional-Looking Finish
The application method employed can significantly affect the final appearance of the refinished cabinet doors. Brushing, rolling, and spraying are the most common application techniques, each with its own advantages and disadvantages.
Brushing is a versatile method suitable for small to medium-sized projects. Choose a high-quality brush designed for the type of finish being applied. For water-based paints, use a synthetic bristle brush, and for oil-based paints and stains, use a natural bristle brush. Apply the finish in long, even strokes, following the grain of the wood. Avoid applying too much pressure, which can lead to brush marks. If brush marks are visible, lightly sand the finish between coats to smooth the surface.
Rolling is another option for applying paint, particularly on flat surfaces. Use a foam roller or a short-nap roller for a smooth finish. Apply the paint in thin, even coats, overlapping each stroke slightly. Avoid pressing down too hard on the roller, which can create ridges or bubbles. Back-brushing, which involves lightly brushing the paint after rolling, can help to eliminate roller marks and create a smoother finish.
Spraying offers the most professional-looking finish, but it requires specialized equipment and a greater degree of skill. Airless sprayers and HVLP (high-volume, low-pressure) sprayers are commonly used for refinishing cabinet doors. Spraying provides a consistent and even coating with minimal brush marks or roller marks. However, it's essential to properly mask off the surrounding area to protect it from overspray. Adequate ventilation is also crucial, and appropriate PPE, such as a respirator, should be worn. Practice spraying on a scrap piece of material to get a feel for the sprayer settings and technique before applying the finish to the cabinet doors.
Regardless of the application method chosen, multiple thin coats are generally preferable to one thick coat. Thin coats dry faster, reduce the risk of drips and runs, and create a more durable and even finish. Lightly sand between coats with fine-grit sandpaper (320-400 grit) to remove any imperfections and create a smooth surface for the next coat.
After the final coat of finish has been applied and allowed to dry completely, the cabinet doors can be reinstalled. Reattach the hardware, such as hinges and knobs, and carefully mount the doors back onto their frames. Take care not to scratch or damage the new finish during installation. A successful refinishing project can significantly enhance the appearance of the kitchen and increase the value of the home.

Cabinet Refinishing Guide

Cabinet Refinishing An 8 Step Guide For Pro Painters Ppc

Refinishing Kitchen Cabinets Modern Refacing Made Easy Wisewood

Refinishing Kitchen Cabinets A Beautiful Mess

How To Refinish Kitchen Cabinets N Hance

How To Refinish Cabinets Like A Pro

Best Kitchen Cabinet Refacing For Your Home The Depot

Refinish Kitchen Cabinets With Kilz Restoration Primer

How To Paint Kitchen Cabinets Without Sanding Or Priming

How To Refinish Kitchen Cabinets Diy