```html
Building Upper Kitchen Cabinets: A Comprehensive Guide
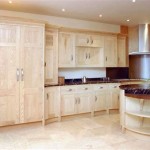
Upper kitchen cabinets are a fundamental element of kitchen design, providing essential storage space for dishes, cookware, and pantry items. Constructing these cabinets requires careful planning, precision, and a thorough understanding of woodworking techniques. This article outlines the steps involved in building upper kitchen cabinets, from initial design considerations to final installation.
Planning and Design
The initial phase of building upper cabinets involves meticulous planning and design. This stage is crucial for ensuring that the finished cabinets meet specific storage needs and complement the overall kitchen aesthetic. Key considerations include cabinet dimensions, construction methods, and hardware selection.
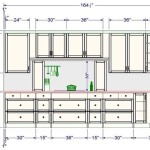
Cabinet dimensions are primarily dictated by the available space and the desired storage capacity. Standard upper cabinet depths range from 12 to 14 inches, while heights typically vary from 30 to 42 inches. The width of each cabinet should be determined by the layout of the kitchen and the intended contents. It is vital to accurately measure the wall space where the cabinets will be installed, accounting for any obstructions such as pipes or electrical outlets.
Construction methods also influence the design. Face frame cabinets, where a frame of solid wood is attached to the cabinet box, are a common choice due to their strength and traditional appearance. Frameless cabinets, also known as European-style cabinets, offer a more contemporary look and maximize interior storage space because they lack the face frame. The choice between these methods depends on personal preferences and the desired style of the kitchen.
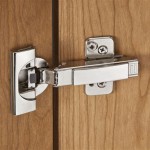
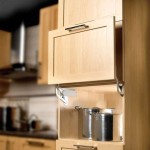
Hardware selection, including hinges, pulls, and knobs, plays a significant role in the functional and aesthetic aspects of the cabinets. Hinges should be chosen based on the cabinet door style and weight, ensuring smooth and reliable operation. Pulls and knobs should be selected to complement the overall design scheme and provide comfortable grip. Soft-close hinges and drawer slides are popular upgrades that enhance the user experience.
A detailed plan, including precise measurements and construction details, is essential before commencing the building process. This plan should include a cut list, specifying the dimensions of each component required for the cabinet construction. A well-defined plan minimizes errors and ensures a smooth and efficient building process.
Materials and Tools
Selecting the appropriate materials is critical for the durability and longevity of the upper kitchen cabinets. Common choices include plywood, medium-density fiberboard (MDF), and solid wood. Each material offers distinct advantages and disadvantages in terms of cost, strength, and workability.
Plywood is a versatile and cost-effective option, known for its strength and stability. It is resistant to warping and splitting, making it a suitable choice for cabinet boxes. MDF is a smooth and consistent material that is ideal for painting. It is less expensive than solid wood but is also more susceptible to moisture damage. Solid wood offers a premium appearance and durability but is also the most expensive option. It is commonly used for face frames and door components.
In addition to the primary building materials, various other supplies are required, including wood glue, screws, nails, and sandpaper. Wood glue provides a strong and durable bond between wood components, while screws and nails are used to reinforce joints. Sandpaper is essential for smoothing surfaces and preparing them for finishing.
A range of tools is necessary for building upper kitchen cabinets, including a table saw, miter saw, drill, sander, and measuring tools. A table saw is used for cutting large panels of wood to precise dimensions. A miter saw is ideal for making accurate angle cuts for face frames and other components. A drill is used for creating pilot holes and driving screws. A sander is used for smoothing surfaces and preparing them for finishing. Accurate measuring tools, such as a tape measure and a square, are essential for ensuring that the cabinets are built to the specified dimensions.
Safety equipment, such as safety glasses, hearing protection, and a dust mask, is crucial for protecting against potential hazards during the building process. Woodworking can generate significant amounts of dust and noise, so it is important to take appropriate precautions to safeguard health.
Construction Process
The construction process involves assembling the cabinet box, attaching the face frame (if applicable), and building the doors and drawers. Each step requires careful attention to detail and precise execution.
The cabinet box is typically constructed by joining the sides, top, bottom, and back panel together. These components can be joined using various methods, such as screws, nails, or dado joints. Dado joints, where a groove is cut into one piece of wood to receive another, provide a strong and stable connection. The back panel is typically attached with screws or nails and reinforces the cabinet box.
If using a face frame construction method, the frame is assembled separately and then attached to the cabinet box. The face frame provides structural support and a decorative element to the cabinet. It is typically attached with wood glue and screws or nails. The face frame should be carefully aligned and secured to ensure a seamless fit.
Cabinet doors can be constructed in various styles, including raised panel, flat panel, and shaker style. The choice of door style depends on personal preferences and the overall design of the kitchen. Raised panel doors are more complex to construct and require specialized tools. Flat panel and shaker style doors are simpler to build and offer a more contemporary look. The door components are typically joined using mortise and tenon joints or cope and stick joints. The doors are then attached to the cabinet box using hinges.
If the upper cabinets include drawers, the drawers are built separately and then installed into the cabinet box using drawer slides. Drawer slides allow the drawers to open and close smoothly. Soft-close drawer slides are a popular upgrade that prevents the drawers from slamming shut. The drawer box is typically constructed from plywood or solid wood and joined using dovetail joints or other strong joinery methods. The drawer front is attached to the drawer box with screws and aligned to the cabinet face.
Finishing and Installation
After the cabinets are assembled, the finishing process involves sanding, priming, and painting or staining the surfaces. This step enhances the appearance of the cabinets and protects them from moisture and wear.
Sanding is essential for creating a smooth and even surface for finishing. Start with a coarse grit sandpaper to remove any imperfections and then gradually move to finer grits to achieve a polished finish. Ensure all surfaces are thoroughly sanded before applying any finish.
Priming is important for sealing the wood and providing a uniform surface for the paint or stain. Use a high-quality primer that is compatible with the chosen finish. Apply the primer in thin, even coats and allow it to dry completely before sanding lightly and applying the first coat of paint or stain.
Painting or staining is the final step in the finishing process. Choose a paint or stain that complements the overall design of the kitchen and provides the desired level of protection. Apply the finish in thin, even coats, allowing each coat to dry completely before applying the next. Multiple coats may be necessary to achieve the desired color and coverage. Consider using a clear topcoat to protect the finish and enhance its durability.
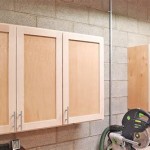
Installation of the upper kitchen cabinets requires careful planning and precise execution. The cabinets should be securely attached to the wall studs to ensure that they can support the weight of the contents. A level is essential for ensuring that the cabinets are installed straight and level. Start by marking the location of the wall studs and the desired height of the cabinets. Use a ledger board to temporarily support the cabinets while they are being installed. Attach the cabinets to the wall studs with screws, ensuring that they are securely fastened. Once the cabinets are installed, install the shelves and hardware.
Building upper kitchen cabinets is a rewarding project that can significantly enhance the functionality and aesthetic appeal of the kitchen. By following these steps carefully, it is possible to create custom cabinets that meet personal storage needs and complement the overall design scheme.
```
Building Upper Cabinets Part 2 Canadian Woodworking

Woodsmith Custom Kitchen Cabinets Plans Wilker Do S

How To Build Wall Cabinets Houseful Of Handmade

How To Build Upper Kitchen Cabinets House One This Old

30in Upper Cabinet Carcass Frameless Rogue Engineer

30in Upper Cabinet Carcass Frameless Rogue Engineer

Building Cabinets Court Nate

Upper Kitchen Cabinet Build Merzke Custom Woodworking

How To Install Kitchen Cabinets Diy Family Handyman

Extending Kitchen Cabinets Up To The Ceiling Thrifty Decor Diy And Organizing
Related Posts