Cabinet Knob Location: A Guide to Optimal Placement on Doors
The placement of cabinet knobs and pulls is a crucial element in both the functionality and aesthetic appeal of cabinetry. Incorrect placement can lead to awkward operation, uneven wear, and an overall unbalanced appearance. This article explores the principles that govern optimal knob placement on cabinet doors, considering various factors that influence this decision, including door style, size, and intended function.
Understanding the Basics of Knob Placement
Before diving into specific measurements and techniques, a fundamental understanding of basic principles is necessary. The goal is to position the knob in a location that feels natural for the user, requires minimal effort to operate, and complements the visual design of the cabinet.
Generally, knobs are placed on the stile of a cabinet door, which is the vertical frame member. This provides the necessary structural support for the hardware. The position on the stile, however, is subject to variation based on door style and proportions. For inset doors, where the door sits flush with the cabinet frame, the placement considerations are similar, but the mounting surface is often more restrictive.
The most common method involves using a measuring tape and pencil to mark the desired location. Specialized jigs are also available to ensure consistency, particularly when installing knobs on multiple doors. These jigs typically use adjustable guides to standardize the drilling process.
It is also useful to consider the overall design scheme. A modern, minimalist kitchen might benefit from subtly placed knobs, while a more traditional kitchen may call for more pronounced hardware that is visually impactful.
Factors Influencing Knob Placement on Different Door Styles
Cabinet door styles vary considerably, and the optimal knob placement often depends on the specific design. Below are some common door styles and their corresponding placement recommendations.
Slab Doors: These doors are characterized by their flat, unadorned surface. The primary consideration is visual balance. A common guideline is to place the knob in the lower or upper corner, approximately 2 to 4 inches from the edge. The exact distance may need to be adjusted based on the size of the door; larger doors may benefit from slightly increased spacing. Another approach involves placing the knob along the centerline of the door, either horizontally or vertically, depending on the door's orientation and surrounding design elements. This provides a modern and symmetrical look.
Shaker Doors: Shaker doors feature a recessed center panel surrounded by a frame. Knobs are typically placed on the stile, the vertical part of the frame. A widely accepted guideline is to position the knob 2 to 3 inches from the top or bottom of the door, centered on the stile. This placement provides a comfortable grip and visually harmonizes with the clean lines of the Shaker style. For larger Shaker doors, the knob placement may be slightly higher or lower to maintain a balanced proportion.
Raised Panel Doors: These doors incorporate a raised central panel, often with decorative molding. Due to the more ornate design, careful consideration is needed to avoid clashing with the existing details. Similar to Shaker doors, knobs are typically placed on the stile. The optimal height can vary depending on the specific design of the raised panel, but generally, a distance of 2 to 4 inches from the top or bottom of the door is a good starting point. The placement should be evaluated visually to ensure it complements the panel design and does not appear overcrowded. In some cases, slightly adjusting the height to align with a specific detail in the panel can create a more cohesive look.
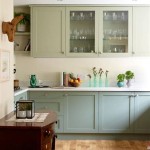
Glass Front Doors: Glass front doors present a unique challenge as they require special consideration to avoid damaging the glass. Knobs are typically mounted on the frame surrounding the glass, similar to Shaker or raised panel doors. However, the stile width may be narrower, requiring a smaller knob or pull. It's crucial to ensure that the hardware mounting screws do not come into contact with the glass. Alternatively, decorative knobs can be mounted directly onto the glass using specialized adhesive, though this requires precision and may not be suitable for all glass types.
Overlay vs. Inset Doors: Overlay doors, where the door overlaps the cabinet frame, offer more flexibility in knob placement as the stile is fully accessible. Inset doors, which sit flush within the cabinet frame, require more precise placement to ensure the knob does not interfere with the frame when the door is closed. The thickness of the door and frame must be carefully considered to ensure proper clearance.
Practical Considerations and Measurement Techniques
Beyond door style, several practical factors influence knob placement. These include cabinet size, user ergonomics, and hardware finish.
Cabinet Size: The height and width of the cabinet door directly impact the perceived balance of the knob placement. On taller or wider doors, a knob placed too close to the edge may appear disproportionate. It may be necessary to experiment with different placements to find the most visually appealing position.
Ergonomics and Accessibility: The placement should prioritize ease of use. Consider the height of the cabinet and the typical reach of the user. For lower cabinets, a knob placed too low may require excessive bending. For upper cabinets, a placement that is too high can be difficult to reach. Universal design principles suggest placing knobs at a height accessible to a wide range of users, including those with limited mobility.
Hardware Finish and Style: The finish and style of the knob should complement the overall design of the kitchen or bathroom. A brushed nickel finish might be suitable for a modern kitchen, while an antique brass finish could be more appropriate for a traditional setting. The size and shape of the knob should also be proportionate to the door. A small, delicate knob might be easily lost on a large cabinet door, while a bulky knob could overwhelm a smaller door.
Using Jigs and Templates: For consistent and accurate knob placement, particularly on multiple doors, using a jig or template is highly recommended. These tools provide a guide for drilling the mounting holes, ensuring that all knobs are positioned identically. Various jigs are available, ranging from simple adjustable guides to more sophisticated multi-hole templates. A typical jig will clamp onto the door, allowing for precise drilling without the risk of slippage. Templates can be created from cardboard or wood, providing a cost-effective alternative to commercial jigs. However, the accuracy of homemade templates should be carefully verified.
Accurate Measurement Techniques: Precise measurement is essential for ensuring consistent knob placement. Use a high-quality measuring tape or ruler with clearly marked graduations. Double-check all measurements before drilling. When marking the drilling location, use a sharp pencil or a marking knife to create a small indentation. This will help to prevent the drill bit from wandering. It is always advisable to practice on a scrap piece of wood before drilling into the actual cabinet door.
Pilot Holes: Drilling a pilot hole before installing the knob is essential to prevent splitting the wood. The diameter of the pilot hole should be slightly smaller than the diameter of the mounting screws. Use a drill bit designed for wood and drill slowly and steadily. Avoid applying excessive pressure, which can damage the wood. For hardwoods, a slightly larger pilot hole may be necessary.
Dealing with Existing Cabinetry and Retrofitting
When replacing existing hardware on cabinetry, certain adjustments may be necessary. The existing hole pattern may not align with the desired position of the new knobs. In this case, there are several options to consider.
Filling Existing Holes: The existing holes can be filled with wood filler and sanded smooth. Once the filler has dried and been sanded, the surface can be repainted or stained to match the surrounding finish. This effectively creates a blank canvas for the new knob placement.
Using Backplates: Backplates are decorative plates that are installed behind the knob. They serve to cover existing holes and provide a larger mounting surface. Backplates come in various shapes, sizes, and finishes. They can be used to add a decorative touch to the cabinetry while also resolving the issue of mismatched hole patterns.
Adjusting Knob Style: In some cases, it may be possible to choose a knob style that accommodates the existing hole pattern. Knobs with a wider base or a different mounting mechanism can sometimes be used to cover the existing holes without requiring any modifications to the cabinet door.
Consulting a Professional: If the existing holes are particularly large or if the cabinet door is made of a delicate material, it may be advisable to consult a professional cabinet maker or installer. They can provide expert advice on the best approach for retrofitting the hardware without damaging the cabinetry.
Ultimately, the optimal placement of cabinet knobs on doors is a balance between aesthetic considerations, ergonomic principles, and practical constraints. Understanding the factors that influence this decision allows for informed choices that enhance both the functionality and visual appeal of the cabinetry.

Where To Place Cabinet Hardware Emtek Living Blog

Cabinet Hardware Placement Guide

How To Place Cabinet Knobs Pulls

Cabinet Hardware Placement Guide

Tips For Cabinet Hardware Placement Knobs Are Placed Opposite Of Door Hinges Pontis Construction

Set It And Forget Small Spikes Help Keep Knobs In Place Amerock

Design 101 Cabinet Hardware Placement Lark Linen

A Simple Guide For Ideal Cabinet Knob Placement

Cabinet Hardware Placement A Complete Guide Stefana Silber

An Easy Cabinet Hardware Placement Guide Tidbits Twine