Can I Just Paint My Kitchen Cabinets? A Comprehensive Guide
The question of whether one can simply paint kitchen cabinets is a common one for homeowners looking to refresh their kitchens without undertaking a full-scale renovation. While painting cabinets can be a cost-effective and relatively simple solution, the answer isn't a straightforward "yes" or "no." Several factors influence the success and longevity of a painted cabinet finish. This article provides a detailed examination of these factors, outlining the necessary preparation, materials, and techniques for achieving a professional-looking result.
The appeal of painting kitchen cabinets lies in its potential to dramatically alter the aesthetic of a kitchen space at a fraction of the cost of replacing the cabinets entirely. A fresh coat of paint can modernize outdated styles, brighten dim areas, or simply inject a new color palette into the room. However, neglecting crucial steps or using inappropriate materials can lead to peeling, chipping, and an overall unsatisfactory outcome, ultimately costing more time and money in the long run.
Understanding Cabinet Materials
The type of material your cabinets are made of is paramount in determining the appropriate paint and preparation methods. Different materials react differently to paint, and some require specialized primers and techniques to ensure proper adhesion and durability. Common cabinet materials include solid wood, wood veneer, laminate, and melamine.
Solid wood cabinets, often found in older homes, generally offer the best surface for painting. Wood accepts paint well and allows for a durable bond. However, even solid wood requires proper sanding and priming to create a smooth and even base for the paint. Knotty woods may require special primers to prevent tannins from bleeding through the paint, which can discolor the finish over time.
Wood veneer cabinets consist of a thin layer of wood adhered to a less expensive substrate, such as particleboard or MDF (Medium-Density Fiberboard). These cabinets can be painted, but extra care is needed to avoid sanding through the thin veneer layer. A light sanding to scuff the surface is usually sufficient, followed by a high-quality primer designed for adhesion to non-porous surfaces.
Laminate and melamine cabinets present the greatest challenge for painting. These materials are typically very smooth and non-porous, making it difficult for paint to adhere properly. Specialized adhesive primers are essential for painting laminate or melamine cabinets. These primers are designed to bond to the slick surface, creating a base that the paint can then adhere to. Thorough cleaning and light sanding are still crucial, even when using an adhesive primer.
Essential Preparation Steps
Proper preparation is the most critical factor in achieving a professional and long-lasting painted cabinet finish. Skimping on preparation will almost certainly result in a subpar outcome, regardless of the quality of the paint used. The preparation process involves several key steps, each designed to ensure optimal adhesion and a smooth, uniform surface.
The first step is thorough cleaning. Cabinets accumulate grease, grime, and dust over time, which can interfere with paint adhesion. Use a degreasing cleaner specifically designed for kitchen cabinets to remove all traces of contamination. Rinse thoroughly with clean water and allow the cabinets to dry completely before proceeding.
Next, remove all hardware, including knobs, pulls, hinges, and any other accessories. This will allow for easier sanding and painting, and it will also prevent paint from getting on the hardware. Label each piece of hardware and its corresponding cabinet door or drawer to ensure easy reinstallation later.
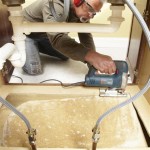
Sanding is a crucial step in creating a receptive surface for the primer and paint. Use a medium-grit sandpaper (around 120-grit) to lightly scuff the surface of the cabinets. This will create a mechanical bond for the primer to adhere to. For laminate or melamine cabinets, use a finer grit sandpaper (around 220-grit) to avoid damaging the surface.
After sanding, wipe down the cabinets thoroughly with a tack cloth to remove all sanding dust. Dust particles can interfere with the paint finish, creating a bumpy or uneven surface. A tack cloth is a sticky cloth specifically designed to pick up dust and debris.
Finally, protect the surrounding areas with drop cloths and painter's tape. Cover countertops, floors, appliances, and walls to prevent paint splatters and drips. Use painter's tape to mask off any areas that you don't want to be painted, such as the inside edges of the cabinet frames.
Choosing the Right Paint and Primer
Selecting the appropriate paint and primer is just as important as proper preparation. Using the wrong products can lead to poor adhesion, uneven coverage, and a finish that is not durable enough to withstand the wear and tear of a kitchen environment. There are several types of paint suitable for kitchen cabinets, each with its own advantages and disadvantages.
Oil-based paints were traditionally the preferred choice for cabinets due to their durability and smooth finish. However, they are becoming less common due to their strong odor, long drying time, and the difficulty in cleaning up. Oil-based paints also tend to yellow over time, especially in areas that are not exposed to direct sunlight.
Latex or water-based paints are a more environmentally friendly and user-friendly option. They have low VOC (Volatile Organic Compounds), are easy to clean up with soap and water, and dry relatively quickly. High-quality acrylic latex paints provide excellent durability and are a good choice for kitchen cabinets.
Alkyd paints offer a compromise between oil-based and latex paints. They are water-based but contain alkyd resins, which provide enhanced durability and a smoother finish compared to traditional latex paints. Alkyd paints are a good option for those who want the benefits of both types of paint.
Cabinet-specific paints are also available. These paints are formulated specifically for use on kitchen cabinets and typically offer excellent adhesion, durability, and a smooth, self-leveling finish. They may be more expensive than other types of paint, but they can be worth the investment for a professional-looking result.
The primer is just as important as the paint. A good primer will create a solid foundation for the paint to adhere to, seal the surface, and prevent stains from bleeding through. Choose a primer that is specifically designed for the type of cabinet material you are painting. For solid wood cabinets, a general-purpose primer is usually sufficient. For laminate or melamine cabinets, an adhesive primer is essential.
Consider tinted primers. Having the primer tinted to a similar shade as the topcoat can aid in achieving even coverage and minimize the number of paint coats required.
Application Techniques
The application of the paint is another crucial element in achieving a professional-looking cabinet finish. While the quality of the paint and primer are important, improper application can lead to brush strokes, runs, and other imperfections that detract from the overall appearance.
There are several ways to apply paint to kitchen cabinets, including brushing, rolling, and spraying. Brushing is the most common method for DIYers, as it requires minimal equipment. However, it can be difficult to achieve a smooth, even finish with a brush. Use a high-quality brush designed for the type of paint you are using and apply the paint in thin, even coats.
Rolling can be a good option for painting large, flat surfaces, such as cabinet doors. Use a small, high-density foam roller to achieve a smooth finish. Apply the paint in thin, even coats and avoid pressing too hard, which can create roller marks.
Spraying is the best way to achieve a professional, factory-like finish. However, it requires specialized equipment, such as a paint sprayer and a well-ventilated workspace. Spraying allows for a smooth, even coat of paint with no brush strokes or roller marks. If you are not comfortable using a paint sprayer, consider hiring a professional painter to spray your cabinets.
Regardless of the application method, it is important to apply multiple thin coats of paint rather than one thick coat. Thin coats will dry more evenly and are less likely to run or sag. Allow each coat of paint to dry completely before applying the next coat. Lightly sand between coats with a fine-grit sandpaper (around 320-grit) to remove any imperfections and create a smooth surface for the next coat.
Reassembly and Hardware
Once the paint is completely dry, carefully reassemble the cabinets, reinstalling the hardware. Use the labels you created earlier to ensure that each piece of hardware is reinstalled in its correct location.
Consider upgrading the hardware to further enhance the new look of your cabinets. New knobs, pulls, and hinges can make a significant difference in the overall aesthetic of the kitchen. Choose hardware that complements the style and color of your painted cabinets.
Be careful not to scratch or damage the painted finish during reassembly. Use a soft cloth or towel to protect the cabinets from scratches. If you need to tighten screws, use a screwdriver that fits properly to avoid stripping the screw heads.
Allow the paint to fully cure for several days before using the cabinets heavily. This will allow the paint to harden and become more resistant to scratches and chips.
Cleaning painted cabinets should be done with a gentle, non-abrasive cleaner. Avoid using harsh chemicals or abrasive scrubbers, as they can damage the painted finish. Wipe up spills and splatters immediately to prevent staining.
In summary, while painting kitchen cabinets is feasible, it requires careful planning, meticulous preparation, and the use of appropriate materials and techniques. By understanding the type of cabinet material, preparing the surfaces properly, selecting the right paint and primer, and applying the paint carefully, homeowners can achieve a professional-looking and durable finish that transforms their kitchen space.

How To Paint Kitchen Cabinets In 7 Simple Steps

How To Paint Kitchen Cabinets In 7 Simple Steps

Avoid These Mistakes How To Paint Cabinets That Are Already Painted Grace In My Space

How To Prep And Paint Kitchen Cabinets Lowe S

Kitchen Spray Painting The Facelift Company

How To Paint Kitchen Cabinets Best Color Ideas Cost

Step By How To Paint Your Kitchen Cabinets

Should I Paint My Kitchen Cabinets

Painting Kitchen Cabinets

Budget Kitchen Renovation With Diy Shaker Painted Cabinets I
Related Posts