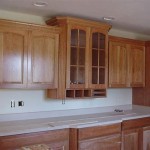
Can Maple Kitchen Cabinets Be Painted?
Maple is a popular hardwood widely used in kitchen cabinetry due to its density, durability, and attractive grain pattern. While often valued for its natural appearance when stained or sealed, homeowners sometimes consider painting maple cabinets to update their kitchen's aesthetic. Whether painting maple cabinets is a viable option depends on several factors, including the cabinet's existing finish, the desired outcome, and the preparation involved. This article explores the feasibility of painting maple kitchen cabinets, potential challenges, and best practices for achieving a professional, long-lasting finish.
Understanding Maple's Properties and Their Impact on Paint
Maple is characterized by its fine, closed grain. Unlike open-grained woods like oak, maple has smaller pores. This characteristic is generally considered advantageous because it provides a smoother surface for finishing. However, it also means that paint may not adhere as readily as it would to a more porous surface. The smooth surface of maple can sometimes lead to adhesion problems if the correct preparation techniques are not employed.
Furthermore, maple can have variations in color and grain, sometimes presenting noticeable mineral streaks or knots. While these natural variations can add character to stained maple, they may become visible through lighter paint colors. Proper priming and potentially the use of a tinted primer can help to mitigate these inconsistencies and ensure a uniform finish.
The hardness of maple also plays a role in the painting process. Being a relatively hard wood, maple is resistant to dents and scratches, which is beneficial for cabinets in a high-use area like the kitchen. However, this hardness also means that it may require more effort to sand and prepare the surface for painting. Thorough sanding is crucial for creating a mechanical bond between the paint and the wood.
Considerations Before Painting Maple Cabinets
Before embarking on a painting project, several factors must be carefully considered to determine if painting is the right approach. The current condition of the cabinets is a primary concern. Cabinets with significant damage, such as deep scratches, water damage, or warping, might require extensive repairs before painting can even begin. In such cases, replacement might be a more cost-effective and practical solution.
The existing finish on the cabinets also influences the painting process. Cabinets with a glossy or heavily sealed finish require more thorough preparation than those with a simpler, matte finish. Removing or adequately abrading the existing finish is essential for proper paint adhesion. Failure to do so can result in peeling, chipping, or other adhesion problems over time.
Homeowners should also consider their skill level and available time. Painting kitchen cabinets is a labor-intensive process that requires patience and attention to detail. Improper preparation or application can lead to an unprofessional-looking finish. If unsure, engaging a professional painter may be a wiser investment to ensure a high-quality, durable result.
Additionally, the desired aesthetic should be carefully considered. Painting maple cabinets is a significant change that can dramatically alter the look and feel of a kitchen. It's crucial to choose a paint color and finish that complements the overall style of the kitchen and the homeowner's personal preferences. Color samples should be tested in the actual kitchen environment to ensure they look as expected under different lighting conditions.
Steps for Successfully Painting Maple Kitchen Cabinets
Achieving a professional-looking painted finish on maple cabinets requires meticulous preparation and careful execution. The following steps outline the key aspects of the painting process:
1. Removal and Preparation: The first step involves removing all cabinet doors and drawers. Label each piece clearly to ensure proper reinstallation. Remove hardware such as knobs, pulls, and hinges. Thoroughly clean all surfaces with a degreasing cleaner to remove grease, grime, and any other contaminants that could interfere with paint adhesion. Rinse thoroughly and allow the cabinets to dry completely.
2. Sanding: Sanding is crucial for creating a sound surface for the paint to adhere to. Use 120-grit sandpaper to lightly scuff the existing finish. The goal is not to remove the entire finish but to create a rough surface that the primer can grip onto. Pay particular attention to edges and corners, sanding evenly to avoid creating uneven surfaces. After sanding, wipe down the cabinets with a tack cloth to remove all sanding dust. Dust is a common cause of imperfections in the final painted finish.
3. Priming: Applying a high-quality primer is essential for sealing the wood, blocking stains, and providing a uniform surface for the paint to adhere to. Choose a primer specifically designed for cabinets and that offers good adhesion to smooth surfaces. Apply a thin, even coat of primer using a brush, roller, or sprayer. Allow the primer to dry completely according to the manufacturer's instructions. Once dry, lightly sand the primed surface with fine-grit sandpaper (220-grit or higher) to smooth out any imperfections and create an even better surface for the paint. Remove all sanding dust with a tack cloth.
4. Painting: Choose a high-quality cabinet paint designed for durability and resistance to chipping and scratching. Acrylic latex paints are a popular choice for cabinets due to their ease of application, durability, and availability in a wide range of colors and finishes. Apply the paint in thin, even coats using a brush, roller, or sprayer. Avoid applying too much paint in a single coat, as this can lead to drips and uneven coverage. Allow each coat of paint to dry completely according to the manufacturer's instructions before applying the next coat. Typically, two coats of paint are sufficient for achieving a fully opaque and durable finish.
5. Curing and Reassembly: Once the final coat of paint has dried thoroughly, allow the cabinets to cure for several days, or even a week, before reassembling them. Curing allows the paint to fully harden and achieve maximum durability. Reinstall the hardware and reattach the doors and drawers, ensuring that they are properly aligned. Consider adding soft-close hinges to prevent slamming and protect the painted finish.
Choosing the Right Paint and Tools
The success of any painting project hinges on selecting the right materials. For maple kitchen cabinets, certain paints and tools will deliver superior results. Acrylic latex paints are generally preferred for their durability, ease of cleaning, and low VOC (volatile organic compound) content. Alkyd paints, while offering a harder finish, require more careful application and longer drying times. Consider a paint specifically formulated for cabinets, which often includes additives to improve adhesion and durability.
The paint's sheen level also significantly impacts the final appearance. Semi-gloss and gloss finishes are easier to clean and more resistant to moisture, making them suitable for kitchens. However, they also highlight imperfections more readily. Satin and eggshell finishes offer a softer look and are more forgiving regarding imperfections, but they may not be as easy to clean. Homeowners should test different sheens in their kitchen to determine the best option.
The tools used for application are equally important. High-quality brushes with synthetic bristles are recommended for achieving a smooth, even finish without leaving brush marks. Foam rollers are also effective for applying paint to large, flat surfaces. Paint sprayers can provide the most even and professional-looking finish, but they require practice and proper setup to avoid runs and drips. Investing in quality tools will ultimately save time and improve the overall result.
Addressing Potential Challenges
Painting maple cabinets can present certain challenges that homeowners should be aware of. One common issue is paint adhesion. Maple's smooth surface can make it difficult for paint to adhere properly, leading to peeling or chipping over time. Thorough sanding and the use of a high-quality primer are essential for addressing this issue.
Another potential challenge is bleed-through. Maple wood can contain tannins or other substances that can leach through the paint, causing discoloration. Using a stain-blocking primer can prevent bleed-through and ensure a consistent color throughout the painted surface.
Uneven paint coverage can also be a problem, particularly when painting cabinets with intricate details or recessed panels. Applying thin, even coats of paint and using appropriate application techniques can help to achieve uniform coverage. Multiple coats may be necessary to achieve the desired level of opacity.
Finally, dust and debris can contaminate the painted surface, creating imperfections. Working in a clean, well-ventilated environment and using a tack cloth to remove dust before each coat of paint can minimize this issue. A paint booth or temporary enclosure can further protect the cabinets from dust and contaminants.

Can Maple Cabinets Be Painted White D Franco Painting Huntley

Cures For A Maple Orange Kitchen Emily Henderson

Tips For Painting Maple Wood Kitchen Cabinets

Maple Kitchen Cabinets Before After Painted Off White Benjamin Moore And Painting

5 Easy Ways To Transform Cabinets When Painting Isn T An Option

Our Painted Maple Cabinets 2 Years Later Kylie M Interiors

Gorgeous Kitchen Makeover Just By Painting The Cabinets Funcycled

Painting Maple Kitchen Cabinets Benjamin Moore Black Funcycled

Painted Maple Cabinets In A Casual Kitchen Omega

My Dream Kitchen Makeover Before And After Faux To Finish Painted Maple Cabinets Antique White Almond Adde Braune Küchenschränke Küchenumbau Schrank Küche
Related Posts