Can You Change Handles on Kitchen Cupboards? A Comprehensive Guide
Kitchen cupboards are a central element of kitchen design, influencing both functionality and aesthetic appeal. While cabinets themselves represent a significant investment, smaller details, such as handles, contribute significantly to the overall look and feel of the space. Changing these handles can be a cost-effective way to update the kitchen’s style without undertaking a full renovation. This article will explore the feasibility of changing handles on kitchen cupboards, the factors involved, and the steps required to ensure a successful outcome.
The simple answer to the question "Can you change handles on kitchen cupboards?" is generally yes. However, the process isn't always straightforward, and careful consideration must be given to several factors before proceeding. These factors include the existing hole spacing, the type of handle desired, and the material of the cabinet doors and drawers.
Understanding Handle Types and Hole Spacing
Kitchen cabinet handles come in a wide variety of styles and materials, ranging from traditional knobs and pulls to more contemporary designs. The most common types include knobs, which typically require a single mounting hole, and pulls, which require two or more holes. The distance between these holes, known as the "center-to-center" measurement, is a critical factor when selecting replacement handles.
Before purchasing new handles, it is essential to accurately measure the existing hole spacing on the cabinet doors and drawers. This is typically done by measuring the distance between the centers of the existing screw holes. Standard hole spacings are often measured in inches (e.g., 3 inches, 3 3/4 inches, 4 inches), but metric measurements are also common, especially in European-style cabinetry. Using a precise measuring tool, such as a digital caliper or a ruler with clearly marked increments, will ensure accurate measurements.
Once the hole spacing is known, the selection of replacement handles can begin. Ideally, new handles should match the existing hole spacing to avoid the need for drilling new holes, which can be a more complex and demanding task. If a perfect match is not possible, there are several options to consider. One option is to choose handles with adjustable mounting points, which allow for slight variations in hole spacing. Another option is to fill the existing holes and drill new ones, which will be discussed in more detail later in this article.
Furthermore, the style of the handle can impact the perceived hole spacing. For example, a longer pull can visually bridge a slight mismatch in hole spacing, making it less noticeable. Conversely, a small knob might highlight any discrepancies in the placement of the existing hole.
Assessing Cabinet Material and Structural Integrity
The material of the cabinet doors and drawers plays a significant role in the ease and success of changing handles. Common materials include solid wood, wood veneer, laminate, MDF (Medium Density Fiberboard), and metal. Solid wood is generally the easiest material to work with, as it can be easily drilled and filled. However, it’s important to pre-drill pilot holes to prevent splitting the wood, especially near the edges.
Wood veneer and laminate surfaces present a greater challenge, as they are prone to chipping or cracking if not handled carefully. When drilling into these materials, it is crucial to use sharp drill bits and apply gentle pressure. It is also recommended to use painter's tape to protect the surface around the drilling area.
MDF is a composite material that is relatively easy to drill, but it can be prone to swelling if exposed to moisture. Therefore, it is important to seal any newly drilled holes with a suitable sealant or varnish to prevent water damage.
Metal cabinet doors and drawers, while less common in residential kitchens, require specialized tools and techniques for drilling. It is best to consult with a professional for guidance on working with metal cabinetry.
Beyond the surface material, it's also important to assess the structural integrity of the cabinet doors and drawers. If the existing holes are damaged or stripped, the new handles may not be securely attached. In such cases, repairs may be necessary before installing the new handles. This could involve filling the damaged holes with wood filler or epoxy and then drilling new holes.
It is also crucial to consider the thickness of the cabinet doors and drawers when selecting handles. The screws that come with the handles should be long enough to securely fasten the handle without protruding through the back of the door or drawer. If the screws are too long, they can be trimmed or replaced with shorter screws.
Steps for Changing Handles: A Detailed Guide
Changing handles on kitchen cupboards is a task that can be accomplished by most homeowners with basic tools and a moderate level of DIY skill. The following steps provide a detailed guide to the process:
1. Gather the Necessary Tools and Materials: Before starting, gather all the necessary tools and materials. These typically include a screwdriver (or drill with screwdriver bits), a measuring tape or ruler, a pencil, a drill (if needed), drill bits, wood filler (if needed), sandpaper, painter's tape, and of course, the new handles and screws.
2. Remove the Existing Handles: Use a screwdriver or drill to remove the screws holding the existing handles in place. Carefully detach the handles from the cabinet doors and drawers. Place the old handles and screws in a safe place in case you need them later.
3. Measure and Mark the New Hole Locations (If Necessary): If the new handles don't match the existing hole spacing, carefully measure and mark the locations for the new holes. Use a measuring tape or ruler to accurately determine the position of the holes. Use a pencil to mark the spots clearly.
4. Fill the Existing Holes (If Necessary): If you are drilling new holes, fill the existing holes with wood filler or epoxy. Allow the filler to dry completely according to the manufacturer's instructions. Once the filler is dry, sand it smooth with fine-grit sandpaper to create a seamless surface flush with the cabinet door or drawer.
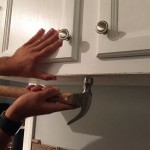
5. Drill New Holes (If Necessary): Using a drill and appropriate drill bit, carefully drill new holes at the marked locations. Start with a small pilot hole to guide the larger drill bit and prevent splintering. Drill slowly and steadily, applying gentle pressure. Ensure that the drill bit is perpendicular to the surface of the cabinet door or drawer.
6. Install the New Handles: Align the new handles with the existing or newly drilled holes. Insert the screws through the back of the cabinet door or drawer and into the handles. Tighten the screws until the handles are securely attached, but avoid over-tightening, which could damage the cabinet material or strip the screw threads. Before tightening completely, make sure the handle is horizontally aligned for best aesthetics. If there are multiple handles on vertical door panels ensure they are aligned in the same plane using a level.
7. Test and Adjust: Once all the handles are installed, test them to ensure they are securely attached and function properly. Check for any loose screws or misalignments. Make any necessary adjustments to ensure that the handles are comfortable to use and aesthetically pleasing.
8. Clean Up: Once the handles are fully and securely installed, clean up any debris and dispose of materials correctly. Wipe down the cabinet doors and drawers to remove any dust or fingerprints.
Changing handles on kitchen cupboards is a relatively straightforward DIY project that can significantly enhance the appearance of the kitchen. By carefully considering the factors outlined in this article and following the steps outlined above, homeowners can successfully update their kitchen cabinets without the expense of a full renovation. However, if any uncertainty exists regarding the process, seeking assistance from a qualified professional might be the best available option.

How To Install Cabinet Handles The Home Depot

How To Replace Cabinet Handles Without Damage N Diy Guide 2025

How To Fit A Cupboard Handle

How To Mix And Match Your Kitchen Cabinet Hardware

How To Change Your Cabinet Handles Filling The Old Holes

How To Install Cabinet Handles The Home Depot

Kitchen Revamp On A Budget Goodhomes

How To Change Out Kitchen Cabinet Hardware A Diy Project For The Do It Yourselfer Listy

Best Kitchen Cabinet Hardware 2024

How To Install Cabinet Hardware Ask This Old House
Related Posts