Can You Paint Honey Oak Cabinets? A Comprehensive Guide
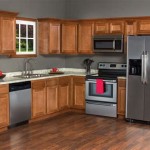
Honey oak cabinets were a popular choice for many homes built in the late 20th century. Characterized by their warm, golden hue and prominent wood grain, they offered a sense of natural beauty and durability. However, as design trends shifted towards brighter, more modern aesthetics, many homeowners find themselves contemplating whether or not to paint their honey oak cabinets. The question is not simply whether it's possible, but rather, whether it's a worthwhile and feasible project, considering cost, time investment, and potential pitfalls.
Painting honey oak cabinets is indeed a viable option for updating a kitchen or bathroom without the expense of a complete renovation. Painting the cabinets breathes new life into the space and gives a refresh. The success of this undertaking, however, hinges largely on meticulous preparation, the selection of appropriate materials, and the application of proper painting techniques. Shortcuts or inadequate preparation can lead to a finish that is prone to chipping, peeling, or an overall unprofessional appearance.
This article will delve into the key factors to consider when painting honey oak cabinets, addressing the challenges posed by the wood's inherent characteristics and outlining the necessary steps to achieve a durable, aesthetically pleasing result. We will explore the importance of proper cleaning and degreasing, the necessity of priming, and the selection of paint types that adhere well to oak's porous surface. Understanding these critical elements will equip homeowners with the knowledge to make informed decisions and execute a successful cabinet painting project.
Key Point 1: The Importance of Preparation
The foundation of any successful paint job, especially when dealing with honey oak cabinets, is thorough preparation. Oak, by its nature, has a pronounced grain pattern and a relatively open pore structure. This characteristic presents two main challenges: the prominent grain can be visible through the paint if not addressed, and the porous surface requires proper sealing to ensure adequate paint adhesion. Neglecting these aspects will compromise the final finish and lead to premature wear and tear.
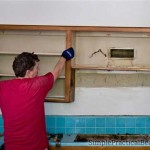
The initial step in preparation involves removing all hardware from the cabinets, including knobs, pulls, hinges, and any other detachable components. This allows for unobstructed access to the entire surface of the cabinet doors and frames, preventing paint buildup around hardware and ensuring a clean, professional look. Each piece of hardware should be carefully labeled and stored in a secure location to avoid loss or confusion during reinstallation.
Next, the cabinets must be thoroughly cleaned to remove any grease, grime, or accumulated dirt. A degreasing cleaner specifically designed for kitchen surfaces should be used, followed by a thorough rinsing with clean water. Stubborn residue can be tackled with a gentle scrubbing pad, taking care not to damage the wood surface. Allowing the cabinets to dry completely after cleaning is paramount, as moisture can impede paint adhesion and lead to blistering or peeling.
After cleaning, it is crucial to assess the existing finish of the oak cabinets. If the cabinets have a glossy or varnished surface, sanding is required to create a "tooth" for the primer to grip onto. Using a medium-grit sandpaper (around 120-150 grit), lightly sand all surfaces to be painted. The goal is not to completely remove the existing finish, but rather to dull it and create a slightly rough texture. After sanding, meticulously remove all sanding dust with a tack cloth or a vacuum equipped with a soft brush attachment. Dust particles left behind will create imperfections in the final paint finish.
Addressing the open grain of oak is a critical step in achieving a smooth, professional finish. This can be accomplished by applying a wood filler or grain filler. These products are designed to fill in the pores of the wood, creating a more uniform surface for painting. The selected filler should be applied according to the manufacturer's instructions, typically involving spreading the filler across the surface and then wiping away the excess with a putty knife or scraper. Multiple applications may be necessary to completely fill the grain. After the filler has dried completely, it should be sanded smooth with fine-grit sandpaper (around 220 grit) before proceeding to priming.
Key Point 2: Selecting the Right Primer and Paint
Choosing the appropriate primer and paint is paramount to the success and longevity of a painted honey oak cabinet project. The primer acts as a crucial intermediary between the oak surface and the paint, providing adhesion, blocking stains, and creating a uniform base for the topcoat. The paint, in turn, provides the desired color and finish while protecting the underlying wood. Selecting the correct combination of primer and paint that is compatible with each other and suitable for use on wood is very important.
For honey oak cabinets, an oil-based or shellac-based primer is generally recommended. These primers excel at blocking the tannins present in oak, which can bleed through water-based primers and cause discoloration in the topcoat. Oil-based primers offer excellent adhesion and create a durable base, while shellac-based primers dry quickly and are particularly effective at sealing stains and odors. When selecting a primer, it is essential to check the manufacturer's specifications to ensure compatibility with the chosen paint.
The application of the primer should be done carefully and evenly. Using a high-quality brush or a paint sprayer, apply a thin, consistent coat of primer to all surfaces. Avoid applying too much primer at once, as this can lead to drips and runs. Allow the primer to dry completely according to the manufacturer's instructions, which may vary depending on the product and environmental conditions. After the primer has dried, lightly sand it with fine-grit sandpaper (around 320 grit) to smooth out any imperfections and create an even better surface for the paint to adhere to.
When selecting paint for honey oak cabinets, both latex (water-based) and alkyd (oil-based) options are available. Latex paints are generally preferred for their ease of use, low odor, and quick drying time. They also offer good durability and are resistant to chipping and scratching. Alkyd paints, on the other hand, provide a harder, more durable finish and are often preferred for high-traffic areas like kitchens. However, alkyd paints have a stronger odor, require longer drying times, and necessitate the use of solvents for cleanup.
Regardless of whether latex or alkyd paint is chosen, it is crucial to select a high-quality product specifically formulated for use on cabinets. These paints typically have a higher solids content, which provides better coverage and durability. Semi-gloss or satin finishes are generally recommended for cabinets, as they offer a good balance of durability and ease of cleaning. A flat or matte finish is generally not recommended for cabinets, as they are more difficult to clean and tend to show fingerprints and smudges.
Applying the paint in thin, even coats is essential for achieving a professional-looking finish. Multiple thin coats are always preferable to one thick coat, as thick coats are more prone to dripping, running, and sagging. Allow each coat of paint to dry completely before applying the next, and lightly sand between coats with fine-grit sandpaper to remove any imperfections and create a smooth surface. Depending on the color and opacity of the paint, two or three coats may be necessary to achieve full coverage.
Key Point 3: Application Techniques and Achieving a Smooth Finish
Even with the right preparation and materials, the success of painting honey oak cabinets ultimately depends on the application techniques employed. Achieving a smooth, flawless finish requires careful attention to detail and the use of appropriate tools. The choice between using a brush, roller, or paint sprayer will significantly impact the final appearance of the cabinets.
Brushes are a versatile option for painting cabinets, particularly for intricate details and hard-to-reach areas. When using a brush, select a high-quality synthetic brush with fine bristles. Load the brush with a moderate amount of paint, avoiding over-saturation which can lead to drips and runs. Apply the paint in long, even strokes, following the direction of the wood grain. Avoid applying too much pressure, as this can cause the brush bristles to splay and leave unsightly brush marks. After each stroke, lightly feather the edges to blend the paint seamlessly with the surrounding area.
Rollers can be used to paint larger, flat surfaces more quickly and efficiently. When using a roller, select a high-density foam roller with a short nap. These rollers create a smoother finish than traditional nap rollers. Load the roller with a moderate amount of paint, being careful not to over saturate it. Apply the paint in a "W" or "M" pattern, overlapping each stroke slightly. After applying the paint, use a light touch to "lay off" the paint, which involves gently rolling over the surface in one direction to create a smooth, even finish. Avoid pressing too hard on the roller, as this can create a textured finish.
Paint sprayers offer the potential to achieve the smoothest, most professional-looking finish on cabinets. However, they also require more skill and experience to operate effectively. When using a paint sprayer, select a model that is appropriate for the type of paint being used. Before spraying the cabinets, practice on a piece of scrap wood to adjust the sprayer's settings and become familiar with the spraying technique. Hold the sprayer approximately 6-8 inches from the surface of the cabinets and move it in a smooth, even motion, overlapping each stroke slightly. Avoid spraying too much paint at once, as this can lead to runs and sags. Multiple thin coats are always preferable to one thick coat.
Regardless of the application method chosen, careful attention to detail is crucial for achieving a smooth finish. Pay close attention to edges, corners, and other hard-to-reach areas. Use a small brush to touch up any imperfections or areas that were missed. After each coat of paint has dried, inspect the surface carefully for any drips, runs, or other imperfections. Use fine-grit sandpaper to smooth out any imperfections before applying the next coat of paint.
Once the final coat of paint has dried completely, allow the cabinets to cure for several days before reinstalling the hardware and reattaching the doors and drawers. This will allow the paint to fully harden and become more resistant to chipping and scratching. When reinstalling the hardware, use new screws if necessary to ensure a secure fit. Take care not to over-tighten the screws, as this can damage the paint finish.

Exactly How To Paint Oak Cabinets Written By A Pro Painted Kayla Payne

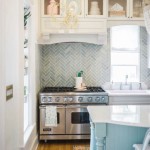
Glossy White Paint On Honey Oak Kitchen Cabinets Before After

Diy Painted Oak Kitchen Cabinets Makeover

From To Great A Tale Of Painting Oak Cabinets

Painted Wood Cabinets Vs Stained A Questionnaire Kylie M Interiors

How To Paint Oak Cabinets And Hide The Grain Tutorial

Paint Colors To Go With Honey Oak Trim Cabinets West Magnolia Charm

Glossy White Paint On Honey Oak Kitchen Cabinets Before After

The Best Wall Paint Colors To Go With Honey Oak True Design House

Kitchen Cabinets Leave Honey Oak Or Paint White Mocked Up Photo Included
Related Posts