Can You Paint Your Kitchen Cabinets Yourself? A Comprehensive Guide
Painting kitchen cabinets is a cost-effective method to revitalize a kitchen's aesthetics without incurring the expense of a full remodel. The question of whether this is a feasible do-it-yourself (DIY) project depends on various factors, including the homeowner's skill level, the condition of the existing cabinets, and the desired finish quality. This article delves into the process, offering a comprehensive overview of the considerations and steps involved in painting kitchen cabinets successfully.
Assessing the Feasibility of a DIY Cabinet Painting Project
Before embarking on the task of painting kitchen cabinets, a thorough assessment of the current situation is crucial. This involves evaluating the condition of the existing cabinets, the type of material they are made of, and the desired outcome of the painting project.
The condition of the cabinets significantly impacts the preparatory work required. Cabinets with extensive damage, such as peeling veneer, deep scratches, or significant water damage, may require more extensive repairs before painting. Warped doors or drawers might necessitate replacement rather than repair, adding to the overall project cost and complexity.
The material of the cabinets dictates the appropriate preparation techniques and paint products to use. Solid wood cabinets generally require sanding and priming to ensure proper adhesion. Laminate or melamine cabinets, on the other hand, often require specialized primers designed for non-porous surfaces. Understanding the cabinet material is critical to achieving a durable and professional-looking finish.
Consideration must also be given to the desired final result. A simple refresh with a single coat of paint might be achievable for a novice DIYer. However, achieving a high-end, factory-like finish typically requires more advanced techniques, specialized equipment, and a higher level of expertise.
Furthermore, the homeowner must realistically assess their own skillset and time availability. Painting cabinets is a time-consuming process that requires patience, attention to detail, and a willingness to learn. If the homeowner lacks experience with painting or woodworking, it might be prudent to consider hiring a professional.
The Essential Steps Involved in Painting Kitchen Cabinets
The process of painting kitchen cabinets involves several crucial steps, each contributing to the final outcome. Neglecting any of these steps can compromise the quality and durability of the painted finish.
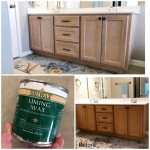
1. Preparation: This is arguably the most critical step. Begin by removing all cabinet doors and drawers. Label each door and drawer with its corresponding cabinet location to ensure proper reinstallation. Remove all hardware, such as knobs, pulls, and hinges. Clean the cabinet surfaces thoroughly with a degreaser to remove grease, grime, and any residue. Fill any holes or imperfections with wood filler and sand smooth. Caulk any gaps or seams for a seamless finish.
2. Sanding: Sanding is essential to create a surface that the primer and paint can adhere to. Use a medium-grit sandpaper (e.g., 120-grit) to scuff sand the surfaces. For laminate or melamine cabinets, use a finer grit sandpaper (e.g., 220-grit) to avoid damaging the surface. After sanding, wipe down the surfaces with a tack cloth to remove all dust.
3. Priming: Apply a high-quality primer to all cabinet surfaces. Primer provides a uniform base for the paint and helps to block stains and prevent bleed-through. For cabinets made of wood, use a wood primer. For laminate or melamine cabinets, use an adhesive primer specifically designed for non-porous surfaces. Allow the primer to dry completely according to the manufacturer's instructions.
4. Painting: Choose a paint specifically designed for cabinets, such as acrylic enamel or alkyd enamel. These paints offer durability and a smooth, washable finish. Apply the paint in thin, even coats using a high-quality brush, roller, or sprayer. Allow each coat to dry completely before applying the next. Multiple thin coats are preferable to one thick coat, which can lead to drips and imperfections.
5. Finishing: After the final coat of paint has dried, consider applying a clear topcoat for added protection and durability. Polyurethane or acrylic topcoats are commonly used for cabinets. Apply the topcoat in thin, even coats, allowing each coat to dry completely before applying the next. Once the topcoat is dry, reassemble the cabinets, reinstall the hardware, and enjoy the newly painted kitchen.
Tools and Materials Required for Cabinet Painting
Having the right tools and materials is essential for a successful cabinet painting project. Investing in quality supplies will contribute to a better finished product and a more efficient workflow. Below is a list of essential tools and materials:
Tools:
- Screwdrivers (for removing hardware)
- Sandpaper (various grits)
- Sanding block or orbital sander
- Tack cloth
- Paintbrushes (various sizes and angles)
- Paint rollers (foam or microfiber)
- Paint trays
- Painter's tape
- Drop cloths or plastic sheeting
- Safety glasses
- Respirator or dust mask
- Caulk gun
- Putty knife
- Spray gun (optional, for a smoother finish)
Materials:
- Degreaser or cleaning solution
- Wood filler
- Caulk
- Primer (appropriate for the cabinet material)
- Paint (cabinet-grade acrylic enamel or alkyd enamel)
- Clear topcoat (polyurethane or acrylic)
- Paint thinner or mineral spirits (for cleaning brushes and equipment)
- Rags or paper towels
The selection of appropriate paint is critical for achieving a durable and aesthetically pleasing result. Acrylic enamel paints offer excellent durability, water resistance, and are relatively easy to clean. Alkyd enamel paints provide a harder, more durable finish but require mineral spirits for cleanup and may have a stronger odor. The choice between the two depends on the homeowner's preferences and project requirements.
Furthermore, the quality of brushes and rollers directly impacts the smoothness and evenness of the paint application. Investing in high-quality brushes and rollers will minimize brushstrokes and roller marks, resulting in a more professional-looking finish. Foam rollers are particularly well-suited for applying paint to smooth surfaces like laminate or melamine, while microfiber rollers are a good choice for wood cabinets.
Proper ventilation is also crucial when working with paints and finishes. Ensure adequate ventilation in the workspace by opening windows and using fans. Wear a respirator or dust mask to protect against inhaling harmful fumes and dust particles.
By carefully selecting the appropriate tools and materials and adhering to proper safety precautions, the homeowner can significantly increase their chances of achieving a successful and satisfying cabinet painting project.
Ultimately, the decision of whether to paint kitchen cabinets oneself depends on a combination of factors, including skill level, time commitment, and desired quality. A realistic assessment of these factors is essential before embarking on the project.

How To Prep And Paint Kitchen Cabinets Lowe S

How To Paint Kitchen Cabinets In 7 Simple Steps

How To Paint Kitchen Cabinets Without Sanding Or Priming

Diy Painting Your Kitchen Cabinets The Right Way

How To Paint Kitchen Cabinets A Step By Guide Confessions Of Serial Do It Yourselfer
How To Paint Kitchen Cabinets In 7 Simple Steps

The Best Way To Paint Kitchen Cabinets No Sanding Palette Muse

20 Diy Painted Kichen Cabinet Ideas A Cultivated Nest

How To Paint Kitchen Cabinets Best Color Ideas Cost

How To Paint Kitchen Cabinets Best Color Ideas Cost