Can You Spray Paint A Kitchen? A Comprehensive Guide
The kitchen, often considered the heart of the home, frequently undergoes renovations to reflect changing tastes and functional needs. Replacing kitchen cabinets and other fixtures can represent a significant financial investment. Consequently, homeowners often explore alternative, more budget-friendly options to revitalize their kitchen's aesthetic. Spray painting, utilizing spray paint as the primary coating, emerges as a viable solution for transforming kitchen elements, especially cabinets. This article provides a comprehensive overview of spray painting a kitchen, outlining its feasibility, benefits, necessary preparations, paint selection, application techniques, and potential challenges.
Spray painting, in essence, involves applying a thin, even layer of paint via an aerosol can or a spray gun. This process offers several advantages over traditional brush or roller applications. The smooth, consistent finish achieved through spray painting is often difficult to replicate with manual methods. Furthermore, spray painting can expedite the painting process, particularly when dealing with intricate designs or detailed surfaces. Spray paint also adheres effectively to a variety of materials commonly found in kitchens, including wood, laminate, and metal, making it a versatile option for diverse kitchen renovation projects.
Key Point 1: Evaluating the Suitability of Spray Painting for Your Kitchen
Before embarking on a spray painting project, it is crucial to assess whether this method is suitable for the specific components of your kitchen and the desired outcome. Several factors influence the suitability of spray painting, including the material of the cabinets, the existing finish, the overall condition of the surfaces, and the homeowner's skill level.
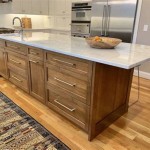
Cabinets constructed from solid wood, particularly those with intricate profiles or raised panel designs, are generally excellent candidates for spray painting. The fine mist produced by spray paint can effectively reach into crevices and contours, providing uniform coverage. Laminate cabinets can also be successfully spray painted, but proper surface preparation is paramount to ensure adequate adhesion. Metal components, such as cabinet hardware or range hoods, can be effectively spray painted after thorough cleaning and priming.
The existing finish on the cabinets plays a significant role in determining the success of spray painting. A smooth, well-adhered existing finish simplifies the preparation process. However, if the existing finish is peeling, cracking, or otherwise damaged, it must be properly addressed before applying spray paint. This typically involves removing the loose finish, sanding the surface to create a smooth substrate, and applying a primer to promote adhesion.
The overall condition of the surfaces significantly affects the final result. Any imperfections, such as dents, scratches, or gouges, will be visible through the spray paint. Therefore, it is essential to repair these imperfections before painting. Wood filler can be used to fill dents and gouges, while sanding can address scratches and minor surface irregularities. Proper surface preparation is the cornerstone of a successful spray painting project.
The homeowner’s skill level is the final, but crucially important, consideration. Spray painting requires a steady hand, consistent application technique, and an understanding of how to control the spray pattern and distance. Novice spray painters should practice on a less conspicuous surface before tackling the kitchen cabinets. Improper technique can result in runs, drips, orange peel texture, or uneven coverage. If unsure, it may be prudent to consult with a professional painter.
Key Point 2: Essential Preparations for Spray Painting a Kitchen
Thorough preparation is absolutely crucial for achieving a professional-looking finish when spray painting a kitchen. This stage is often more time-consuming than the actual painting itself, but it is essential for ensuring proper adhesion, preventing overspray, and creating a clean and organized work environment.
The first step involves removing all hardware from the cabinets, including knobs, pulls, hinges, and handles. These items should be stored in a safe place to prevent loss or damage. If certain hardware is not easily removable, it should be carefully masked off with painter's tape. Drawers and cabinet doors should be removed from their frames to facilitate easier access and ensure uniform coverage. Labeling each drawer and door with its corresponding location is highly recommended to simplify reinstallation.
The next step involves meticulously cleaning all surfaces to be painted. Grease, grime, and other contaminants can prevent proper paint adhesion. A degreasing cleaner, such as trisodium phosphate (TSP), can be used to remove stubborn grease. After cleaning, the surfaces should be thoroughly rinsed with clean water and allowed to dry completely. Sanding is the next imperative step. Sanding creates a "tooth" or slightly roughened surface that allows the primer and paint to bond effectively. A medium-grit sandpaper (e.g., 220-grit) is typically adequate for most surfaces. For glossy surfaces, a coarser grit sandpaper (e.g., 180-grit) may be necessary to break the sheen. After sanding, all surfaces should be wiped down with a tack cloth to remove any remaining dust.
Masking is a critical step to protect surrounding areas from overspray. Painter's tape and masking paper or plastic sheeting should be used to cover countertops, appliances, walls, floors, and any other surfaces that are not being painted. It is important to use high-quality painter's tape that will not leave residue or damage the existing finish. Overlap the tape slightly to ensure complete coverage. Creating a spray booth, even a temporary one using plastic sheeting, can help contain overspray and minimize cleanup. Adequate ventilation is also crucial when spray painting. Open windows and doors, and use fans to circulate air. A respirator is essential to protect against inhaling paint fumes.
Key Point 3: Selecting the Right Spray Paint and Applying It Effectively
Choosing the correct type of spray paint is paramount for achieving the desired aesthetic and durability. Various spray paint formulations are available, each with its own unique properties and applications.
For kitchen cabinets, enamel-based paints are generally preferred due to their durability and resistance to chipping and scratching. Acrylic enamel paints offer good adhesion, color retention, and ease of cleaning. Oil-based enamel paints provide exceptional durability and a smooth, glossy finish, but they require longer drying times and more rigorous cleanup. Latex-based paints are generally not recommended for kitchen cabinets due to their lower durability and susceptibility to moisture damage.
Primer is essential for ensuring proper adhesion and creating a uniform surface for the paint to adhere to. A high-quality primer will also help to block stains and prevent bleed-through from the existing finish. An oil-based primer is generally recommended for wood cabinets, while a bonding primer is suitable for laminate or metal surfaces. Apply the primer in thin, even coats, allowing each coat to dry completely before applying the next. Lightly sand the primed surface with fine-grit sandpaper (e.g., 320-grit) to create an even smoother surface for the paint.
When applying the spray paint, hold the can or spray gun approximately 8-10 inches from the surface. Use a smooth, sweeping motion, overlapping each stroke slightly to ensure uniform coverage. Avoid holding the can or spray gun in one place for too long, as this can cause runs and drips. Apply thin, even coats, allowing each coat to dry completely before applying the next. Multiple thin coats are always preferable to one thick coat. Refer to the manufacturer's instructions for specific drying times and re-coat windows. Pay particular attention to edges, corners, and crevices, ensuring that these areas are adequately coated. After applying the final coat of paint, allow it to dry completely before reinstalling the hardware and reassembling the cabinets. A clear topcoat can be applied to enhance durability and provide additional protection against scratches and stains. This is particularly recommended for high-traffic areas, such as around the sink and stove.
Spray painting a kitchen is a viable and cost-effective way to refresh the appearance of cabinets and other fixtures. However, achieving professional-quality results requires careful planning, meticulous preparation, and proper application techniques. By following the steps outlined in this article, homeowners can successfully transform their kitchen with spray paint, creating a space that is both beautiful and functional. Thoroughness in preparation and execution is key to the success of this endeavor.

3 Ways To Spray Kitchen Cabinets In The Sprayworks

Kitchen Spray Painting The Facelift Company

Kitchen Spray Painting Decorative Paint Cupboard

What Is The Best Spray Paint On Kitchen Cabinets

How To Paint Kitchen Cabinets With A Gun Painttech Training Academy

Kitchen Respray Or Replacement Upvc Spray Painting Services

Want To Find Out How Spray Paint Kitchen Cabinets Like A Pro

Can You Spray Paint Cabinets First Home Love Life

Kitchen Spray Painting The Facelift Company

Are Painted Kitchen Cabinets Durable Spray Painting
Related Posts