Frenchic Paint: A Comprehensive Guide for Kitchen Cabinet Transformations
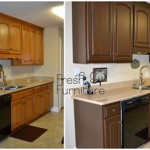
Transforming your kitchen cabinets with Frenchic paint is a popular DIY project that can breathe new life into your space. Frenchic is an eco-friendly and durable furniture paint known for its ease of application and beautiful finishes. However, before you embark on this project, it's crucial to understand the essential aspects of using Frenchic paint on kitchen cabinets.
1. Surface Preparation: The Key to Success
Thorough surface preparation is paramount for a successful paint job. Begin by thoroughly cleaning the cabinets with a degreasing cleaner to remove any dirt, grease, or debris. Next, inspect the surfaces for any imperfections or damage. Fill any holes or cracks with wood filler, allowing it to dry completely.
Sanding is an essential step to create a smooth base for the paint. Use a fine-grit sandpaper (120 or finer) to lightly sand the surfaces in the direction of the wood grain. This will remove any rough edges or imperfections and enhance paint adhesion.
2. Choosing the Right Frenchic Paint Finish
Frenchic offers a range of paint finishes to suit different preferences. For kitchen cabinets, Frenchic Alfresco is a highly durable water-based paint, ideal for areas prone to wear and tear. It is available in a wide range of colors to match any kitchen decor.
If you prefer a chalky finish, Frenchic Chalk Paint is a popular choice. It is highly pigmented and provides excellent coverage. However, it is slightly less durable than Alfresco and may require additional protection in high-traffic areas.
3. Application Techniques for a Flawless Finish
Frenchic paint is versatile and can be applied using various techniques. A foam roller is recommended for smooth and even application on large surfaces. For detailed areas or intricate designs, a brush can be used.
Apply thin coats of paint, allowing each coat to dry completely before applying the next. For optimal durability, it's recommended to apply 2-3 coats of paint, especially for areas subject to frequent use.
4. Distressing and Finishing Touches
If desired, you can distress the painted surfaces to create a vintage or aged look. Use a fine-grit sandpaper or a sanding sponge to lightly sand the edges or corners, exposing the underlying paint color.
For a protective finish, apply a clear topcoat such as Frenchic Finishing Coat. This will help seal the paint and enhance its durability, especially in areas prone to wear and moisture.
5. Maintenance and Care: Preserving Your Masterpiece
To ensure the longevity of your freshly painted cabinets, proper maintenance is crucial. Clean the surfaces regularly with a mild detergent and a soft cloth. Avoid using harsh cleaning products or abrasive sponges.
If any damage or wear occurs, touch up the affected areas with matching Frenchic paint. It's always a good idea to keep a small amount of leftover paint for future maintenance purposes.
Conclusion: Transform Your Kitchen with Frenchic Paint
Using Frenchic paint on kitchen cabinets is a rewarding DIY project that can dramatically enhance the aesthetics and functionality of your space. By following these essential aspects, you can achieve a professional-looking finish that will last for years to come. Embrace the transformation and enjoy your newly refreshed kitchen!

Cool Beans Kitchen Makeover

She S A Gentry Diy Diaries The Kitchen Edit With Frenchic Paint

Stormy Kitchen Transformation Inspiration Frenchic

Frenchic Diy Kitchen Makeover On A Budget With Al Fresco Chalk Paint Doodledash Vintage Home

She S A Gentry Diy Diaries The Kitchen Edit With Frenchic Paint

Dazzle Me Dazzling White Al Fresco Furniture Paint Frenchic

Frenchic Furniture Paint On Instagram Monday Makeover Who Doesn T Love A Before And After Kitchen Diy Upcycle Inspirations

I Transformed My Dated And Boring White Kitchen For Just 260 Using Frenchic Paint Clever Diy S Taught Myself The Sun

Kitchen Storage Cabinet Upcycle With Frenchic Paint

Hornblower Kitchen Makeover Inspiration Frenchic
Related Posts


