Chalk Paint On High Gloss Kitchen Cabinets: Exploring the Essentials
Transforming high-gloss kitchen cabinets with chalk paint can revitalize their appearance and create a unique aesthetic. However, specific preparations and techniques are crucial for achieving a successful result. This article will guide you through the essential aspects of chalk painting high-gloss kitchen cabinets, ensuring a lasting and satisfying outcome.
Surface Preparation:
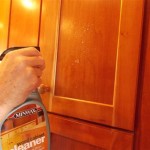
Thoroughly clean the cabinets with a degreaser to remove dirt and grease. Sanding is vital to create a rough surface texture that enhances paint adhesion. Use fine-grit sandpaper (e.g., 220 grit) to gently sand the high-gloss surface, focusing on edges and corners. Wipe away sanding dust with a tack cloth.
Primer Selection:
Applying a primer is essential for creating a smooth and uniform surface. Choose a bonding primer specifically designed for high-gloss surfaces. Brush or roll on the primer evenly, ensuring it covers the entire surface. Allow ample time for the primer to dry according to the manufacturer's instructions.
Paint Selection:
Opt for high-quality chalk paint that provides excellent coverage and durability. Select a color that complements your kitchen decor and desired style. Chalk paint is available in various finishes, such as matte, satin, or distressed. Choose the finish that best suits your preferences.
Painting Technique:
Brush or roll on the chalk paint in thin, even coats. Start with light strokes and use a light touch to avoid disturbing the primer. Allow each coat to dry completely before applying the next. The number of coats required depends on the desired coverage and opacity. Lightly sand between coats with fine-grit sandpaper to smooth the surface.
Finishing Touches:
Once the paint is dry, apply a clear wax or polyurethane finish to protect the surface and enhance its durability. This layer will also give the finish a subtle sheen or matte effect. Use a soft cloth to apply the finish in thin, even strokes, and gently buff it to a desired shine. Allow the finish to cure thoroughly before using the cabinets.
By following these essential aspects, you can successfully transform your high-gloss kitchen cabinets with chalk paint. With careful preparation, high-quality materials, and precise painting techniques, you can achieve a stunning and durable cabinet makeover that will add charm and character to your kitchen.

Painting Kitchen Cabinets With Chalk Paint Simply Today Life

Chalk Paint Kitchen Cabinets 2 Amazing Before Afters And How To The Interiors Addict

Chalk Painted Kitchen Cabinets 2 Years Later Our Storied Home

Why I Repainted My Chalk Painted Cabinets Sincerely Sara D Home Decor Diy Projects

Chalk Painted Kitchen Cabinets 2 Years Later Our Storied Home

Why I Repainted My Chalk Painted Cabinets Sincerely Sara D Home Decor Diy Projects

My Chalk Painted Cabinets 4 Years Later How Did They Do Artsy Rule

Chalk Painted Kitchen Cabinets 2 Years Later Our Storied Home

Painting Kitchen Cabinets With Chalk Paint Simply Today Life

Chalk Painted Kitchen Cabinets 2 Years Later Our Storied Home
Related Posts