Changing Kitchen Cabinet Colors: A Comprehensive Guide
Updating kitchen cabinets is a common home improvement project that can significantly transform the look and feel of a kitchen. Rather than replacing cabinets entirely, which can be a costly and disruptive undertaking, changing the cabinet colors offers a more economical and less invasive alternative. This article provides a detailed explanation of the process, covering various aspects from preparation and material selection to application and maintenance.
Understanding the Scope of the Project
Before commencing any work, a thorough assessment of the existing cabinets is crucial. This involves evaluating the cabinet material (wood, laminate, metal), the existing finish (paint, stain, varnish), and the overall condition of the cabinets. Identifying any damage, such as scratches, dents, or warping, is essential as these will need to be addressed during the preparation phase. Furthermore, understanding the construction of the cabinets, including door style (raised panel, flat panel, shaker), hinges, and hardware, is important for determining the best approach for painting or staining.
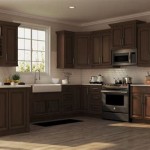
The choice of color is paramount to achieving the desired aesthetic. Consider the overall style of the kitchen and the surrounding décor. Lighter colors can create a brighter and more spacious feel, while darker colors can add depth and sophistication. It's also important to consider the existing countertops, backsplash, and flooring, ensuring the new cabinet color complements these elements. Sampling different paint or stain colors in the kitchen environment is highly recommended to visualize the final result under various lighting conditions.
Budgetary considerations also play a vital role in the project's scope. The cost of materials, including paint, primer, brushes, rollers, sandpaper, and cleaning supplies, needs to be factored in. If professional assistance is required, the cost of labor should also be included. Obtaining quotes from multiple contractors is advised to ensure a competitive price. Additionally, consider the time commitment involved. This type of project, especially for a larger kitchen, can span multiple days or even weeks, depending on the complexity and drying times.
Preparation: The Foundation for a Flawless Finish
Proper preparation is arguably the most important step in achieving a professional-looking finish. This process involves several key stages, each designed to ensure optimal adhesion and a smooth, even surface.
The first step is to remove all cabinet doors, drawers, and hardware, including hinges, knobs, and pulls. Labeling each door and drawer with its corresponding location is crucial to ensure proper reinstallation. This can be done using painter's tape and a permanent marker. The hardware should be stored in a safe place to prevent loss or damage. This separation allows for individual attention to each component, making the process easier.
Next, thoroughly clean all cabinet surfaces to remove any dirt, grease, or contaminants. A degreasing cleaner is recommended for removing grease buildup, particularly around the stove and sink areas. Rinse the surfaces with clean water and allow them to dry completely. For heavily soiled cabinets, a more aggressive cleaning solution may be necessary. The cleanliness will significantly impact the paint adherence.
Sanding is a critical step in preparing the surface for paint or stain. Use a medium-grit sandpaper (120-150 grit) to lightly sand all surfaces, creating a slightly rough texture that promotes adhesion. For cabinets with a glossy finish, more aggressive sanding may be required to remove the sheen. After sanding, wipe down all surfaces with a tack cloth to remove any sanding dust. This is an essential step that ensures the paint doesn’t have any imperfections.
If the cabinets have any dents, scratches, or imperfections, these should be filled with wood filler or spackle. Allow the filler to dry completely according to the manufacturer's instructions, and then sand it smooth with fine-grit sandpaper (220 grit). Priming is a crucial step to create a consistent surface for the topcoat, especially when painting over dark colors or stains. Apply a coat of high-quality primer formulated for the cabinet material, allowing it to dry completely before proceeding. Priming also ensures the final color is correct and even.
Application Techniques and Material Selection
The choice of paint or stain and the application method can significantly impact the final result. Different types of paints and stains offer varying levels of durability, sheen, and ease of application.
For painting cabinets, acrylic latex paint is a popular choice due to its durability, ease of cleaning, and low VOC (volatile organic compounds) content. Oil-based paints offer a harder, more durable finish, but they have a longer drying time and require mineral spirits for cleanup. Consider using enamel paint specifically designed for cabinets for increased durability and resistance to chipping and scratching. The selection of the paint affects long term wear.
For staining cabinets, oil-based stains penetrate deeper into the wood, providing a richer color and a more durable finish. Water-based stains are easier to clean up and have a lower VOC content, but they may not be as durable as oil-based stains. Gel stains are a good option for cabinets with a non-porous surface, such as laminate, as they sit on top of the surface rather than penetrating it. Stains alter the wood grain in a natural way unlike paint.
The application method depends on personal preference and the desired finish. Brushes and rollers are suitable for smaller projects and can provide a smooth, even finish with proper technique. Spraying using a paint sprayer offers a faster and more efficient application, especially for larger projects and intricate door styles. However, spraying requires more preparation, including masking off surrounding areas to prevent overspray. Regardless of the chosen method, applying thin, even coats is crucial to prevent drips and runs. Multiple coats are generally required to achieve full coverage and a durable finish. Sanding lightly between coats with fine-grit sandpaper can further enhance the smoothness of the final result. Always allow each coat to dry completely before applying the next.
Once the paint or stain is fully dry, apply a clear topcoat to protect the finish and enhance its durability. Polyurethane is a popular choice for its durability and resistance to water and scratches. Water-based polyurethane is a good option for its low VOC content and ease of cleanup. Apply the topcoat in thin, even coats, allowing each coat to dry completely before applying the next. Lightly sand between coats with fine-grit sandpaper for an exceptionally smooth finish. The top coat protects the color and finish for years to come.
Reassembly and Hardware Installation
After the paint or stain and topcoat have completely dried, the cabinets can be reassembled. This involves reinstalling the doors, drawers, and hardware. Before reassembling, inspect all components for any damage or imperfections that may have occurred during the project. Touch up any areas as needed before proceeding.
Reinstall the hinges on the cabinet doors and then reattach the doors to the cabinet frames. Ensure the doors are aligned properly and that they swing freely. Adjust the hinges as needed to achieve a perfect fit. Reinstall the drawer slides and then reinsert the drawers into the cabinet frames. Ensure the drawers slide smoothly and that they are properly aligned. This is a critical step that takes patience.
Install the new or existing hardware, including knobs, pulls, and handles. Ensure the hardware is securely attached and that it is aligned properly. If installing new hardware, consider using a template to ensure consistent placement across all cabinets and drawers. The hardware is the “jewelry” of the cabinets, adding a finishing touch. After the hardware is installed, perform a final inspection of all cabinets and drawers to ensure everything is functioning properly. Address any issues or adjustments as needed. Clean the cabinets with a soft cloth and a mild cleaner to remove any dust or fingerprints. Avoid using harsh chemicals or abrasive cleaners, as these can damage the finish.
The successful transformation of kitchen cabinets through color change hinges on meticulous planning, thorough preparation, careful application, and precise reassembly. By adhering to these principles, homeowners can achieve a professional-looking finish that enhances the aesthetic appeal and value of their kitchens.

Quick Guide On How You Can Change Color Effects Of The Kitchen

Kitchen Cabinet Refinishing Cabinets Colors

Change The Material Or Color On Kitchen Cabinets And Countertops Roomsketcher Help Center

How To Paint Kitchen Cabinets Like The Pros

Cabinet Color Change N Hance Of Lowcountry

The Best Ways To Change Color Of My Cabinets

14 Kitchen Cabinet Color Combinations To Try

Kitchen Cabinet Colors For The Modern Homeowner Model Remodel

How To Do It Yourself Kitchen Cabinet Color Change No Stripping And Refinishing

21 Diy Affordable Ways To Redo Kitchen Cabinets Extra Space Storage
Related Posts