The Art of Distressing White Kitchen Cabinets DIY: A Comprehensive Guide
Distressed white kitchen cabinets evoke a timeless charm, adding character and warmth to any space. Achieving this coveted look requires a blend of patience, attention to detail, and a few essential tools. Here's a step-by-step guide to help you create stunning distressed white kitchen cabinets like a pro:
Materials and Tools:
- Paint stripper - Sandpaper (fine and coarse) - TSP cleaner - White paint - Matte polyurethane - Soft cloths - Steel wool - Hammer - Nails - Drywall putty - Putty knife
Step 1: Preparation
Remove all hardware and clean the cabinets thoroughly with TSP cleaner. Protect the surrounding surfaces from paint stripper with plastic sheeting or painter's tape.
Step 2: Stripping the Paint
Apply paint stripper according to the manufacturer's instructions. Let it penetrate and soften the paint. Use a putty knife or paint scraper to remove the softened paint.
Step 3: Sanding
Sand the bare wood with coarse sandpaper to remove any remaining paint or imperfections. Switch to fine sandpaper for a smoother finish.
Step 4: Staining (Optional)
If desired, apply a wood stain to enhance the natural grain and add depth. Allow it to dry completely.
Step 5: Painting
Apply a coat of white paint to the cabinets. Use a刷子 for better control and coverage. Allow the paint to dry completely.
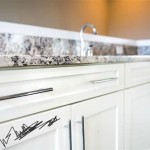
Step 6: Distressing
Use steel wool or sandpaper to lightly distress the edges, corners, and areas that would naturally show wear. This creates a worn and aged look.
Step 7: Hammering
Gently hammer nails into the cabinets to create dents and dings for a more authentic distressed effect. Be careful not to damage the wood.
Step 8: Drywall Putty
Mix drywall putty according to the instructions. Use putty to fill in any dents or holes created by the hammering. Smooth it out with a putty knife.
Step 9: Seal
Apply several coats of matte polyurethane to protect the cabinets and enhance their distressed finish. Allow each coat to dry completely before applying the next.
Step 10: Finishing Touches
Reinstall the hardware and admire your newly distressed white kitchen cabinets. The weathered and charming look will complement any décor style.
Remember, distressing is an art, so experiment with different techniques to create a unique and personalized finish. With careful preparation, attention to detail, and a touch of creativity, you can transform your kitchen cabinets into a focal point of warmth and character.

Rescuing And Reviving A Glazed Distressed Kitchen Bella Tucker

Distressed Kitchen Cabinets How To Distress Your

Kitchen Cabinet Refacing On A Budget Farm Fresh Vintage Finds Distressed Cabinets

Distressed And Antiqued Kitchen Cabinets

Distressed Kitchen Cabinets How To Distress Your

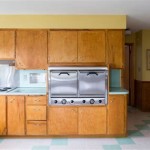
Old Oak Cabinets Painted White And Distressed Hometalk

50 Awesome Kitchen Design Ideas With Painted Cabinet That Looks More Distressed Cabinets Rustic

Rescuing And Reviving A Glazed Distressed Kitchen Bella Tucker

Distressed And Antiqued Kitchen Cabinets

10 Simple Ideas To Update Your Kitchen Cabinets Jenna Sue Design
Related Posts