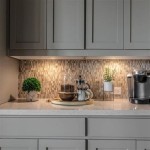
DIY Contact Paper Kitchen Cabinets: A Comprehensive Guide
Transforming the look of your kitchen cabinets without breaking the bank is possible with DIY contact paper. This versatile material provides an affordable and easy solution for updating cabinet doors and drawer fronts, giving your kitchen a fresh and stylish makeover. Here's a comprehensive guide to help you achieve professional-looking results with DIY contact paper kitchen cabinets:
Materials and Tools Required:
- Contact paper in the desired color and pattern
- Measuring tape or ruler
- Scissors or craft knife
- Squeegee or credit card
- Razor blade or sharp utility knife
- Cleaning solution (e.g., rubbing alcohol or window cleaner)
- Clean rags or paper towels
Step-by-Step Guide:
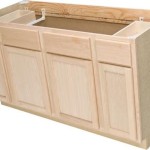
- Prepare the Cabinet Surfaces: Clean the cabinet doors and drawer fronts thoroughly with the cleaning solution and a rag. Allow them to dry completely.
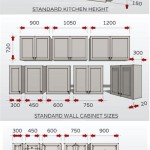
- Measure and Cut the Contact Paper: Measure the width and height of each cabinet door or drawer front. Add a few extra inches to each side for overlapping and trimming. Cut the contact paper accordingly using scissors or a craft knife.
- Peel and Align the Contact Paper: Peel a few inches of the contact paper backing from the top of the cabinet door. Carefully align the contact paper with the top edge and slowly peel the backing while smoothing it down with a squeegee. Continue peeling and smoothing the contact paper until the entire surface is covered.
- Trim Excess Contact Paper: Once the contact paper is applied, use a sharp razor blade or utility knife to trim any excess material around the edges. Be careful not to cut into the cabinet surface.
- Smooth Out Air Bubbles: Use the squeegee to gently press out any air bubbles that may have formed during the application process.
- Finishing Touches: Clean any residue or fingerprints from the contact paper surface with a damp rag. For a more durable finish, apply a top coat of clear sealant, following the manufacturer's instructions.
Tips for Success:
- Choose high-quality contact paper designed for kitchen use, as it will be more resistant to moisture and heat.
- Use a new, sharp razor blade or utility knife for clean, precise cuts.
- Take your time during the application process and avoid rushing.
- If you make any mistakes, simply peel off the contact paper and reapply a new piece.
- Be patient and enjoy the process of transforming your kitchen cabinets.
By following these steps and incorporating these tips, you can achieve stunning DIY contact paper kitchen cabinets that will elevate the look of your kitchen without the hefty cost of a professional remodel.

Diy Contact Paper Kitchen Counters The Interior Diyer

Diy Countertop Cabinet With Only Contact Paper

How To Update Cabinets Using Contact Paper Al Kitchen Makeover Cover

7 Super Fast Mini Makeovers Kitchen Cabinets Makeover Contact Paper Diy

Re Wrapping Kitchen Cabinets With Contact Paper Er Friendly

Diy Contact Paper Kitchen Update Part 1 Cabinets Roaming Home

Diy Contact Paper Kitchen Counters The Interior Diyer

Diy Kitchen Cabinet Makeover For Ers Stars Streetlights

Diy Kitchen Makeover Under 40 Anita Yokota

Amazing Er Friendly Kitchen Makeover On A Budget 150 Easy Diy W Contact Paper Cabinets
Related Posts