DIY Grey Distressed Kitchen Cabinets: A Comprehensive Guide
Distressing kitchen cabinets is a popular method for achieving a rustic, vintage, or farmhouse aesthetic. A grey distressed finish, in particular, offers a versatile and sophisticated look that complements various kitchen styles. This article provides a comprehensive guide on transforming existing kitchen cabinets into stylish grey distressed pieces. It covers the necessary materials, preparation steps, application techniques, and finishing touches required for a successful DIY project.
Before embarking on this project, it's crucial to assess the condition of the existing cabinets. Warped doors, damaged hinges, or severely deteriorated surfaces might require repair or replacement before proceeding with the distressing process. Addressing these issues early will ensure a more professional and long-lasting result. Furthermore, consider the existing hardware. Distressed cabinets often pair well with antique brass, oil-rubbed bronze, or wrought iron hardware. Replacing the hardware can significantly enhance the overall look and complement the distressed finish.
Key Point 1: Preparation is Paramount
Proper preparation is the most critical aspect of any successful painting or distressing project. It ensures optimal paint adhesion and a clean, professional finish. This section outlines the necessary preparation steps for achieving a durable and aesthetically pleasing grey distressed kitchen cabinet.
The first step is thorough cleaning. Remove all hardware, including knobs, pulls, hinges, and any other decorative elements. Use a degreasing cleaner to remove grease, grime, and food splatters from the cabinet surfaces. Lingering grease can prevent paint from adhering properly, leading to peeling or chipping. Rinse the cabinets thoroughly with clean water and allow them to dry completely.
Next, sanding is essential to create a slightly roughened surface that promotes paint adhesion. Use a medium-grit sandpaper (around 120-grit) to lightly sand all surfaces that will be painted. Focus on smoothing any existing imperfections and removing any loose paint or varnish. For cabinets with a glossy finish, more aggressive sanding may be required to dull the sheen. After sanding, thoroughly remove all sanding dust with a tack cloth or a damp cloth. Dust particles can compromise the paint finish and create an uneven texture.
Priming is a crucial step, especially when painting over previously painted or stained surfaces. A high-quality primer provides a uniform base for the paint, seals any existing stains, and enhances paint adhesion. Choose a primer that is compatible with the type of paint you plan to use. Apply a thin, even coat of primer using a brush, roller, or sprayer. Allow the primer to dry completely according to the manufacturer's instructions before proceeding with the painting process. Consider using a tinted primer that is close to the final grey color. This can help to achieve a more consistent color and reduce the number of paint coats required.
Before painting, protect the surrounding area with drop cloths or plastic sheeting. This will prevent paint splatters and protect your floors, countertops, and appliances. Use painter's tape to mask off any areas that you don't want to be painted, such as the inside edges of the cabinet frames or the walls adjacent to the cabinets. Secure the tape firmly to prevent paint from bleeding underneath.
Key Point 2: Applying the Grey Paint and Distressing Techniques
Once the cabinets are properly prepared, the next step is to apply the grey paint and create the distressed effect. Choosing the right paint and employing suitable distressing techniques are crucial for achieving the desired aesthetic.
Selecting the right paint is essential for durability and appearance. Acrylic latex paint is a popular choice for kitchen cabinets due to its durability, ease of application, and water-based cleanup. Choose a paint specifically designed for cabinets and trim, as these paints typically offer better adhesion and resistance to wear and tear. Consider a satin or eggshell finish for a balance between durability and ease of cleaning. A flat or matte finish may be more difficult to clean, while a high-gloss finish can be too reflective and accentuate imperfections.
Apply the grey paint in thin, even coats using a brush, roller, or sprayer. Multiple thin coats are preferable to one thick coat, as this will prevent drips, runs, and an uneven finish. Allow each coat to dry completely according to the manufacturer's instructions before applying the next coat. Depending on the color and opacity of the paint, two or three coats may be necessary for full coverage. Lightly sand between coats with fine-grit sandpaper (around 220-grit) to remove any imperfections and create a smooth surface for the next coat.
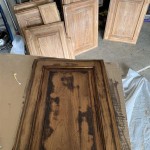
Several techniques can be used to create a distressed effect. Sanding is the most common method. After the paint has dried completely, use medium-grit sandpaper (around 120-grit) to selectively remove paint from areas that would naturally experience wear and tear, such as edges, corners, and around knobs and pulls. Vary the pressure and direction of the sanding to create a natural, random look. Another technique involves using a damp cloth to wipe away paint while it is still wet. This creates a subtle, faded effect, particularly on raised panels or detailed areas. A third technique involves using a chisel or other sharp tool to create small nicks and scratches in the paint. This adds a more rustic, aged appearance.
Experiment with different techniques and combinations to achieve the desired level of distressing. Start with a light touch and gradually increase the effect until you are satisfied. Remember that distressed furniture is meant to look imperfect, so don't be afraid to embrace the flaws and imperfections. Consider using a stencil and a contrasting color to add a decorative element to the distressed cabinets. This can create a unique and personalized look.
Key Point 3: Sealing and Protecting the Finish
After applying the grey paint and distressing techniques, it's essential to seal and protect the finish to ensure durability and longevity. A protective topcoat will prevent the paint from chipping, scratching, or fading over time.
Choose a clear topcoat that is compatible with the type of paint you used. Polyurethane is a popular choice for kitchen cabinets due to its durability and resistance to moisture and stains. Water-based polyurethane is a good option for a low-VOC (volatile organic compounds) finish. Apply the clear topcoat in thin, even coats using a brush, roller, or sprayer. Multiple thin coats are preferable to one thick coat.
Allow each coat to dry completely according to the manufacturer's instructions before applying the next coat. Lightly sand between coats with fine-grit sandpaper (around 320-grit) to remove any imperfections and create a smooth surface for the next coat. Two to three coats of clear topcoat are typically recommended for optimal protection. Consider using a matte or satin finish for the topcoat to maintain a natural, non-glossy look that complements the distressed finish.
Allow the clear topcoat to cure completely before reattaching the hardware and putting the cabinets back into use. Curing time can vary depending on the type of topcoat used, so refer to the manufacturer's instructions for specific recommendations. Once the cabinets are fully cured, reattach the hardware and carefully reinstall the cabinets. Inspect the finished product for any imperfections or areas that may require touch-up. Address any issues promptly to prevent further damage or deterioration.
Proper maintenance is essential for preserving the beauty and durability of the grey distressed kitchen cabinets. Clean the cabinets regularly with a mild soap and water solution. Avoid using harsh chemicals or abrasive cleaners, as these can damage the paint finish. Touch up any chips or scratches promptly to prevent them from spreading. Apply a fresh coat of clear topcoat every few years to maintain the protective barrier and keep the cabinets looking their best.
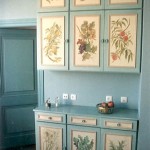
By following these steps, any homeowner can transform their outdated kitchen cabinets into stylish and unique grey distressed pieces. The finished product will not only enhance the aesthetic appeal of the kitchen but also add character and personality to the space. The key to success lies in meticulous preparation, careful application, and proper finishing techniques. With a little patience and effort, achieving a professional-looking result is attainable for anyone willing to undertake this DIY project.

Give Your Kitchen A Whole New Look Without Spending Thousands Of Dollars By Glazing C Cabinets Makeover Glazed Renovation

Distressed Kitchen Cabinets How To Distress Your

Gray Distressed Kitchen Cabinets Funcycled

Grey Distressed Kitchen Cabinets Painting

20 Distressed Kitchen Cabinets You Have To See Hunker

Beautiful Diy Distressed Gray Chalk Paint Furniture Makeover Abbotts At Home

Gray Painted And Distressed Kitchen Meadville Pa Fairfield Custom Kitchens

50 Awesome Kitchen Design Ideas With Painted Cabinet That Looks More Distressed Cabinets Rustic Renovation

Distressed Kitchen Cabinets Pictures Options Tips Ideas

Beautiful Diy Distressed Gray Chalk Paint Furniture Makeover Abbotts At Home
Related Posts