DIY Hanging Kitchen Wall Cabinets: A Comprehensive Guide
Installing kitchen wall cabinets is a significant undertaking that can dramatically enhance the functionality and aesthetics of a kitchen space. While professional installation is an option, a do-it-yourself approach can offer cost savings and a sense of accomplishment. However, successfully hanging kitchen wall cabinets requires careful planning, precise execution, and adherence to safety protocols. This article provides a detailed guide to the DIY process, covering essential considerations and step-by-step instructions.
Planning and Preparation: The Foundation of Success
Before commencing any physical work, a comprehensive plan is crucial. This involves assessing the existing kitchen layout, determining cabinet placement, verifying structural integrity, and procuring necessary tools and materials. Neglecting this preliminary stage can lead to costly errors and project delays.
The initial step is to accurately measure the wall space where the cabinets will be installed. This includes both the width and height available. Consider existing features such as windows, doors, and plumbing fixtures that may impact cabinet placement. Create a detailed diagram illustrating the proposed cabinet configuration. This diagram should include the dimensions of each cabinet and their relative positions. Consider the desired height of the lower edge of the cabinets. A standard height is 18 inches above the countertop, providing ample workspace. However, this can be adjusted based on individual preferences and ergonomic considerations.
Examine the wall structure to ensure it can adequately support the weight of the cabinets, especially when loaded with contents. Locate wall studs using a stud finder. Cabinets should ideally be anchored to studs for maximum stability. If studs are not located in optimal positions, consider using appropriate wall anchors designed for heavy loads. The type of wall (drywall, plaster, concrete) will dictate the appropriate type of anchor. Consult with a hardware professional to select the correct anchors for the specific wall type and anticipated load.
Once the layout is finalized, compile a list of all necessary tools and materials. Essential tools include a stud finder, level (laser level is highly recommended), measuring tape, drill with various drill bits, screwdriver (or drill with screwdriver bits), pencil, safety glasses, and a ladder. Materials include the cabinets themselves, screws (specifically cabinet mounting screws), shims, and a temporary support system (such as a ledger board). It is imperative to acquire high-quality materials and tools to ensure a lasting and secure installation.
Step-by-Step Installation: A Systematic Approach
The installation process requires a systematic and meticulous approach. Each step builds upon the previous one, and accuracy is paramount to achieving a professional-looking and functional result.
Begin by marking the stud locations on the wall. Use the stud finder to locate each stud and mark its center with a pencil. Extend these lines vertically to indicate the stud locations behind where the cabinets will be hung. These marks will serve as crucial reference points for screw placement. It is advisable to double-check the stud locations to minimize the risk of drilling into empty wall space.
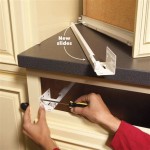
Install a ledger board to provide temporary support for the cabinets during installation. The ledger board is a length of wood (typically a 1x4 or 1x6) attached horizontally to the wall at the desired height of the bottom edge of the cabinets. This board supports the weight of the cabinets while they are being aligned and secured. Use screws to attach the ledger board to the wall studs. Ensure the ledger board is perfectly level, as this will dictate the levelness of the entire cabinet run. A laser level simplifies this process, but a traditional spirit level can also be used.
Carefully lift the first cabinet into place, resting it on the ledger board. Align the cabinet with the marked stud locations. Use shims as needed to ensure the cabinet is perfectly level, both horizontally and vertically. Once the cabinet is level, drill pilot holes through the cabinet's mounting rails and into the wall studs. Secure the cabinet to the studs using cabinet mounting screws. These screws are specifically designed for this purpose, offering superior holding power compared to standard screws.
Install the remaining cabinets, one at a time, following the same procedure. Ensure each cabinet is level and aligned with its adjacent cabinets. As you install each cabinet, clamp it tightly to the adjacent cabinet. This helps maintain consistent spacing and ensures a seamless appearance. Drill pilot holes through the stiles (the vertical framing members) of adjacent cabinets and connect them with screws. This creates a strong and unified cabinet run.
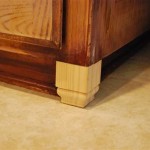
Once all the cabinets are installed and interconnected, remove the ledger board. Inspect the cabinets for any gaps or imperfections. Use caulk to fill any gaps between the cabinets and the wall. If desired, install light rails or other decorative trim to enhance the aesthetic appeal of the installation.
Important Considerations: Safety and Precision
Throughout the installation process, safety and precision are paramount. Failure to adhere to safety protocols can result in injury, while neglecting precision can compromise the structural integrity and aesthetic appeal of the installation.
Always wear safety glasses to protect your eyes from flying debris. When drilling, be aware of the location of electrical wiring and plumbing pipes within the wall. If unsure, consult with a qualified electrician or plumber. Use appropriate personal protective equipment (PPE) such as gloves and a dust mask, especially when working with drywall or other materials that can generate dust.
Double-check all measurements and alignments before drilling or screwing. A slight error can propagate and become magnified as the installation progresses. Use a laser level to ensure cabinets are perfectly level. This is particularly important for long cabinet runs. Employ shims strategically to compensate for any irregularities in the wall surface. Shims should be concealed as much as possible to maintain a professional appearance.
When selecting screws, ensure they are of the appropriate length and type for the application. Cabinet mounting screws should be long enough to penetrate deeply into the wall studs, providing a secure anchor. Avoid over-tightening screws, as this can strip the screw holes and weaken the connection. Use a screw gun with adjustable torque settings to prevent over-tightening.
If encountering unexpected challenges or encountering any doubts about the proper procedure, consult with a qualified professional. It is preferable to seek expert advice rather than risk damaging the cabinets or compromising the safety of the installation. Properly installed kitchen wall cabinets should provide years of reliable service. By adhering to the guidelines outlined in this article and prioritizing safety and precision, homeowners can successfully undertake this DIY project and significantly enhance their kitchen space.

How To Install Kitchen Cabinets Diy Family Handyman

How To Install Cabinets Like A Pro The Family Handyman

Diy Wall Cabinets With 5 Storage Options Plans Fixthisbuildthat

Wall Kitchen Cabinet Basic Carcass Plan Ana White

Installing Kitchen Cabinets Momplex Vanilla Ana White

How To Install Upper Cabinets Like A Pro Cabinetselect Com

How To Install Kitchen Cabinets Installing Building

Wall Units Kitchen Diy Kitchens

How To Build A Cabinet Diy Guide For Beginners Wall Storage Cabinets Kitchen Shelves

How To Build Wall Cabinets Houseful Of Handmade