DIY Kitchen Cabinet Doors Designs: A Guide to Updating Your Space
Kitchen cabinet doors are a significant component of the overall aesthetic of a kitchen. They can drastically alter the look and feel of the space, making it feel outdated or modern, cozy or sleek. Replacing existing cabinet doors can be a costly endeavor, but DIY kitchen cabinet doors offer a budget-friendly and rewarding alternative. With a little creativity, patience, and the right tools, homeowners can transform their kitchen cabinets with custom-designed doors that reflect their personal style and enhance the overall ambiance of the room.
Choosing the Right Design
The first step in any DIY project is planning. Before embarking on creating new cabinet doors, homeowners need to consider the desired style and functionality. There are numerous design options available, each with its own unique advantages and drawbacks. Here are a few popular choices:
- Slab doors: Simple and sleek, slab doors are characterized by a flat, uninterrupted surface and minimal hardware. They provide a modern and minimalist aesthetic, perfect for contemporary kitchens.
- Raised panel doors: These doors feature a raised center panel that adds depth and dimension to the cabinet face. They offer a classic and traditional look, often found in farmhouse or cottage-style kitchens.
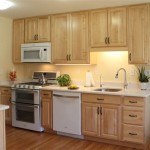
- Shaker doors: Known for their simple yet elegant design, Shaker doors have a recessed center panel and frame, offering a clean and timeless look. They are versatile and can complement a variety of kitchen styles.
- Glass-front doors: Adding a touch of elegance and functionality, glass-front doors allow for the display of beautiful dishware or decorative items. They are ideal for showcasing collectibles or adding a sense of openness to a small kitchen.
The chosen design should not only complement the existing kitchen style but also align with the homeowner's personal preferences. Consider the overall ambiance you wish to create and the desired level of complexity.
Materials and Tools for DIY Kitchen Cabinet Doors
After deciding on the design, it's time to gather the necessary materials and tools. The choice of materials will depend on the chosen design and desired aesthetic. Some common options include:
- Wood: A popular choice for cabinet doors, wood offers durability, versatility, and a natural appeal. Common wood types include cherry, maple, oak, and pine. Each wood species has unique characteristics in terms of grain pattern, color, and hardness.
- Medium-density fiberboard (MDF): A cost-effective alternative to solid wood, MDF is a manufactured wood product that offers smooth surfaces and good stability. It is an excellent option for creating detailed designs with intricate moldings and decorative elements.
- Plywood: Known for its strength and stability, plywood consists of thin layers of wood veneers glued together. It is a versatile material suitable for both traditional and modern cabinet doors.
In terms of tools, you'll need a variety of hand and power tools, including:
- Measuring tape and pencil
- Circular saw or jigsaw
- Router and router bits
- Sandpaper and sanding block
- Clamps
- Screwdriver or drill
- Wood glue
- Paint or stain
- Brushes or spray gun
Step-by-Step Guide to Building DIY Kitchen Cabinet Doors
The construction process for DIY kitchen cabinet doors involves several steps, from measuring and cutting the wood to assembling the panels and finishing them. Here's a step-by-step guide to help you through the process:
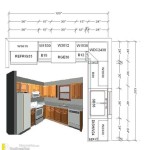
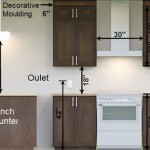
- Take measurements and create a template: Measure the existing cabinet doors accurately, including the dimensions, thickness, and any existing hardware placements. Create a template using cardboard or plywood to ensure accurate cutting.
- Cut the wood panels: Use a circular saw or jigsaw to cut the wood panels according to the template dimensions. Ensure accurate cuts for a seamless fit.
- Shape the edges and create details: Use a router to create raised panels or decorative edges. Follow the chosen design and use the appropriate router bits for desired effects.
- Assemble the panels: Glue and clamp the panels together for a sturdy and durable construction. Use wood glue for a strong bond and ensure alignment before clamping.
- Sand and finish the surface: Sand the assembled panels thoroughly to create a smooth surface. This helps eliminate sharp edges and prepare the surface for paint or stain.
- Apply paint or stain: Choose the desired paint color or stain finish and apply it evenly to the cabinet doors. Use multiple coats for optimal coverage and durability.
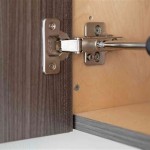
- Install the hardware: Install the hinges, knobs, and other hardware according to the chosen design. Ensure proper alignment and secure installation.
- Attach the doors to the cabinets: Remove the existing doors and carefully attach the newly created doors to the cabinet frames using the installed hinges.
Remember to take your time, be precise with measurements, and follow all safety precautions when using power tools. The process requires patience and attention to detail, but the final result will be a set of custom-designed kitchen cabinet doors that add a touch of personal style to your kitchen.

15 Easy Diy Cabinet Door Ideas To Upgrade Your Kitchen Waterbuckpump

26 Diy Kitchen Cabinet Updates So You Don T Have To Replace Them Cabinets Home Improvement Remodeling

17 Easy Diy Cabinet Door Ideas On A Budget The Handyman S Daughter

Diy Kitchen Cabinet Ideas 10 Easy Door Makeovers Cupboard Doors Makeover

20 Diy Cabinet Door Makeovers With Furniture Stencils Makeover Doors Cabinets
:strip_icc()/101455270-e083e78b9ad4402296444d3c11c825e7.jpg?strip=all "26 Diy Kitchen Cabinet Updates So You Don T Have To Replace Them")
26 Diy Kitchen Cabinet Updates So You Don T Have To Replace Them

Diy Fluted Cabinet Doors Jenna Sue Design

Kitchen Cabinet Designs For Contemporary Cooking Spaces

10 Simple Ideas To Update Your Kitchen Cabinets Jenna Sue Design

Streamlined Kitchen Cabinet Makeover
Related Posts