Diy Kitchen Cabinet Faces: A Comprehensive Guide to Refreshing Your Kitchen Decor
Tired of the dated look of your kitchen cabinets? Upgrading them doesn't have to break the bank or involve extensive renovations. DIY kitchen cabinet faces offer a budget-friendly and effective way to give your kitchen a whole new look. This guide will provide you with everything you need to know about DIY kitchen cabinet faces, from choosing the right materials to installation techniques.
Materials for DIY Kitchen Cabinet Faces
The choice of materials for your DIY kitchen cabinet faces depends on your desired aesthetic and durability requirements. Here are some popular options:
- Wood: Offers a classic and timeless look. Choose hardwoods like oak, maple, or cherry for durability.
- Laminate: An affordable and low-maintenance option that comes in a wide range of colors and patterns.
- Thermofoil: A durable and moisture-resistant material that resembles wood grain or solid color finishes.
Choosing the Right Door Style
The door style you choose will significantly impact the overall look of your kitchen. Here are some popular options:
- Shaker: A classic and versatile style with recessed panels and square edges.
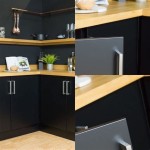
- Flat-panel: A modern and streamlined style with smooth, flush doors.
- Raised-panel: A traditional style with raised panels surrounded by a frame.
Tools and Supplies
To complete your DIY kitchen cabinet face project, you'll need the following tools and supplies:
- Measuring tape
- Circular saw
- Jigsaw
- Drill
- Screwdriver
- Wood glue
- Clamps
- New cabinet faces
- Cabinet door hinges
Installation Instructions
Follow these step-by-step instructions to install your DIY kitchen cabinet faces:
- Measure the existing cabinet faces and cut the new faces to size.
- Apply wood glue to the edges of the new faces and attach them to the cabinets using clamps.
- Drill holes for the hinges and attach the hinges to the cabinet faces and doors.
- Align the doors and adjust the hinges as needed.
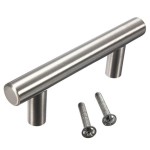
- Secure the doors with screws and finish with decorative hardware.
- Measure accurately to ensure a perfect fit.
- Use sharp tools to prevent chipping or splitting.
- Allow ample drying time for the wood glue.
- Test the doors before securing them to ensure proper alignment.
- Don't hesitate to seek professional help if needed.
Tips for Success
To ensure a successful DIY kitchen cabinet face project, keep these tips in mind:
Conclusion
DIY kitchen cabinet faces are a cost-effective and rewarding project that can dramatically enhance the look of your kitchen. By following the steps and tips outlined in this guide, you can create beautiful new cabinet faces that will add style and functionality to your space.

Diy Shaker Cabinet Doors The Easy Way Mimzy Company

Diy Shaker Cabinet Doors How To Make Your Own For Less Farmhouseish

How To Make Diy Cabinet Doors Without Fancy Router Bits

Kitchen Cabinet Doors Ana White

17 Easy Diy Cabinet Door Ideas On A Budget The Handyman S Daughter

All About Replacing Cabinet Doors New

Mudroom Update Diy Shaker Cabinet Doors Faux Remodelando La Casa

Diy 2 4 Kitchen Cabinets Cherished Bliss

Kitchen Cabinet Designs For Contemporary Cooking Spaces

How To Diy Reface Your Kitchen Cabinet Doors Two Hands
Related Posts