DIY Kitchen Cabinet Hardware: A Comprehensive Guide
Upgrading the hardware on your kitchen cabinets can transform the aesthetics and functionality of your kitchen without a complete remodel. Whether you're a seasoned DIY enthusiast or just starting out, this comprehensive guide will equip you with the essential knowledge to select, install, and maintain your own kitchen cabinet hardware.
Types of Hardware
Kitchen cabinet hardware encompasses a wide variety of styles, materials, and finishes. The most common types include:
- Knobs: Small, rounded handles that are easy to grip and pull
- Pulls: Longer, bar-shaped handles that offer a more comfortable grip and can handle heavier loads
- Handles: Similar to pulls, but typically designed with a curved or arched shape
- Drawer Slides: Hidden mechanisms that allow drawers to open and close smoothly
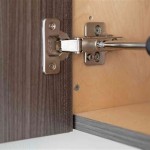
- Hinges: Hinged mechanisms that connect cabinet doors to the frame
Materials and Finishes
Kitchen cabinet hardware can be made from various materials, each with unique characteristics:
- Wood: Offers a warm, natural look and can be stained or painted to match your decor
- Metal: Provides durability and a sleek, modern aesthetic
- Ceramic: Adds a touch of elegance and is easy to clean
- Glass: Creates a sophisticated and light-reflecting effect
- Plastic: Affordable and comes in a wide range of colors and styles
Finishes can further enhance the appearance of your hardware. Consider options like brushed nickel, polished brass, oil-rubbed bronze, or matte black to complement your kitchen's overall design.
Measurements and Spacing
To ensure proper installation and functionality, it's essential to determine the correct measurements and spacing for your hardware. Typically:
- Knobs: Distance between mounting holes: 1-1/4 inches to 1-3/4 inches
- Pulls: Distance between mounting holes: 3 inches to 6 inches
- Drawer Slides: Length should match the width of the drawer
- Hinges: Cup depth should match the thickness of the cabinet door
Installation
Installing kitchen cabinet hardware requires a few basic tools and some technical know-how:
- Power drill
- Screwdriver or drill bit
- Level
- Measuring tape
- Pencil or marking tool
Follow these steps for a secure installation:
- Mark the placement of the hardware using a measuring tape and level.
- Drill pilot holes for screws if necessary.
- Insert the screws into the hardware and tighten using a screwdriver or drill bit.
- Check the alignment and adjust if needed.
Maintenance and Troubleshooting
Proper maintenance will extend the life of your kitchen cabinet hardware. Regularly clean surfaces with a damp cloth and mild soap solution. If the hardware becomes loose, simply retighten the screws.
In case of any difficulties or malfunctions, consult a professional for assistance. They can troubleshoot issues such as misalignments, broken mechanisms, or damaged hardware.
Conclusion
Upgrading your kitchen cabinet hardware is a budget-friendly way to revitalize your kitchen's appearance and functionality. By following these essential aspects, you can select, install, and maintain your own hardware with confidence. Whether you prefer the classic charm of knobs or the sleek lines of pulls, the right hardware can transform your kitchen into a space you love.

Diy Drawer Pulls 15 Cool Cabinet Hardware Ideas Bob Vila

Diy Cabinet Handles The Honeycomb Home

Upcycle Ingenious Drawer Pulls And Handles Diy Drawers Unique

How To Install Cabinet Handles Straight Without Losing Your Mind

Diy Cabinet Hardware Template Installation Made Easy

Simple Homemade Jig For Cabinet Door Pulls

Spray Paint Brass Kitchen Knobs Cabinet Pulls

Diy How To Make Leather Handles Cabinet Drawer Loop Pulls Tutorial

Diy Drawer Pulls 15 Cool Cabinet Hardware Ideas Bob Vila

How To Make Pull Out Shelves For Kitchen Cabinets Ron Hazelton
Related Posts


