Essential Aspects of DIY Kitchen Cabinet Painting Before and After
To ensure a successful DIY kitchen cabinet painting project that transforms the heart of your home, careful consideration of essential aspects before and after painting is crucial. These aspects lay the foundation for a beautiful and durable finish that will elevate the style and functionality of your kitchen for years to come.
Let's delve into the essential aspects of DIY kitchen cabinet painting before and after to guide you through the process and help you achieve stunning results that will make your kitchen the envy of your guests.
### Pre-Painting Phase #### Assessment and PreparationBefore you pick up a brush, assess the condition of your cabinets. Repair any damages or imperfections to ensure a smooth painting surface. Clean your cabinets thoroughly to remove dirt, grease, and any contaminants that could interfere with paint adhesion.
#### Material SelectionChoose the right paint and primer for your kitchen cabinets. Oil-based paints offer durability, while water-based paints are easier to apply. Select a primer that matches the paint type and is specifically designed for kitchen cabinets.
Additionally, consider the type of paint finish you desire. Glossy finishes are more durable, while matte finishes hide imperfections better. Satin finishes strike a balance between the two.
#### Cabinet Disassembly and Hardware RemovalFor best results, remove cabinet doors and drawers. Disassemble them if possible to paint all sides thoroughly. Remove hardware like knobs and handles for separate painting or replacement.
### Painting Phase #### PrimingApply a thin layer of primer to the cabinets and let it dry completely. Primer helps the paint adhere better, resulting in a smooth finish. Lightly sand the primed surfaces before painting to remove any imperfections.
#### PaintingApply the first coat of paint using a brush or roller. Allow it to dry thoroughly and then lightly sand the surface. This roughening will provide better adherence for the second coat, which should be applied perpendicular to the first.
### Post-Painting Phase #### Hardware ReinstallationOnce the paint is completely dry, reinstall the hardware. Ensure screws are tightened securely to prevent the hardware from coming loose over time.
#### Cabinet Assembly and InstallationReassemble the cabinet doors and drawers and install them back into the cabinets. Double-check the alignment and make any necessary adjustments.
#### Kitchen Cabinet Care and MaintenanceProper care and maintenance will extend the life of your newly painted cabinets. Clean them regularly with a damp cloth and avoid using harsh cleaners. Touch up any scratches or chips promptly to prevent further damage.
By following these essential aspects of DIY kitchen cabinet painting before and after, you can transform your kitchen into a beautiful and functional space that reflects your style. Remember, careful preparation and meticulous execution will yield stunning results that will bring joy to your home for years to come.

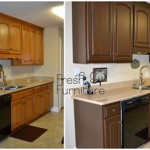
15 Diy Kitchen Cabinet Makeovers Before After Photos Of Cabinets

Diy Painting Your Kitchen Cabinets The Right Way

Update On Our Diy White Painted Kitchen Cabinets 2 Years Later

Pa Wedding Photographer Diy Painted Kitchen Cabinets Before After

Diy Painted Oak Kitchen Cabinets Makeover

A Diy Project Painting Kitchen Cabinets

Painted Cabinets Nashville Tn Before And After Photos

20 Pictures Of Before And After Kitchen Makeovers With Cost Painting Cabinets

Should I Paint My Kitchen Cabinets

20 Diy Painted Kichen Cabinet Ideas A Cultivated Nest
Related Posts