DIY Kitchen Cabinet Refacing Ideas: A Comprehensive Guide
Kitchen cabinet refacing is a cost-effective and efficient method to revitalize a kitchen's aesthetic without the expense and disruption of a full cabinet replacement. This process involves replacing the cabinet doors and drawer fronts, and applying a new veneer to the existing cabinet boxes. For individuals with basic carpentry skills and a willingness to invest time and effort, refacing can be a viable and rewarding DIY project. This article provides a detailed exploration of DIY kitchen cabinet refacing ideas, covering various materials, techniques, and considerations to help navigate the project successfully.
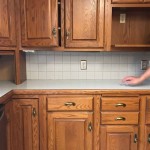
Prior to embarking on a refacing project, a thorough assessment of the existing cabinet structure is crucial. Examine the cabinet boxes for any signs of damage, such as water damage, warping, or structural weakness. Addressing any underlying issues before refacing is essential to ensure the longevity and stability of the finished product. If the cabinet boxes are severely damaged, replacement may be a more appropriate option rather than refacing.
Assuming the cabinet boxes are in good condition, the next step involves selecting the appropriate refacing materials. The choice of materials significantly impacts the final appearance and durability of the kitchen. Common options include wood veneer, rigid thermofoil (RTF), and laminate. Each material offers unique advantages and disadvantages in terms of cost, aesthetics, and ease of installation.
Selecting the Right Refacing Materials
The selection of refacing materials is a critical decision that will influence the overall look, durability, and cost of the project. Each material presents a unique set of characteristics that must be weighed against individual needs and preferences.
Wood Veneer: Wood veneer offers a classic and luxurious look, providing the appearance of solid wood at a fraction of the cost. It consists of thin slices of real wood adhered to a substrate. Wood veneer is available in a wide range of wood species, allowing for customization to match existing décor or create a new aesthetic. Applying wood veneer typically requires careful surface preparation, precise cutting, and the application of contact cement. The edges are often finished with iron-on veneer edge banding. Wood veneer is generally considered a more challenging material to work with compared to RTF or laminate, demanding a higher level of skill and attention to detail. However, the resulting finish can be remarkably realistic and aesthetically pleasing.
Rigid Thermofoil (RTF): RTF is a durable and low-maintenance option consisting of a thin layer of vinyl applied to a medium-density fiberboard (MDF) core. RTF is known for its resistance to moisture, scratches, and stains, making it a practical choice for kitchens. It is available in a variety of colors, textures, and styles, including options that mimic the look of real wood. RTF doors and drawer fronts are typically manufactured in a factory and arrive pre-finished, simplifying the installation process. The cabinet boxes can be refaced with matching RTF sheets, which are applied using contact cement. RTF is generally considered easier to install than wood veneer and offers a consistent and uniform finish.
Laminate: Laminate is a cost-effective and versatile option consisting of layers of paper impregnated with resin. It is available in a vast array of colors, patterns, and textures, including those that replicate the look of wood, stone, and other materials. Laminate is relatively easy to clean and maintain, making it a practical choice for busy kitchens. Applying laminate involves cutting the material to size, applying contact cement to both the laminate and the cabinet surface, and then carefully positioning and bonding the laminate. Edges can be finished with laminate edge banding. While laminate is durable, it is more susceptible to chipping and scratching compared to wood veneer or RTF. However, its affordability and wide range of design options make it a popular choice for DIY refacing projects.
In addition to the primary refacing material, it is also important to consider the hardware. New knobs, pulls, and hinges can significantly enhance the appearance of the refaced cabinets. Choose hardware that complements the style and finish of the refacing material. Consider the functionality of the hardware as well. For example, soft-close hinges can add a touch of luxury and prevent slamming doors.
Accurate measurements are paramount for a successful refacing project. Carefully measure each cabinet box, door, and drawer front. Label each piece to avoid confusion during installation. It is advisable to create a detailed diagram of the kitchen layout, noting the dimensions and location of each cabinet component. Double-checking measurements before ordering materials is crucial to prevent costly errors.
Preparing the Existing Cabinet Boxes
Proper preparation of the existing cabinet boxes is essential for ensuring a smooth and durable refacing finish. This process involves cleaning, sanding, and priming the surfaces to create a suitable bonding surface for the new veneer or laminate.
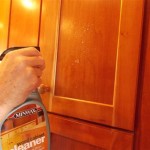
Cleaning: Begin by thoroughly cleaning the cabinet boxes with a degreasing cleaner. Remove any grease, dirt, or grime that may have accumulated over time. Pay particular attention to areas around the stove and sink, where grease and food splatters are common. Rinse the surfaces with clean water and allow them to dry completely.
Sanding: Sanding is necessary to create a slightly roughened surface that will promote adhesion. Use a medium-grit sandpaper (120-grit) to lightly sand the cabinet boxes. Focus on removing any existing finish or imperfections. Be careful not to sand too aggressively, as this could damage the underlying material. After sanding, remove the sanding dust with a tack cloth or vacuum cleaner.
Priming: Priming is recommended to create a uniform surface and improve the adhesion of the new veneer or laminate. Choose a high-quality primer that is compatible with the refacing material. Apply the primer evenly using a brush or roller. Allow the primer to dry completely according to the manufacturer's instructions. If necessary, lightly sand the primed surface with fine-grit sandpaper (220-grit) to create an even smoother finish.
In addition to cleaning, sanding, and priming, it is also important to address any imperfections in the cabinet boxes. Fill any holes or cracks with wood filler. Allow the filler to dry completely and then sand it smooth. Replace any damaged or loose trim. Ensure that all surfaces are clean, smooth, and free of debris before proceeding with the refacing process.
When applying contact cement, it is crucial to work in a well-ventilated area. Contact cement contains volatile organic compounds (VOCs) that can be harmful if inhaled. Wear a respirator or mask to protect yourself from inhaling the fumes. Apply the contact cement evenly to both the cabinet surface and the back of the veneer or laminate. Allow the contact cement to dry until it is tacky to the touch. Carefully position the veneer or laminate on the cabinet surface and then press it firmly into place. Use a roller or a J-roller to ensure that the veneer or laminate is fully bonded to the cabinet surface.
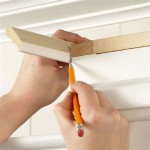
Trimming excess veneer or laminate requires precision and care. Use a sharp utility knife or a laminate trimmer to trim the edges. Follow the contours of the cabinet boxes carefully to create a clean and professional-looking finish. Sand the edges lightly to remove any sharp edges or burrs.
Installing New Doors and Drawer Fronts
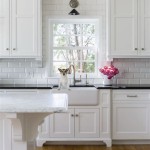
The final step in the refacing process involves installing the new doors and drawer fronts. This step can significantly transform the appearance of the kitchen, giving it a fresh and updated look.
Hinges: When installing new doors, it is important to use the correct type of hinges. Concealed hinges are a popular choice for refaced cabinets, as they provide a clean and modern look. Concealed hinges are mounted inside the cabinet box and are not visible when the door is closed. To install concealed hinges, you will need to use a hinge jig to drill precise holes for the hinge cups. Align the door carefully with the cabinet box and then attach the hinges. Adjust the hinges as needed to ensure that the door opens and closes smoothly.
Drawer Fronts: Installing new drawer fronts is a relatively straightforward process. First, remove the old drawer fronts by unscrewing them from the drawer boxes. Align the new drawer fronts with the drawer boxes and then attach them using screws. Ensure that the drawer fronts are properly aligned and that they fit snugly against the drawer boxes.
Hardware: After the doors and drawer fronts are installed, add the new hardware. Install knobs or pulls on the doors and drawer fronts. Choose hardware that complements the style and finish of the refacing material. Consider the placement of the hardware carefully to ensure that it is both functional and aesthetically pleasing. For example, knobs are typically placed in the center of the door or drawer front, while pulls are often placed horizontally on drawers and vertically on doors.
Once the hardware is installed, inspect the refaced cabinets carefully. Check for any gaps, imperfections, or misalignment. Make any necessary adjustments to ensure that the cabinets look and function properly. With careful planning and execution, a DIY kitchen cabinet refacing project can transform a kitchen into a more attractive and functional space. The project offers significant cost savings compared to a full cabinet replacement, allowing homeowners to achieve a refreshed kitchen aesthetic without breaking the bank.
Maintaining the refaced cabinets is crucial for preserving their appearance and longevity. Clean the cabinets regularly with a mild detergent and water. Avoid using abrasive cleaners or scouring pads, as these can damage the finish. Wipe up spills immediately to prevent staining. Protect the cabinets from excessive moisture and humidity. Consider using a sealant or protectant to further enhance the durability of the refacing material. With proper care and maintenance, refaced cabinets can provide years of beauty and functionality.
Furthermore, exploring different design styles can significantly impact the final look. Consider incorporating shaker-style doors for a classic and timeless appeal, or opt for slab doors for a sleek and modern aesthetic. Experiment with different paint colors and finishes to create a personalized kitchen space that reflects individual tastes and preferences. The possibilities are virtually endless, allowing for a truly customized and unique kitchen transformation.

Cabinet Refacing Ideas Diy Projects Craft How To S For Home Decor With

Cabinet Refacing Ideas Diy Projects Craft How To S For Home Decor With Kitchen Remodel Small Remodeling Cabinets

Painted Furniture Ideas Diy Refacing Kitchen Cabinets

20 Kitchen Cabinet Refacing Ideas Options To Refinish Cabinets Remodel Small Design Backsplash Designs

Diy Cabinet Refacing Budget Friendly Made Easy Wisewood

New Cabinet Refacing Ideas To Revamp Your Old Kitchen Layout

5 Best Diy Kitchen Cabinet Refacing Ideas To Try

Diy Cabinet Refacing Budget Friendly Made Easy Wisewood

Kitchen Cabinet Refacing How To Redo Cabinets

520 Best Diy Cabinet Refacing Ideas In 2024 Cabinets
Related Posts