DIY Kitchen Cabinet Removal: A Comprehensive Guide
Kitchen cabinet removal can be a daunting task, but it's certainly achievable with careful planning and preparation. By following these essential steps, you can successfully remove your old cabinets without causing unnecessary damage to your kitchen.
Step 1: Preparation
Before you begin, it's crucial to prepare your workspace and safety gear. Clear the kitchen of all appliances, furniture, and any other items that could obstruct your work. Ensure proper ventilation by opening windows or using fans. Gather necessary tools such as a screwdriver, cordless drill, hammer, crowbar, and a reciprocating saw if necessary.
Step 2: Disconnect Utilities
Safety comes first! Disconnect all utilities connected to the cabinets, including water, gas, and electricity. This step is vital to prevent accidental damage and injury. If you're not comfortable with electrical work, seek professional assistance.
Step 3: Remove Doors and Drawer Fronts
Start by removing all the cabinet doors and drawer fronts. Use a screwdriver or drill to loosen the hinges or screws holding them in place. Carefully lift and detach the doors and set them aside.
Step 4: Remove Cabinet Frames
Now, it's time to tackle the cabinet frames. Determine how the frames are attached to the wall and floor. Use a screwdriver or drill to remove screws or nails holding the frames in place. Carefully lift and pull the frames away from the wall, detaching any sealant or adhesive that may be present.
Step 5: Disconnect Countertops and Backsplash
If your countertops and backsplash are attached to the cabinets, you'll need to remove them before proceeding further. Use a reciprocating saw to cut through any sealant or adhesive holding them in place. Carefully lift and remove the countertops and backsplash.
Step 6: Remove Base Cabinets
Start with the base cabinets. Remove the toe kick at the bottom of the cabinets, which is usually held in place with screws or nails. Use a crowbar or pry bar to gently pry the base cabinets away from the wall, taking care not to damage the flooring or walls.
Step 7: Remove Wall Cabinets
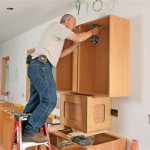
Finally, it's time to remove the wall cabinets. These are typically secured to the wall using screws, bolts, or a combination of both. Use a drill or screwdriver to remove the fasteners and carefully lower the cabinets to the ground.
Step 8: Dispose of Old Cabinets
Once you have successfully removed all the cabinets, dispose of them responsibly. Contact your local waste management company for proper disposal options. Alternatively, you can consider donating or recycling the cabinets if they are still in good condition.
Conclusion
By following these steps diligently, you can successfully remove your old kitchen cabinets yourself. Remember to prioritize safety, prepare adequately, and take your time to avoid any potential damage. With a little effort and planning, you can transform your kitchen space with ease.

How To Remove Kitchen Cabinets A Diy Guide Dumpsters Com

3 Ways To Remove Kitchen Cabinets Wikihow
.jpg?strip=all)
Orc Week Three Retro Cabinet Removal Dream Green Diy

How To Remove Kitchen Cabinets Budget Dumpster

Diy Blog Onegirlmanyideas

How To Remove Kitchen Cabinets Budget Dumpster

How To Demo A Kitchen Yourself And Save Big Dumpsters Com

Removing Kitchen Cabinets Diy Remodel Experience 1

Kitchen Demolition Day 2 Cabinets And Counter Tops Projects For Tomorrow

Diy Blog Onegirlmanyideas
Related Posts

