DIY Paint Oak Kitchen Cabinets: A Guide to Refurbishing Your Space
Oak kitchen cabinets, once a popular choice for their durability and classic look, can sometimes feel outdated. However, with a little effort and the right techniques, you can refresh these cabinets and give your kitchen a whole new vibe. Painting oak kitchen cabinets is a DIY project that can significantly improve the appearance of your kitchen without the hefty price tag of a complete remodel. This guide will provide you with a step-by-step approach to successfully paint your oak cabinets, transforming them from worn to wonderful.
Preparation is Key: Clean and Sand
Before you even think about picking up a paintbrush, proper preparation is crucial for a smooth and long-lasting finish. Start by thoroughly cleaning your cabinets to remove grease, dirt, and any residue. Use a degreaser or a solution of dish soap and warm water, and make sure to rinse well. After cleaning, let the cabinets dry completely before moving on to the next step.
Next, sanding is essential for creating a surface that will properly adhere to the paint. Use a fine-grit sandpaper (120-180 grit) to lightly sand the cabinet surfaces, focusing on areas where the finish feels rough or uneven. The goal is not to remove all the existing finish; it's simply to create a slightly rough surface for the paint to grip onto. For a more even finish, you can use a sanding block or an orbital sander. After sanding, wipe down the cabinets again to remove dust.
Priming for Success: The Foundation for Excellent Paint Adhesion
Priming is a vital step in painting oak cabinets that is often overlooked. Oak is a porous wood, and its natural oils can interfere with paint adhesion. A good primer will create a barrier between the wood and the paint, ensuring a more even and durable finish. There are various types of primers available, but for oak cabinets, a primer specifically designed for wood and stain blocking is highly recommended.
Apply the primer to your cabinets using a brush or a roller, ensuring even coverage. Let the primer dry thoroughly according to the manufacturer's directions. Once the primer is dry, lightly sand it with a fine-grit sandpaper to create a smooth surface for the paint. This step will help to achieve a professional-looking finish.
Choose the Right Paint: Matching Your Vision with the Best Option
Selecting the right paint is critical for achieving the desired look and durability for your kitchen cabinets. For most DIY projects, latex paint is a good choice; it's relatively easy to apply and cleans up with soap and water. However, consider factors like your desired sheen and the level of traffic the cabinets receive.
For a more traditional look, a semi-gloss or gloss finish is ideal. It offers a smooth, durable surface that is easy to clean. However, if you prefer a more modern or contemporary aesthetic, a flat or matte finish might be more suitable. It provides a softer, less reflective look. Keep in mind that flat finishes can be more susceptible to stains and scratches, so they may not be the best choice for high-traffic areas.
For optimal durability, consider using cabinet-grade paint. This type of paint is specifically designed for high-use applications and is known for its resistance to chipping and scratches. It's worth the investment for a finish that will last.
Application and Finishing: Ensuring a Professional Look
Finally, it's time to bring your vision to life by applying the chosen paint to your cabinets. For the best results, use a high-quality paintbrush or a small foam roller. Apply thin, even coats, working in sections to ensure a smooth, consistent finish. Allow each coat to dry thoroughly according to the manufacturer's instructions before applying the next coat. For most paints, two coats should be sufficient for optimal coverage.
Once the final coat of paint has dried, consider adding protective finishes like a topcoat or a polyurethane sealant. These finishes will help to protect the paint from scratches, stains, and moisture. Apply the chosen sealant according to the manufacturer's instructions.
Additional Tips for Success
To further enhance your DIY cabinet painting project, consider these helpful tips:
- Use painter's tape for clean lines: Use painter's tape to protect areas you don't want to paint, such as countertops, walls, and hardware. Make sure the tape is pressed firmly to create a seal to prevent paint bleeding.
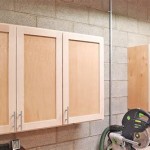
- Remove cabinet doors and drawers: Remove cabinet doors and drawers for easier access and a more professional finish. Paint these separately and allow them to dry completely before reinstalling.
- Use a paint sprayer for larger projects: If you are tackling a large number of cabinets, consider using a paint sprayer for faster and more even coverage. Make sure to use a sprayer designed for latex paint and practice on a scrap piece of wood first.
Painting oak kitchen cabinets is a rewarding DIY project that can transform your kitchen's appearance. By diligently following these steps and tips, you can achieve a professional-looking finish that will make your kitchen feel fresh and updated.

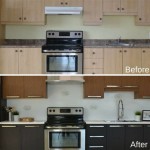
Diy Painted Oak Kitchen Cabinets Makeover

Diy Painted Oak Kitchen Cabinets Makeover

Tips Tricks To Paint Honey Oak Kitchen Cabinets Cottage Living And Style

Tips Tricks To Paint Honey Oak Kitchen Cabinets Cottage Living And Style

How To Paint Oak Cabinets And Hide The Grain Tutorial

How To Paint Oak Cabinets And Hide The Grain Tutorial

How To Paint Oak Cabinets White Best Diy Guide 2024

Diy Staining Oak Cabinets Eclectic Spark

Diy Painted Oak Kitchen Cabinets Makeover
:strip_icc()/101671998-27cdf40f639448d0a56ff6c7eab609d7.jpg?strip=all "Expert Tips For Painting Oak Cabinets")
Expert Tips For Painting Oak Cabinets
Related Posts