DIY Painted Rustic Kitchen Cabinets: A Step-by-Step Guide for a Stunning Transformation
Your kitchen is the heart of your home, and it deserves to be a place you love. If your kitchen cabinets are looking tired and dated, a fresh coat of paint can do wonders to transform their appearance and create a beautiful, rustic atmosphere.
Painting kitchen cabinets is a DIY project that can be tackled with a little preparation and care. Here's a step-by-step guide to help you create stunning painted rustic kitchen cabinets:
Step 1: Prepare Your Cabinets
To ensure the paint adheres properly, it's essential to thoroughly clean your cabinets. Remove all hardware, including hinges and knobs. Use a degreaser to clean the cabinet surfaces, and then sand lightly with fine-grit sandpaper to create a smooth base for the paint.
Step 2: Prime the Cabinets
Priming helps create a barrier between the wood and the paint, improving the paint's adhesion and durability. Apply a coat of high-quality primer to the entire surface of your cabinets, including the interiors of doors and drawers.
Step 3: Choose Your Paint
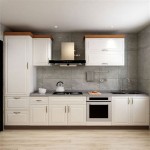
For a rustic look, opt for muted, natural shades such as white, gray, beige, or green. Eggshell or matte finishes will provide a more subtle, aged effect. Choose a high-quality paint that is specifically designed for kitchen cabinets.
Step 4: Paint the Cabinets
Using a brush or roller, apply the first coat of paint to the cabinets. Allow the first coat to dry completely before applying a second coat for even coverage and depth of color.
Step 5: Distress the Cabinets (Optional)
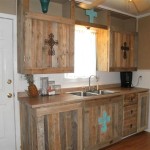
If you want to create a more rustic look, consider distressing the cabinets. Use sandpaper or a sanding block to lightly sand the edges of the cabinets, revealing the underlying wood and creating a distressed effect.
Step 6: Seal the Cabinets
To protect your newly painted cabinets from wear and tear, apply a clear polyurethane or varnish. Use a brush or roller to apply a thin, even coat of sealer, allowing it to dry thoroughly before replacing the hardware.
Step 7: Reinstall the Hardware
Once the sealer has dried, reinstall the hinges, knobs, and any other hardware. Your newly painted rustic kitchen cabinets are now complete!
Tips for Success:
- Use a high-quality primer and paint to ensure durability and a professional finish.
- Take your time and allow each coat of primer and paint to dry completely before moving on to the next step.
- If you're not comfortable distressing the cabinets yourself, hire a professional to achieve a natural-looking effect.
- Enjoy the transformation of your kitchen! Your newly painted rustic cabinets will create a warm and inviting atmosphere that you'll love for years to come.
:strip_icc()/102208273-b8b528884cd144a3a8e813140cae5b7e.jpg?strip=all "Rustic Kitchen Ideas")
Rustic Kitchen Ideas

Rescuing And Reviving A Glazed Distressed Kitchen Bella Tucker

Designing A Rustic Kitchen Incorporating Cabinets Furniture And Decor

27 Best Rustic Kitchen Cabinet Ideas And Designs For 2024

Distressed Kitchen Cabinets How To Distress Your

Rustic Style Really Brings The Excitement To Room It Works Great With Farmhouse And Distressed Kitchen Cabinets

Navy Kitchen Cabinet Paint Color Home Bunch Interior Design Ideas

Dark Cobalt Blue Matte Farmhouse Cabinets Rustic Kitchen Cabinet Design
:strip_icc()/VirginiaBell-fd3cd606097c4e64b73ea90c6d5433ce.jpeg?strip=all "20 Best Rustic Kitchen Cabinet Design Ideas")
20 Best Rustic Kitchen Cabinet Design Ideas

How To Paint Kitchen Cabinets Like The Pros
Related Posts