DIY Redo Kitchen Cabinets: A Comprehensive Guide
Kitchen cabinets often form the visual core of a kitchen. Over time, they can become worn, outdated, or simply not reflect evolving aesthetic preferences. Replacing kitchen cabinets is a significant expense. Therefore, many homeowners explore DIY options to revitalize their existing cabinets, offering a cost-effective and customizable solution. This article provides a step-by-step guide to successfully redoing kitchen cabinets, covering planning, preparation, execution, and common pitfalls to avoid.
1. Planning and Assessment
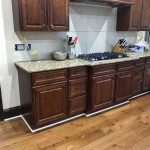
The initial phase involves a thorough assessment of the existing cabinets and development of a comprehensive plan. This step determines the overall scope of the project and identifies any potential challenges. First, inspect the structural integrity of the cabinets. Check for water damage, warping, or loose joints. If the cabinets are significantly damaged, replacement may be a more prudent option than attempting a cosmetic makeover. Minor repairs, such as tightening screws or filling small cracks, can be addressed within a DIY project.
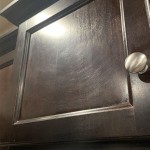
Next, evaluate the existing cabinet style and finish. Consider the overall aesthetic of the kitchen and the desired end result. Options include repainting, staining, refacing, or replacing hardware. Repainting is a popular choice for a quick and relatively inexpensive update. Staining can enhance the natural wood grain if the cabinets are made of quality wood. Refacing involves replacing the cabinet doors and drawer fronts while keeping the existing cabinet boxes. Hardware replacement is a simple yet effective way to modernize the look of the cabinets.
Once the desired outcome is defined, develop a detailed budget. Account for the cost of materials, including paint or stain, primer, sandpaper, brushes, rollers, hardware, and any necessary repair materials. Consider the cost of tools if they need to be purchased or rented. Create a timeline for the project, factoring in preparation time, working time, and drying time. A well-defined plan helps to avoid unexpected costs and delays.
It is also crucial to consider the existing layout and functionality of the kitchen. Does the current cabinet configuration meet current needs? Redoing the cabinets presents an opportunity to make minor modifications, such as adding pull-out shelves or organizers to improve storage and accessibility. Thorough planning ensures a successful cabinet redo that enhances both the appearance and functionality of the kitchen.
2. Preparation is Paramount
Proper preparation is crucial for achieving a professional-looking finish. This stage involves protecting the work area, removing hardware, cleaning the cabinets, and preparing the surfaces for painting or staining. Start by clearing the kitchen of any unnecessary items. Cover countertops, floors, and appliances with drop cloths or plastic sheeting to protect them from paint splatters and dust. Good ventilation is essential, especially when working with paints and solvents. Open windows and use fans to circulate air.
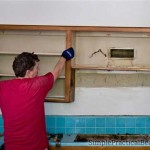
Remove all cabinet doors, drawers, and hardware, including knobs, pulls, hinges, and latches. Label each door and drawer to ensure they are reinstalled in the correct location. Take pictures of the cabinet configuration before disassembly for reference. Place all hardware in labeled bags to keep them organized. If the hardware is being reused, clean it thoroughly with a degreaser to remove any dirt or grime. If new hardware is being installed, ensure it is compatible with the existing cabinet holes or be prepared to drill new ones.
Clean the cabinet surfaces thoroughly with a degreaser or TSP (trisodium phosphate) solution to remove any grease, dirt, or grime. Rinse the cabinets with clean water and allow them to dry completely. This step is essential for ensuring proper adhesion of the paint or stain. Once the cabinets are clean and dry, sand them lightly with fine-grit sandpaper to create a smooth surface and further improve adhesion. Remove any sanding dust with a tack cloth or vacuum cleaner.
Fill any holes or imperfections with wood filler and allow it to dry completely. Sand the filled areas smooth and remove any remaining dust. Apply a primer to the cabinets. Primer creates a uniform surface for the paint or stain, improves adhesion, and helps to block stains from bleeding through. Use a high-quality primer that is compatible with the chosen paint or stain. Allow the primer to dry completely according to the manufacturer's instructions. Lightly sand the primed surface with fine-grit sandpaper to create a smooth finish.
3. Painting or Staining Techniques
Once the cabinets are properly prepared, the next step is to apply the paint or stain. Choose a high-quality paint or stain that is appropriate for the type of cabinets and the desired finish. Consider using a paint specifically formulated for cabinets, as these paints tend to be more durable and resistant to chipping and scratching. For staining, choose a stain that complements the wood grain and the overall aesthetic of the kitchen.
Apply the paint or stain in thin, even coats, using a brush, roller, or sprayer. If using a brush, choose a high-quality brush with synthetic bristles for a smooth finish. If using a roller, use a foam roller for cabinets to minimize brush strokes. If using a sprayer, follow the manufacturer's instructions carefully and practice on a scrap piece of wood to achieve the desired spray pattern and coverage. Allow each coat to dry completely before applying the next coat. Lightly sand between coats with fine-grit sandpaper to remove any imperfections and create a smooth finish.
For painted cabinets, apply at least two coats of paint for optimal coverage and durability. For stained cabinets, apply one or two coats of stain, depending on the desired color intensity. After the final coat has dried completely, apply a clear topcoat to protect the finish and add durability. Choose a topcoat that is compatible with the chosen paint or stain. Apply the topcoat in thin, even coats and allow it to dry completely.
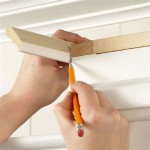
Pay attention to detail during the painting or staining process. Avoid drips, runs, and brush strokes. Use painter's tape to mask off any areas that should not be painted or stained, such as the inside edges of the cabinets or the surrounding walls. Remove the painter's tape carefully after the paint or stain has dried but before it is fully cured to avoid peeling off the finish. Allow the cabinets to cure for several days before reinstalling the hardware and reattaching the doors and drawers.
4. Reassembly and Final Touches
After the paint or stain has fully cured, carefully reassemble the cabinets. Reinstall the hardware, such as knobs, pulls, hinges, and latches. Use the labeled bags and pictures taken during disassembly to ensure that each door and drawer is reinstalled in the correct location. Adjust the hinges as needed to ensure that the doors and drawers align properly and close smoothly.
Clean up the work area thoroughly. Remove all drop cloths and plastic sheeting. Dispose of any paint or stain cans, brushes, rollers, and other materials properly. Vacuum or sweep the floor to remove any dust or debris. Inspect the cabinets carefully for any imperfections or areas that need touch-up. Use a small brush or cotton swab to apply touch-up paint or stain as needed. Allow the touch-up paint or stain to dry completely.
Consider adding finishing touches to enhance the overall look of the cabinets. Replace old or worn-out shelf liners with new ones. Add pull-out shelves or organizers to improve storage and accessibility. Install under-cabinet lighting to illuminate the countertop and create a more inviting atmosphere. These small details can make a big difference in the overall appearance and functionality of the kitchen.
Regularly clean and maintain the cabinets to keep them looking their best. Wipe down the cabinets with a damp cloth to remove any spills or splatters. Avoid using harsh chemicals or abrasive cleaners, as these can damage the finish. Periodically check the hardware and tighten any loose screws. With proper care and maintenance, a DIY cabinet redo can provide years of enjoyment and enhance the value of the home.

Diy Painted Oak Kitchen Cabinets Makeover

Diy Painting Your Kitchen Cabinets The Right Way

Diy Kitchen Cabinets 25 And Easy Ideas For An Update Joyful Derivatives

Diy Kitchen Cabinets Makeover How To Install New Cabinet Glass Inserts

21 Diy Affordable Ways To Redo Kitchen Cabinets Extra Space Storage

How To Paint Kitchen Cabinets Budget Friendly Makeover

A Diy Project Painting Kitchen Cabinets

21 Diy Affordable Ways To Redo Kitchen Cabinets Extra Space Storage

20 Diy Painted Kichen Cabinet Ideas A Cultivated Nest

How To Paint Kitchen Cabinets Like The Pros
Related Posts