Easy Way to Install Kitchen Cabinets: A Comprehensive Guide
Installing kitchen cabinets is a significant home improvement project that can dramatically enhance the functionality and aesthetic appeal of a kitchen. While it may seem daunting, breaking the process down into manageable steps and understanding the key principles can lead to a successful and satisfying outcome. This article outlines a systematic and relatively straightforward approach to installing kitchen cabinets, focusing on precision, proper techniques, and essential tools.
Before embarking on the installation process, meticulous planning and preparation are crucial. This phase lays the foundation for a smooth and efficient installation. It involves accurate measurements, careful selection of cabinets, and thorough preparation of the installation area.
Essential Pre-Installation Steps
The first and arguably most important step is to accurately measure the kitchen space. This includes the length of the walls where the cabinets will be installed, the height from the floor to the ceiling, and the locations of any obstructions like windows, doors, plumbing, and electrical outlets. It is advisable to create a detailed floor plan, noting all measurements and the positions of these elements. This plan will serve as a reference throughout the installation process.
Next, select the cabinets based on the kitchen's design and the available space. Consider both base cabinets, which sit on the floor, and upper cabinets, which are mounted on the wall. Carefully review the specifications of each cabinet, including its dimensions, weight, and mounting requirements. Ensure that the chosen cabinets meet the aesthetic and functional needs of the kitchen. It is often beneficial to explore different cabinet styles and finishes to align with the overall kitchen design.
Preparing the installation area is essential for a successful installation. This involves removing any existing cabinets, appliances, and fixtures from the walls. Inspect the walls for any imperfections, such as holes, cracks, or uneven surfaces. Repair these imperfections using patching compound and sanding. It is crucial to ensure that the walls are plumb (perfectly vertical) and level (perfectly horizontal) before proceeding. Use a level and shims to correct any deviations. Properly prepared walls will provide a solid and even surface for mounting the cabinets.
Gather all necessary tools and materials. At a minimum, the following items will be required: a stud finder, level (at least a four-foot level), drill with various drill bits and driver bits, measuring tape, pencil, safety glasses, screws (of appropriate length and strength), shims, construction adhesive, and a cabinet jack (optional, but highly recommended for lifting heavy upper cabinets). Having all the tools and materials readily available will streamline the installation process and prevent unnecessary delays.
Unpack the cabinets and inspect them for any damage that may have occurred during shipping. Verify that all the necessary hardware, such as screws, hinges, and shelves, are included. Assemble any cabinets that require assembly according to the manufacturer's instructions. Clearly label each cabinet to correspond with its designated location in the kitchen. This will prevent confusion during the installation process.
Once the planning and preparation phase is complete, the actual installation of the cabinets can begin. This involves a step-by-step process of locating studs, creating a level reference line, installing the upper cabinets (often first), and then installing the base cabinets. Each step requires careful attention to detail to ensure a secure and aesthetically pleasing installation.
Installing Upper Cabinets: A Step-by-Step Guide
The installation of upper cabinets typically precedes the installation of base cabinets. This is because upper cabinets are often more difficult to maneuver and install, and installing them first minimizes the risk of damaging the base cabinets. The first step in installing upper cabinets is to locate the wall studs. Use a stud finder to locate the studs and mark their locations with a pencil. The cabinets will need to be securely attached to the studs to bear their weight.
Next, establish a level reference line on the wall at the desired height for the bottom of the upper cabinets. This line will serve as a guide for aligning the cabinets. Use a level to ensure that the line is perfectly horizontal. The height of the reference line will depend on the desired height of the countertop and the height of the base cabinets. A common height for the bottom of the upper cabinets is 54 inches above the floor.
Before lifting the first cabinet into place, apply construction adhesive to the back of the cabinet where it will contact the wall. This will provide additional support and prevent the cabinet from shifting. Enlist the help of a partner to lift the cabinet into position, aligning the bottom edge with the reference line. Use shims to level the cabinet and ensure that it is flush with the wall.
Once the cabinet is properly positioned and leveled, secure it to the wall studs using screws of appropriate length and strength. Drive the screws through the cabinet frames and into the studs. Be careful not to overtighten the screws, as this could damage the cabinet frames. Check the cabinet for level and plumb again after it is secured to the wall.
Repeat the process for each subsequent upper cabinet, ensuring that each cabinet is level and aligned with the adjacent cabinets. Use clamps to hold the cabinets together while screwing them together through the frames. This will create a seamless and uniform appearance. Check the alignment of all the cabinets periodically to ensure that they are straight and level.
If any gaps are present between the cabinets or between the cabinets and the wall, use shims to fill the gaps. Once the shims are in place, use a utility knife to trim off any excess material. Apply caulk to the seams between the cabinets and the wall to create a clean and professional finish.
After the upper cabinets are securely installed, the installation of base cabinets can begin. Base cabinets are typically easier to install than upper cabinets, as they rest on the floor and do not require as much lifting and maneuvering. The process involves leveling the floor, installing the base cabinets, and securing them to the wall and to each other.
Installing Base Cabinets: Achieving Stability and Alignment
Before installing the base cabinets, it's essential to ensure that the floor is level. Imperfections in the floor can cause the cabinets to wobble or sit unevenly. Use a level to check the floor for any high or low spots. If necessary, use shims to level the floor before placing the cabinets. The goal is to create a perfectly level surface for the base cabinets to rest on.
Begin by placing the corner cabinets first, if applicable, as they serve as reference points for the remaining cabinets. Align the cabinet with the wall and use shims to level it. Once the cabinet is level, secure it to the wall using screws of appropriate length and strength. Drive the screws through the cabinet frame and into the wall studs. Be careful not to overtighten the screws.
Next, install the remaining base cabinets, working your way along the wall. Align each cabinet with the adjacent cabinets and use clamps to hold them together while screwing them together through the frames. This will create a seamless and uniform appearance. Use shims as needed to level each cabinet. Ensure that the tops of all the base cabinets are at the same height.
Once all the base cabinets are in place, secure them to the wall using screws. Drive the screws through the cabinet frames and into the wall studs. Be careful not to overtighten the screws. Check the alignment of all the cabinets to ensure that they are straight and level. Make any necessary adjustments before proceeding.
After the base cabinets are securely installed, install the countertop. The countertop should be securely attached to the base cabinets using screws or adhesive. Ensure that the countertop is level and aligned with the cabinets. Once the countertop is installed, install the sink and faucet according to the manufacturer's instructions. Connect the plumbing and electrical fixtures. Verify that all connections are secure and leak-free.
Attaching decorative panels and finishing touches are crucial for a polished look. This comprises installing end panels, toe kicks, and hardware. End panels conceal the sides of exposed cabinets, creating a finished appearance. Toe kicks cover the gap between the bottom of the base cabinets and the floor, providing a clean and professional look.
Final Touches: Hardware and Adjustments
Install the hardware, such as knobs and pulls, on the cabinet doors and drawers. The placement of the hardware should be consistent throughout the kitchen. Use a template to ensure that the hardware is installed in the same location on each door and drawer. Tighten all the screws securely.
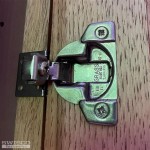
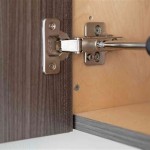
Adjust the hinges on the cabinet doors to ensure that they open and close smoothly. If the doors are not aligned properly, adjust the hinges until they are. Test the drawers to ensure that they slide in and out smoothly. If the drawers are sticking, adjust the runners until they are not. Apply lubricating oil to the runners, if necessary.
Caulk any remaining seams between the cabinets and the wall to create a clean and professional finish. Wipe down all the surfaces of the cabinets with a damp cloth to remove any dust or debris. Inspect the entire installation for any imperfections. Correct any imperfections before considering the installation complete.
By following these steps, kitchen cabinets can be installed efficiently and effectively. A well-executed cabinet installation not only enhances the functionality of the kitchen but also contributes significantly to the overall value and aesthetic appeal of the home.

How To Install Kitchen Cabinets Diy Family Handyman

Installing Kitchen Cabinets Momplex Vanilla Ana White

How To Install Upper Cabinets Like A Pro Cabinetselect Com

How To Install Kitchen Cabinets The Home Depot

Here S How Install New Upper Kitchen Cabinets

How To Install Kitchen Cabinets Interiors

How To Install Kitchen Wall And Base Cabinets Builder Supply

How To Prepare For A Kitchen Cabinet Installation

How To Install Cabinets Like A Pro The Family Handyman

How To Install Kitchen Cabinets
Related Posts