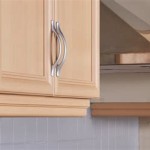
Gel Stain On Kitchen Cabinets: A Comprehensive Guide
Transforming kitchen cabinets with gel stain is a popular and effective DIY project that can rejuvenate the look of your kitchen without the expense of replacing them. Gel stain offers a deep, rich color that enhances the natural grain of the wood, creating a classic and elegant finish. Here's a comprehensive guide to help you achieve stunning results with gel stain on kitchen cabinets.
Preparing the Cabinets
Before applying gel stain, it's essential to ensure the cabinets are clean and free of any dirt, grease, or previous finishes. Remove all hardware, such as knobs and handles, and thoroughly clean the cabinet surfaces with a degreaser. Sand lightly with fine-grit sandpaper to smooth any rough areas or imperfections.
Choosing the Gel Stain
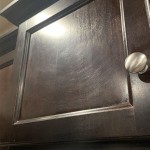
Gel stains come in a wide range of colors and finishes. Consider the existing décor of your kitchen and the desired outcome. For a classic look, opt for natural wood tones like honey, amber, or walnut. If you prefer a more modern or dramatic style, bolder colors like black, navy, or gray can create a striking contrast. Gel stains with a satin or matte finish offer a more subtle and timeless look, while a high-gloss finish exudes a more contemporary and glamorous vibe.
Applying the Gel Stain
Stir the gel stain thoroughly before applying. Use a synthetic brush or a lint-free cloth to spread the stain evenly over the cabinet surface. Work in small sections and apply thin layers, allowing each layer to dry completely before applying the next. Use a clean brush or cloth to wipe away any excess stain, especially from raised panels or detailed areas. Let the final layer dry for at least 24 hours.
Protecting the Stain
Once the gel stain is dry, apply a clear protective finish to seal the color and protect it from wear and tear. Choose a finish that matches the desired sheen level, such as polyurethane, varnish, or lacquer. Apply two or three thin coats, letting each coat dry completely before applying the next. Allow the final coat to cure for several days before reinstalling the cabinet hardware.
Additional Tips
- Test the gel stain on an inconspicuous area first to ensure the color and finish are as desired.
- Use a light touch when sanding to avoid damaging the cabinet surface.
- Allow ample drying time between coats and before applying the protective finish.
- If desired, add a glaze or antiquing medium to enhance the depth and character of the finish.
- Regularly clean and polish the stained cabinets to maintain their beauty and durability.
Conclusion
With proper preparation and application, gel stain can transform kitchen cabinets into stunning focal points. By following these steps, you can achieve a professional-looking finish that will add value and style to your kitchen. Gel stain offers a cost-effective and versatile way to update your cabinets and create a one-of-a-kind look that reflects your personal taste and décor.

Gel Staining Kitchen Cabinets 6 Month Review Merrypad

How To Gel Stain Cabinets With Ease Diva Of Diy

Vintage Refined Gel Staining Kitchen Cabinets

Gel Stain Kitchen Cabinets Without Sanding Fast Easy Diy

10 Best Gel Stain Tips For Beginners Budgeting Bliss

Choosing The Right Dark Gel Stain Java Vs Walnut Staining Cabinets Kitchen Makeover Wood

Java Gel Stain Kitchen Transformation General Finishes Design Center

Gel Staining Kitchen Cabinets 6 Month Review Merrypad

How To Use Gel Stain On Cabinets The Good Bad

How To Gel Stain Cabinets Printable She Buys He Builds
Related Posts