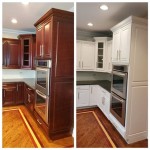
Glaze Colors For Kitchen Cabinets
Glazing kitchen cabinets is a finishing technique that enhances the depth and character of painted or stained wood surfaces. It involves applying a thin layer of semi-transparent color, typically darker than the base finish, into the crevices, corners, and details of the cabinet door. This application emphasizes the existing design elements and adds visual interest, creating a more aged and refined appearance.
The primary purpose of glazing is to highlight the intricate details of the cabinet door style. Raised panels, beaded edges, and other decorative features become more pronounced with the application of a glaze. The glaze settles into these areas, creating shadows and adding dimension that would otherwise be less apparent. This technique can transform standard cabinets into custom-looking installations.
Glaze colors are available in a wide spectrum, ranging from subtle, neutral tones to bolder, more contrasting shades. The selection of a glaze color should complement the base cabinet color and the overall aesthetic of the kitchen. Factors to consider include the style of the kitchen (traditional, contemporary, farmhouse), the desired level of contrast, and the existing colors in the room, such as countertops, flooring, and backsplash.
The application process is crucial for achieving the desired result. Glazing is typically applied after the base coat has been cured. The glaze is brushed or sprayed onto the cabinet door and then wiped away, leaving the color only in the recesses and details. The excess glaze is removed using a clean cloth, and the surface is then sealed with a protective topcoat. Professional application is often recommended to ensure a consistent and even finish.
While glaze can enhance the visual appeal of kitchen cabinets, it's essential to understand its impact on maintenance. Glazed cabinets may require more frequent cleaning than cabinets with a simple painted or stained finish. The glazed areas, particularly in high-traffic zones, can accumulate dirt and grime over time. Regular cleaning with a mild detergent and a soft cloth will help maintain the beauty of the glazed finish.
Understanding the Glaze Application Process
The glazing process is a multi-step procedure that requires careful attention to detail to achieve a professional and aesthetically pleasing outcome. The first step involves preparing the cabinet surface. This typically includes sanding the existing finish to create a slightly rough texture that will allow the glaze to adhere properly. The surface must be clean and free of dust, grease, or any other contaminants.
Once the surface is prepared, the glaze is applied. The application method can vary depending on the type of glaze and the desired effect. Brushing is a common method, particularly for smaller areas and intricate details. Spraying is another option, providing a more even and consistent coverage. Regardless of the method, the glaze should be applied in a thin, even layer.
The critical step is the wiping away of the excess glaze. This is done using a clean, lint-free cloth. The technique used for wiping will determine the final appearance of the glazed finish. Some applicators prefer to wipe in a circular motion, while others prefer to wipe in a straight line, following the grain of the wood. The amount of pressure applied during wiping will also affect the amount of glaze that remains in the recesses and details.
After the excess glaze has been removed, the surface is allowed to dry completely. The drying time will vary depending on the type of glaze and the environmental conditions. Once the glaze is dry, a protective topcoat is applied. The topcoat seals the glaze and provides a durable surface that will resist wear and tear. The topcoat can be a clear coat or a tinted coat, depending on the desired effect.
The entire process should be performed in a well-ventilated area to avoid the buildup of fumes. It's also important to wear appropriate protective gear, such as gloves and a mask, to prevent exposure to the chemicals in the glaze and topcoat. Proper disposal of used cloths and materials is also essential.
Popular Glaze Color Options
The selection of a glaze color is paramount in achieving the desired aesthetic for kitchen cabinets. Several popular options exist, each offering a distinct visual impact. Antique glaze is a classic choice, typically featuring a warm, brown tone that mimics the natural aging process of wood. This glaze adds a sense of history and character to the cabinets, making them look like they have been around for generations.
Black glaze is another popular option, particularly for contemporary and transitional kitchens. This glaze provides a high level of contrast against lighter base colors, such as white or cream. It accentuates the architectural details of the cabinets and adds a touch of drama and sophistication. Black glaze can also be used to create a more industrial or modern look.
Van Dyke Brown glaze is a traditional choice that offers a rich, warm tone. It's often used with cabinets that have a more rustic or traditional design. The Van Dyke Brown glaze adds depth and dimension to the wood grain, enhancing the natural beauty of the material. It pairs well with natural wood tones and earthy color palettes.
Pewter glaze provides a more subtle and sophisticated look. It's a gray-toned glaze that adds a touch of elegance and refinement to the cabinets. Pewter glaze works well with a variety of base colors, including white, gray, and blue. It creates a soft and muted effect that is perfect for creating a calming and inviting kitchen space.
For those seeking a more unique and personalized look, tinted glazes offer a wide range of color options. These glazes can be custom-mixed to match specific colors or to create a unique hue that complements the existing décor. Tinted glazes allow for greater flexibility in design and can be used to create a truly one-of-a-kind kitchen.
Maintenance and Care of Glazed Cabinets
Maintaining glazed kitchen cabinets requires a specific approach to ensure their longevity and continued beauty. Glaze, by nature of its application into crevices and details, can attract and retain dirt and grime more readily than a flat painted or stained surface. Therefore, regular cleaning is essential.
The primary cleaning method for glazed cabinets should involve a mild detergent mixed with warm water. Harsh chemicals or abrasive cleaners should be avoided, as they can damage the glaze and the underlying finish. A soft, non-abrasive cloth should be used to gently wipe the surfaces of the cabinets.
Particular attention should be paid to areas that are prone to grease and splatters, such as the cabinets around the stove and sink. These areas may require more frequent cleaning. A degreasing cleaner can be used sparingly, but it's important to test it on an inconspicuous area first to ensure that it doesn't damage the finish.
After cleaning, the cabinets should be thoroughly dried with a clean cloth. This will prevent water spots and streaks. For stubborn stains or grime, a soft-bristled brush can be used to gently scrub the affected area. However, it's important to avoid excessive pressure, as this can scratch the finish.
In addition to regular cleaning, preventative measures can be taken to protect glazed cabinets. Using a range hood while cooking can help to reduce the amount of grease and splatters that accumulate on the cabinets. Using placemats and coasters can help to protect the cabinets from spills and stains. Promptly cleaning up spills will also prevent them from setting and becoming more difficult to remove.
Periodically, the cabinets can be treated with a furniture polish or wax to protect the finish and enhance their shine. However, it's important to choose a product that is specifically designed for use on painted or glazed surfaces. Always test the product on an inconspicuous area first to ensure that it doesn't damage the finish.
By following these maintenance and care tips, homeowners can ensure that their glazed kitchen cabinets remain beautiful and functional for many years to come. Regular cleaning, gentle cleaning products, and preventative measures are key to preserving the integrity and aesthetic appeal of the glazed finish.

Give Your Kitchen A Whole New Look Without Spending Thousands Of Dollars By Glazing C Cabinets Makeover Glazed Renovation

3 Great Reasons To Glaze Your Kitchen Cabinets

How To Glaze Kitchen Cabinets Diyer S Guide Bob Vila

3 Steps To Glaze Cabinets Correctly Painted Furniture Ideas Distressed Kitchen Glazed Chalk Paint

How To Glaze Kitchen Cabinets Diyer S Guide Bob Vila

How To Glaze Cabinets At Home With The Barkers

Glazed Cabinets Add Traditional Depth Dimension To Any Kitchen

How To Glaze Cabinets At Home With The Barkers

Color Of The Month Maple Glaze Colorfully Behr

Glazed Cabinets Add Traditional Depth Dimension To Any Kitchen
Related Posts

