Glaze On Kitchen Cabinets: Enhancing Depth and Character
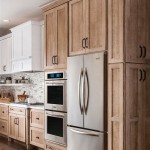
Glazing kitchen cabinets is a decorative finishing technique that enhances the existing color and adds depth and visual interest. It involves applying a thin layer of tinted coating, typically darker than the base paint or stain, into the recesses, corners, and details of the cabinet doors and frames. This process highlights the cabinet's architectural features, creating a subtle contrast and an aged, antique appearance. Glazing can transform ordinary kitchen cabinets into focal points, adding a touch of elegance and customization to the overall design.
The appeal of glazed kitchen cabinets lies in their ability to introduce dimension and subtle variations in tone. Unlike a uniform paint finish, glazing allows for nuances in color and texture, creating a more dynamic and visually appealing surface. This technique is particularly effective on cabinets with raised panel doors, intricate moldings, or other decorative elements. The glaze settles into these areas, accentuating their shape and adding depth.
Selecting the appropriate glaze and application method is crucial for achieving the desired effect. There are various types of glazes available, each with its own characteristics and application techniques. The choice depends on factors such as the base paint or stain color, the desired level of contrast, and the overall aesthetic of the kitchen.
Understanding Glaze Types and Their Properties
The selection of the right glaze is a critical step in the glazing process. Glazes are typically categorized based on their base, such as water-based, oil-based, or acrylic-based. Each type offers unique properties in terms of application, drying time, and durability.
Water-based glazes are known for their ease of use and clean-up. They are generally less toxic and have lower VOC (volatile organic compound) emissions compared to oil-based options. Water-based glazes are also more forgiving, allowing for easier manipulation and blending. However, they may not be as durable as oil-based glazes and may require a protective topcoat.
Oil-based glazes offer superior durability and adhesion. They penetrate the surface better than water-based glazes, resulting in a more robust finish. Oil-based glazes also provide a longer open time, meaning they remain workable for a longer period, allowing for more intricate application techniques. However, they require mineral spirits for clean-up and have higher VOC emissions, making them less environmentally friendly.
Acrylic-based glazes offer a balance between the advantages of water-based and oil-based options. They are relatively easy to use, clean up with water, and offer good durability. Acrylic glazes are also available in a wide range of colors and finishes, providing flexibility in design.
In addition to the base, glazes are also available in different colors and opacities. The color of the glaze should complement the base paint or stain, creating a harmonious contrast. Darker glazes, such as browns, blacks, or grays, are commonly used to create a traditional or antique look. Lighter glazes, such as creams or whites, can be used to create a more subtle effect.
The opacity of the glaze refers to its transparency. Opaque glazes provide more coverage and create a more dramatic contrast, while translucent glazes allow more of the base color to show through, resulting in a more subtle effect. The choice of opacity depends on the desired level of contrast and the overall aesthetic of the kitchen.
Preparation and Application Techniques
Proper preparation is essential for achieving a professional-looking glaze finish on kitchen cabinets. The cabinets must be thoroughly cleaned to remove any dirt, grease, or grime. Any existing finish should be lightly sanded to create a smooth, even surface for the glaze to adhere to.
After cleaning and sanding, the cabinets should be primed. Priming helps to seal the surface, improve adhesion, and create a uniform base for the glaze. Choose a primer that is compatible with the type of glaze being used. Applying a coat of base paint or stain before glazing is necessary if the original cabinets are unfinished. This step ensures that the glaze has a consistent surface to adhere to and enhances the overall color richness.
The application of the glaze involves applying a thin layer of the tinted coating to the cabinet surface. This can be done using a brush, rag, sponge, or spray gun. The choice of application method depends on the desired effect and the type of glaze being used.
When using a brush, apply the glaze in a thin, even layer, working it into the recesses and details of the cabinet doors and frames. Immediately after application, use a clean rag or sponge to wipe away the excess glaze, leaving it only in the crevices and contours. The amount of glaze that is wiped away will determine the intensity of the effect. Experiment with different techniques to achieve the desired look.
When using a rag or sponge, apply the glaze in a circular motion, working it into the surface. Use a clean section of the rag or sponge to wipe away the excess glaze. This method is particularly effective for creating a distressed or antique look.
When using a spray gun, apply the glaze in a thin, even coat. This method is ideal for achieving a uniform finish on large surfaces. After spraying, use a brush or rag to work the glaze into the details and wipe away the excess.
It is crucial to work in small sections and wipe the excess glaze away immediately. If the glaze is allowed to dry, it will be difficult to remove, which can result in an uneven or blotchy finish. Several light applications of glaze are preferable to one heavy application.
After the glaze has dried completely, apply a protective topcoat. The topcoat will seal the glaze and protect it from wear and tear. Choose a topcoat that is compatible with the type of glaze being used. Apply the topcoat in thin, even coats, allowing it to dry completely between coats.
Design Considerations and Aesthetic Effects
The choice of glaze color and application technique can significantly impact the overall aesthetic of the kitchen. Glazing can be used to create a variety of design styles, from traditional to contemporary.
For a traditional look, consider using a dark glaze, such as brown or black, with a heavy application. This will create a rich, antique appearance. Pair this with ornate hardware and traditional cabinet door styles.
For a more contemporary look, consider using a lighter glaze, such as cream or white, with a subtle application. This will add depth and dimension without overwhelming the overall design. Combine this with sleek hardware and minimalist cabinet door styles.
Glazing can also be used to create a distressed or weathered look. This can be achieved by using a rag or sponge to apply the glaze in a random pattern. After applying the glaze, use sandpaper to lightly sand the edges and corners of the cabinets, revealing the base paint or stain. This technique is ideal for creating a rustic or farmhouse-style kitchen.
The color of the glaze can also be used to complement the other colors in the kitchen. For example, if the kitchen has blue walls, consider using a gray or blue-toned glaze on the cabinets. This will create a cohesive and harmonious color scheme.
Additionally, glaze can be applied selectively to certain areas of the cabinets to highlight specific features. For instance, glaze can be applied only to the raised panels of the cabinet doors, drawing attention to their shape and detail. Alternatively, glaze can be applied only to the edges of the cabinets, creating a subtle contrast and adding depth.
Proper lighting is essential for showcasing the beauty of glazed kitchen cabinets. Under-cabinet lighting can highlight the details and textures of the glaze, creating a warm and inviting atmosphere. Pendant lighting can also be used to draw attention to the cabinets and create a focal point in the kitchen.
Glazing kitchen cabinets is a versatile and effective way to enhance their appearance and add character to the kitchen. By carefully selecting the appropriate glaze, application technique, and lighting, one can create a unique and personalized space that reflects individual style and taste.

How To Glaze Kitchen Cabinets Diyer S Guide Bob Vila

Rescuing And Reviving A Glazed Distressed Kitchen Bella Tucker

3 Great Reasons To Glaze Your Kitchen Cabinets

How To Glaze Cabinets At Home With The Barkers

How To Glaze Kitchen Cabinets

Glazed Cabinets Add Traditional Depth Dimension To Any Kitchen

How To Glaze Kitchen Cabinets Diyer S Guide Bob Vila

How To Glaze Cabinets Like A Pro

Glazed Cabinets Add Traditional Depth Dimension To Any Kitchen Antique White Beige

How To Glaze Cabinets At Home With The Barkers
Related Posts

