Essential Aspects of Glazing Kitchen Cabinets Techniques
Glazing kitchen cabinets adds a unique touch of elegance and sophistication to any kitchen. The process involves applying a clear or colored glass finish to the cabinet doors and drawer fronts. While it may seem like a daunting task, glazing kitchen cabinets can be an easy and rewarding DIY project if done correctly.
### Types of Glazing TechniquesThere are two main techniques for glazing kitchen cabinets:
brush-on
andspray-on
. Brush-on glazing is applied with a brush, providing a more rustic and uneven finish. Spray-on glazing is applied using a paint sprayer, resulting in a smoother and more even finish. ### Glazing MaterialsThe choice of glazing materials is crucial for achieving the desired effect. Water-based glazes are easy to apply and clean up, making them a popular choice for beginners. Oil-based glazes are more durable and provide a richer finish, but are more difficult to work with.
### Preparing the CabinetsBefore glazing, the cabinets must be properly prepared to ensure optimal adhesion. Clean the cabinets thoroughly with a degreaser to remove any dirt or grease. Sand the cabinet surfaces lightly with fine-grit sandpaper to create a smooth base for the glaze. Apply a primer to prevent the glaze from absorbing into the wood.
### Applying the GlazeBrush-on glazing: Dip a soft-bristled brush into the glaze and apply it in thin, even strokes along the grain of the wood. Allow the glaze to dry completely between coats.
Spray-on glazing: Fill a paint sprayer with the glaze and spray it evenly over the cabinet surfaces. Adjust the spray pattern and nozzle size as needed to achieve the desired finish.
### Finishing the GlazeOnce the glaze has dried completely, it should be sealed to protect it from wear and tear. Apply a clear topcoat, such as polyurethane or lacquer, using a brush or spray gun. Allow the topcoat to dry thoroughly before using the cabinets.
### Tips for Success- Use a high-quality glaze specifically designed for kitchen cabinets.
- Practice on a spare piece of wood before glazing the actual cabinets.
- Apply thin coats and allow each coat to dry before applying the next.
- Use a clean, soft brush or spray gun to avoid streaks or bubbles.
- Protect the glaze from moisture and heat during drying.
### ConclusionGlazing kitchen cabinets is a versatile and rewarding project that can transform the look of your kitchen. By following these essential aspects, you can achieve a professional-looking finish that will enhance the beauty and durability of your cabinets for years to come.

How To Glaze Kitchen Cabinets

How To Glaze Kitchen Cabinets Diyer S Guide Bob Vila

How To Glaze Cabinets At Home With The Barkers

How To Glaze Cabinets At Home With The Barkers

How To Glaze Kitchen Cabinets Diy Network

Porchswings N Honeysuckle Paint And Glaze Cabinet Tutorial Kitchen Renovation Glazed Cabinets Makeover

How To Glaze Cabinets At Home With The Barkers

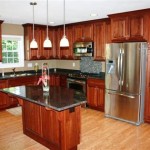
Glazed Cabinets Add Traditional Depth Dimension To Any Kitchen

How To Glaze Cabinets With Gel Stain Adventures Of A Diy Mom

How To Glaze Cabinets At Home With The Barkers
Related Posts