Hanging Kitchen Cabinets on Brick Walls: A Comprehensive Guide
Mounting kitchen cabinets onto brick walls presents a unique set of challenges compared to installations on drywall or wood stud walls. Brick, while structurally sound, requires specific techniques and hardware to ensure a secure and lasting attachment. This article provides a detailed guide to safely and effectively hanging kitchen cabinets on brick walls, covering necessary tools, materials, preparation steps, and installation procedures. The aim is to equip readers with the knowledge to undertake this task with confidence, achieving aesthetically pleasing and functionally robust kitchen cabinetry.
Before commencing the installation, it is crucial to assess the condition of the brick wall. Cracks, crumbling mortar, or spalling bricks can compromise the integrity of the anchoring points, rendering the installation unsafe. Addressing these issues before proceeding is paramount. This may involve repointing mortar joints, replacing damaged bricks, or applying a brick sealant to prevent further deterioration due to moisture ingress. Ignoring existing damage can lead to cabinet instability and potential wall damage over time.
Furthermore, understanding the type of brick is important. Solid brick offers the most reliable anchoring. Hollow brick or brick veneer require specialized anchors designed for use with these materials. Using the incorrect type of anchor can result in failed connections and cabinet instability. The load-bearing capacity of the chosen anchor should always exceed the combined weight of the cabinet and its contents.
Key Point 1: Essential Tools and Materials
Successful cabinet installation on brick necessitates specific tools and materials. Having these readily available will streamline the process and improve the quality of the result. The following list represents essential items:
1. Rotary Hammer Drill: Unlike a conventional drill, a rotary hammer drill delivers a percussive hammering action in addition to rotation. This is essential for efficiently drilling through brick and mortar. Consider a model with adjustable speed and clutch settings for optimal control.
2. Masonry Drill Bits: High-quality carbide-tipped masonry drill bits are indispensable. Choose bits that are specifically designed for drilling through brick. The size of the bit must correspond to the diameter of the chosen anchors. Using dull or inappropriate drill bits can damage the brick and the drill itself.
3. Brick Anchors: Selecting the correct brick anchors is critical. Several types are available, each suited for different applications and brick types. Sleeve anchors are commonly used for heavier loads and solid brick. Wedge anchors offer exceptional holding power and are also suitable for solid brick. Tapcon screws are a popular choice for lighter loads and are relatively easy to install. For hollow brick or brick veneer, specialized hollow wall anchors or toggle bolts are required. Always consult the manufacturer's specifications to determine the appropriate anchor for the specific application and anticipated load.
4. Level: A level is crucial for ensuring the cabinets are installed plumb and level. A 4-foot level is recommended for aligning cabinets along their length. A smaller torpedo level can be useful for checking individual cabinet sections.
5. Measuring Tape: Accurate measurements are fundamental for proper cabinet placement and alignment. A measuring tape is essential for determining cabinet spacing, height, and overall layout.
6. Stud Finder (Optional): While not directly used on brick, a stud finder can be helpful for locating studs in adjacent walls, which might be used for anchoring supporting structures or determining the optimal placement of the cabinet run in relation to existing wall features.
7. Shims: Shims are thin, tapered pieces of wood or plastic used to adjust the alignment of cabinets. They are particularly useful for compensating for uneven surfaces on the brick wall. Using shims behind the cabinets ensures they are plumb and level, even if the wall is not perfectly straight.
8. Screwdrivers and Wrenches: Various screwdrivers (Phillips and flathead) and wrenches are needed for installing and tightening screws and bolts. The specific sizes will depend on the type of anchors used.
9. Safety Glasses and Dust Mask: Drilling into brick generates significant dust and debris. Wearing safety glasses and a dust mask is essential to protect your eyes and respiratory system.
10. Hammer: A hammer may be required for tapping anchors into place or for driving shims.
11. Pencil or Marker: For marking drilling locations and cabinet placement on the brick wall.
12. Cabinet Screws: High-quality cabinet screws are necessary for securing the cabinets together and to the wall mounting strips. Choose screws that are of sufficient length and strength to handle the weight of the cabinets and their contents.
13. Construction Adhesive (Optional): Construction adhesive can be applied to the back of the cabinets to provide additional bonding to the brick wall. This is particularly useful if the wall surface is uneven or if additional security is desired.
14. Spacers or Temporary Supports: These are used to hold the cabinets in place while they are being installed. They can be homemade wooden supports or commercially available cabinet jacks.
Key Point 2: Preparing the Brick Wall and Cabinet Layout
Proper preparation is crucial for achieving a successful and aesthetically pleasing cabinet installation. This involves cleaning the brick wall, determining the optimal cabinet layout, and accurately marking drilling locations.
1. Cleaning the Brick Wall: Begin by thoroughly cleaning the brick wall. Remove any loose mortar, dust, or debris using a wire brush or scraper. Clean the surface with a damp cloth to ensure a clean and stable surface for mounting. A clean surface will also allow construction adhesive (if used) to bond effectively.
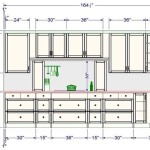
2. Determining Cabinet Layout: Carefully plan the layout of the cabinets. Consider the placement of appliances, plumbing, and electrical outlets. Use a level to draw horizontal and vertical lines on the wall to indicate the top and bottom of the cabinets. These lines will serve as a guide during the installation process.
3. Locating Studs in Adjacent Walls: If the cabinet run abuts other walls, use a stud finder to locate the studs. These studs can provide additional anchoring points for the cabinet end panels, increasing stability.
4. Marking Drilling Locations: Accurately mark the drilling locations on the brick wall. Use a level and measuring tape to ensure the marks are aligned with the cabinet mounting points. Consider using a template to ensure consistent spacing between the anchor points. Double-check all measurements before drilling to avoid errors.
5. Pilot Holes (Optional): For hard brick, consider drilling pilot holes using a smaller drill bit before using the final drill bit size. This can help prevent the drill bit from wandering and ensure accurate hole placement.
6. Pre-Drilling Mounting Strips: If using mounting strips, pre-drill the holes that will align with the cabinet mounting points. This will streamline the installation process and ensure that the screws are properly aligned.
7. Considering Electrical and Plumbing: Ensure that the planned drilling locations do not interfere with any electrical wiring or plumbing pipes concealed within the wall. Use caution when drilling and consult with a qualified electrician or plumber if necessary.
Key Point 3: Installation Procedure
The installation process involves carefully drilling holes into the brick, installing the anchors, and securing the cabinets to the wall. The following steps outline the recommended procedure:
1. Drilling Holes: Using a rotary hammer drill and the appropriate size masonry drill bit, drill holes into the brick at the marked locations. Drill straight and maintain a consistent depth. Ensure that the depth of the hole matches the length of the chosen anchors. Avoid applying excessive pressure, which can damage the drill bit or the brick. Remove dust and debris from the holes using a brush or vacuum cleaner.
2. Installing Anchors: Insert the chosen brick anchors into the drilled holes. Follow the manufacturer's instructions for the specific type of anchor being used. Sleeve anchors typically require tightening a nut to expand the sleeve and grip the brick. Wedge anchors are driven into the hole with a hammer. Tapcon screws are screwed directly into the hole using a screwdriver or drill.
3. Installing Mounting Strips (Optional): If using mounting strips, align the strips with the installed anchors and secure them using screws or bolts. Ensure the strips are level and plumb.
4. Lifting and Positioning Cabinets: Carefully lift the first cabinet into position, using spacers or temporary supports to hold it in place. Align the cabinet with the marked lines on the wall and ensure it is level and plumb. Using shims behind the cabinet can help compensate for unevenness in the wall.
5. Securing Cabinets to Anchors: Secure the cabinet to the installed anchors using screws or bolts. Ensure the screws are of the correct length and strength to hold the weight of the cabinet. Tighten the screws securely, but avoid over-tightening, which can damage the brick or the cabinet.
6. Installing Remaining Cabinets: Repeat steps 4 and 5 for the remaining cabinets, ensuring they are aligned with each other and with the previously installed cabinets. Use cabinet screws to connect adjacent cabinets together.
7. Adjusting and Fine-Tuning: Once all the cabinets are installed, carefully inspect the installation. Check for levelness, plumbness, and alignment. Make any necessary adjustments using shims or by loosening and re-tightening the screws. Ensure that all cabinets are securely attached to the wall.
8. Caulking (Optional): Apply a bead of caulk along the top and sides of the cabinets to seal any gaps between the cabinets and the wall. This will prevent moisture from entering and protect the cabinets from damage.
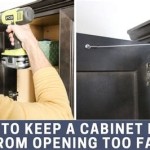
9. Installing Doors and Hardware: Finally, install the cabinet doors, drawers, and hardware. Adjust the hinges and drawer slides as necessary to ensure smooth operation.
Adhering to these guidelines and using appropriate tools and materials will result in a secure and professional-looking kitchen cabinet installation on brick walls. Proper planning and execution are essential for achieving a long-lasting and aesthetically pleasing result.

How To Hang Cabinets On A Brick Wall Fine Homebuilding

Blue Kitchen Cabinets With White Countertops And Red Brick Walls Is A Bold Contrasting Idea Touch O Remodel Cabinet Design

Brick Wall Designs For The Kitchen Designcafe

25 Modern Kitchens And Interior Brick Wall Design Ideas Kitchen Interiors

50 Trendy And Timeless Kitchens With Beautiful Brick Walls Decoist

50 Trendy And Timeless Kitchens With Beautiful Brick Walls Decoist

How To Update Your Kitchen S Backsplash Using Bricks

Brick Backsplash Ideas Stone Subway Tile Com

Brick Backsplash Ideas Kitchen Dark Cabinets Espresso

Diy Brick Backsplash Redhead Can Decorate
Related Posts