High Gloss Cream Kitchen Cupboard Paint: Achieving a Polished Aesthetic
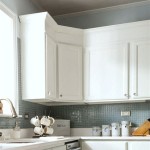
The application of high gloss cream paint to kitchen cupboards presents a sophisticated design choice, offering a blend of classic warmth and modern reflectivity. This particular finish can significantly transform the look of a kitchen, enhancing its brightness and creating a visually appealing space. Understanding the nuances of high gloss cream paint, from its selection and application to its maintenance, is crucial for achieving optimal results.
High gloss paint is characterized by its exceptionally smooth, reflective surface. This high level of sheen is achieved through a higher concentration of resins in the paint formulation. The increased resin content allows the paint to level out more effectively during the drying process, minimizing brushstrokes and creating a mirror-like finish. Cream, as a color, provides a softer alternative to stark white, offering a neutral backdrop that complements a variety of kitchen styles, from traditional to contemporary.
Selecting the right high gloss cream paint for kitchen cupboards involves considering several factors. The type of paint base – oil-based or water-based – significantly impacts its durability, application, and cleanup. Furthermore, the precise shade of cream should be carefully chosen to harmonize with existing elements within the kitchen, such as countertops, flooring, and appliances. The quality of the paint itself is also paramount, as higher-quality paints typically offer superior adhesion, coverage, and resistance to chipping and scratching. Finally, consider the paint's VOC (volatile organic compound) content, opting for low-VOC options to minimize indoor air pollution.
Understanding the Properties of High Gloss Cream Paint
The defining characteristic of high gloss paint is its reflectivity. This inherent property offers several advantages in a kitchen setting. Firstly, it enhances natural and artificial light, making the space appear brighter and more spacious. This is particularly beneficial for kitchens with limited natural light or smaller footprints. Secondly, the smooth surface of high gloss paint is less porous than matte or satin finishes, making it easier to clean and maintain. Splatters, grease, and spills can be readily wiped away without leaving stains or residue. This is especially important in the kitchen, where surfaces are frequently exposed to food and liquids.
However, the high reflectivity of high gloss paint also presents certain challenges. Any imperfections on the cupboard surfaces, such as dents, scratches, or unevenness, will be amplified by the sheen. Therefore, meticulous surface preparation is essential before applying high gloss paint. In addition, high gloss paint can be more challenging to apply than paints with lower sheens. Its tendency to run or drip requires careful application techniques and attention to detail. Finally, high gloss paint may show fingerprints and smudges more readily than matte or eggshell finishes, requiring more frequent cleaning to maintain a pristine appearance.
Oil-based high gloss paints offer exceptional durability and a hard, resilient finish. They are known for their excellent leveling properties, resulting in a smooth, glass-like surface. However, oil-based paints have a longer drying time, emit stronger odors, and require the use of solvents for cleanup. Water-based (latex) high gloss paints, on the other hand, dry more quickly, have lower VOC content, and can be cleaned up with water. While they may not be quite as durable as oil-based paints, advancements in paint technology have significantly improved the performance of water-based options. Choosing between oil-based and water-based paints depends on individual priorities, considering factors such as durability, environmental concerns, and ease of use.
Surface Preparation: The Key to a Flawless Finish
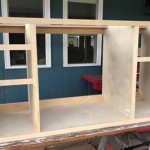
The success of any paint project, particularly with high gloss finishes, hinges on thorough surface preparation. Imperfections that are barely noticeable under a matte finish will be glaringly apparent under a high gloss sheen. Therefore, every step of the preparation process must be executed with precision and attention to detail. The initial step involves cleaning the cupboard surfaces to remove any grease, dirt, or grime. A degreasing cleaner is recommended for this purpose. Rinse thoroughly with clean water and allow the cupboards to dry completely.
Next, inspect the cupboards for any damage, such as dents, scratches, or chips. Fill any imperfections with wood filler, allowing it to dry completely according to the manufacturer's instructions. Once the filler is dry, sand the surface smooth with fine-grit sandpaper (220-grit or higher). Feather the edges of the filled areas to blend them seamlessly with the surrounding surface. Sanding is crucial for creating a smooth, even base for the paint to adhere to.
After sanding, prime the cupboards with a high-quality primer designed for use with high gloss paint. Primer serves several important functions: it seals the surface, providing a uniform base for the paint; it improves adhesion, preventing the paint from chipping or peeling; and it helps to block stains and prevent bleed-through from the underlying wood. Apply the primer in thin, even coats, following the manufacturer's recommendations for drying time. Once the primer is dry, lightly sand the surface with fine-grit sandpaper to remove any imperfections or brushstrokes. This ensures a perfectly smooth surface for the final coat of high gloss cream paint.
Consider the type of wood the cupboards are made from. Some woods, particularly those with open pores, may require a wood filler or grain filler to create a perfectly smooth surface. This will prevent the grain from showing through the paint and creating an uneven finish.
Application Techniques for High Gloss Cream Paint
Applying high gloss paint requires patience and precision. The goal is to achieve a smooth, even coat with minimal brushstrokes or roller marks. Choose high-quality brushes and rollers specifically designed for use with high gloss paint. These tools will typically have fine, synthetic bristles or a smooth, foam roller cover that minimizes texture and ensures a uniform finish. Before beginning, protect the surrounding areas with drop cloths and painter's tape to prevent splatters and drips.
Stir the paint thoroughly to ensure that the pigments and resins are evenly distributed. Pour a small amount of paint into a paint tray and load the brush or roller sparingly. Apply the paint in thin, even coats, working in small sections at a time. Avoid applying too much paint at once, as this can lead to runs and drips. Use long, smooth strokes to apply the paint, overlapping each stroke slightly to ensure complete coverage. When using a brush, hold it at a slight angle to the surface and apply the paint with a light touch. When using a roller, apply the paint in a "W" pattern and then fill in the pattern with vertical strokes.
After applying the first coat of paint, allow it to dry completely according to the manufacturer's instructions. Lightly sand the surface with fine-grit sandpaper to remove any imperfections or brushstrokes. Wipe away the sanding dust with a tack cloth before applying the second coat of paint. Repeat the application process for the second coat, ensuring that it is applied in thin, even layers. Allow the second coat to dry completely before handling the cupboards. In some cases, a third coat may be necessary to achieve optimal coverage and a flawless finish.
For achieving a particularly smooth, professional finish, consider using a paint sprayer. Paint sprayers atomize the paint, creating a fine mist that is evenly distributed across the surface. This can result in a smoother, more uniform finish than can be achieved with a brush or roller. However, paint sprayers require practice and skill to use effectively. It is important to follow the manufacturer's instructions carefully and to wear appropriate safety gear, such as a respirator and eye protection.
Drying time is crucial for high gloss paint. Ensure adequate ventilation in the room to facilitate proper drying. Avoid touching or handling the painted surfaces until they are completely dry to prevent fingerprints and smudges.

76 Best High Gloss Kitchen Ideas

36 Cream Gloss Kitchens Ideas Kitchen Design

15 Best Cream Gloss Kitchen Ideas Decor

Avant Ivory Kitchen Modern White Cabinets Painting Decor

Cream Pu Paint Cupboard

Innova Luca Gloss Cream Handleless Kitchen Glossy White

Cooke Lewis High Gloss Cream Kitchen Contemporary Hampshire Houzz Ie

Livorna Cream Kitchens Buy Kitchen Units At Trade S

High Gloss Cream Contemporary Kitchen Design Ipc428 Cabinet Ideas 2024 Al Habib Panel Doors

Painting Kitchen Cabinets Cupboards Complete Guide Rawlins Paints
Related Posts