How to Update Wood Kitchen Cabinets Without Damaging Them
Wood kitchen cabinets are a significant investment and a defining feature of many homes. Over time, however, they may begin to look dated or simply no longer align with evolving aesthetic preferences. Undertaking a cabinet update is a common remodeling project. However, it is crucial to approach this task with caution to avoid causing irreversible damage to the wood. This article explores several methods for updating wood kitchen cabinets while minimizing the risk of harm, ensuring that the cabinets retain their structural integrity and value.
The initial step in any cabinet update project is a thorough assessment of the cabinets' current condition. Careful inspection reveals potential areas of concern, such as scratches, dents, water damage, or accumulated grime. Understanding the existing finish type (e.g., varnish, lacquer, paint) is also essential, as this will dictate the appropriate cleaning agents and refinishing techniques. A detailed assessment prevents the use of incompatible products or methods that could degrade the wood or existing finish.
Gentle Cleaning and Preparation
Before any cosmetic alterations are made, the cabinets must be thoroughly cleaned. This removes dirt, grease, and any other contaminants that could interfere with the adhesion of new finishes or paints. Harsh cleaning agents are ill-advised, as they can strip the existing finish or damage the wood surface. Instead, a mild solution of dish soap and warm water is generally sufficient. A soft cloth or sponge should be used to gently scrub the cabinets, paying particular attention to areas around handles and hinges where grease tends to accumulate. After washing, the cabinets should be rinsed with clean water and thoroughly dried.
For cabinets with stubborn grime, a specialized wood cleaner can be used. However, it is imperative to test the cleaner in an inconspicuous area first to ensure that it does not discolor or damage the existing finish. Follow the manufacturer's instructions carefully and avoid prolonged contact with the cabinet surface. Once cleaned, allow the cabinets to dry completely before proceeding to the next step.
Proper preparation is key to achieving a professional and long-lasting finish. This often includes lightly sanding the cabinet surfaces to create a slightly rough texture that will allow new paint or stain to adhere more effectively. Fine-grit sandpaper (220-grit or higher) should be used, and sanding should be done in the direction of the wood grain. Excessive sanding should be avoided, as it can remove too much of the existing finish or even damage the wood itself. The goal is simply to scuff the surface, not to remove it entirely.
After sanding, it is crucial to remove all sanding dust. A tack cloth is ideal for this purpose, as it will pick up even the finest particles. Alternatively, a damp cloth can be used, followed by a thorough drying. Ensuring that the cabinet surfaces are clean and free of dust will prevent imperfections in the final finish.
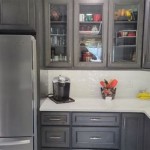
Refacing: A Less Invasive Option
Refacing cabinets involves replacing the cabinet doors and drawer fronts while retaining the existing cabinet boxes. This is a less invasive alternative to completely replacing the cabinets, as it minimizes disruption to the kitchen and reduces the risk of damage associated with demolition. Refacing can dramatically change the appearance of a kitchen without the significant cost and effort of a full remodel.
The first step in refacing is to carefully remove the existing doors and drawer fronts. These should be stored safely to prevent damage. Next, the exposed cabinet boxes are prepared by cleaning and sanding, as described above. Veneer or laminate is then applied to the exterior surfaces of the cabinet boxes to match the new doors and drawer fronts. This creates a seamless and consistent appearance.
The new doors and drawer fronts are typically custom-made to fit the existing cabinet boxes. This ensures a precise fit and a professional look. Once the veneer or laminate has been applied, the new doors and drawer fronts are installed using new hinges and hardware. The choice of hinges and hardware can further enhance the updated look of the cabinets.
Refacing is a viable option for cabinets that are structurally sound but aesthetically outdated. It is important to choose high-quality materials for the new doors, drawer fronts, and veneer or laminate to ensure durability and longevity. Proper installation is also crucial, as a poorly executed refacing job can look worse than the original cabinets.
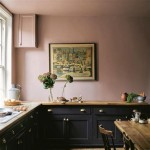
Painting or Staining: Transforming the Existing Finish
Painting or staining is another popular method for updating wood kitchen cabinets. This allows for a complete transformation of the cabinets' appearance without the need for replacement or extensive refacing. However, it is crucial to choose the right type of paint or stain and to follow proper application techniques to avoid damaging the wood or creating an uneven finish.
When choosing a paint or stain, it is important to consider the existing finish and the desired final look. For cabinets that have already been painted, a primer specifically designed for painted surfaces should be used to ensure proper adhesion. For cabinets with a clear finish, such as varnish or lacquer, a bonding primer may be necessary to prevent the new paint from peeling or chipping. Oil-based paints and stains are generally more durable than water-based products, but they also require more careful preparation and ventilation due to their strong fumes.
Before painting or staining, the cabinets should be thoroughly cleaned and sanded, as described above. Any holes or imperfections should be filled with wood filler and sanded smooth. The area surrounding the cabinets should be protected with drop cloths or plastic sheeting to prevent paint or stain from getting on floors or other surfaces. It is also advisable to remove or cover any hardware, such as hinges and knobs, to protect them from paint or stain.
The paint or stain should be applied in thin, even coats, using a high-quality brush or roller. Multiple coats may be necessary to achieve the desired coverage and color. Each coat should be allowed to dry completely before applying the next. Sanding lightly between coats can help to create a smoother finish. A topcoat of clear varnish or polyurethane can be applied to protect the painted or stained surface and to enhance its durability.
Staining allows the natural wood grain to show through, providing a more subtle and natural look. The cabinets must be properly prepared to accept the stain, and the stain should be applied evenly to avoid blotches or streaks. A clear topcoat is essential to protect the stained surface and to prevent it from fading or scratching. Painting offers a wider range of color options and can completely transform the appearance of the cabinets. However, painted cabinets are more prone to chipping and scratching than stained cabinets, so it is important to choose a durable paint and to apply a protective topcoat.
Choosing the right materials and techniques is crucial for achieving a successful and long-lasting paint or stain job. Improper preparation or application can result in a finish that is uneven, prone to peeling, or easily damaged. It is always advisable to consult with a professional if one is unsure about any aspect of the painting or staining process.
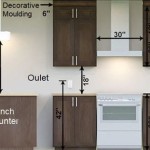
Hardware Updates: A Simple Yet Effective Change
One of the simplest and least invasive ways to update wood kitchen cabinets is to replace the hardware. New knobs, pulls, and hinges can dramatically change the look of the cabinets without requiring any major alterations to the wood itself. This is a cost-effective way to refresh the kitchen's aesthetic and to personalize the cabinets to one's taste.
When choosing new hardware, it is important to consider the style of the cabinets and the overall design of the kitchen. There are countless options available, from classic and traditional styles to modern and contemporary designs. The finish of the hardware should also complement the color of the cabinets and the other fixtures in the kitchen. Brass, chrome, nickel, and black are all popular choices.
Before purchasing new hardware, it is important to measure the existing hardware to ensure that the new hardware will fit properly. The spacing between the screw holes on the existing knobs or pulls should be measured, and the new hardware should have the same spacing. If the new hardware has a different screw hole spacing, it may be necessary to drill new holes in the cabinets. However, this should be done with caution to avoid damaging the wood. A drill bit that is slightly smaller than the screw size should be used, and the drilling should be done slowly and carefully.
Replacing the hinges is also a relatively simple task. It is important to choose hinges that are the same size and type as the existing hinges. The new hinges should be aligned properly and screwed in securely. If the screw holes are stripped, wood glue and toothpicks can be used to fill the holes before re-inserting the screws.
Updating the hardware is a quick and easy way to refresh the look of wood kitchen cabinets without causing any significant damage. It is a versatile option that can be tailored to one's individual preferences and budget. New hardware can add a touch of elegance, sophistication, or modernity to the kitchen, depending on the style chosen.
By employing these methods – gentle cleaning and preparation, refacing, painting or staining with care, and hardware updates – it is possible to update wood kitchen cabinets effectively while minimizing the risk of damage. Ultimately, careful planning, meticulous execution, and the selection of appropriate materials are crucial for achieving a successful and aesthetically pleasing outcome that preserves the integrity of the cabinets.

How To Update Your Kitchen Cabinets Without Replacing Them Real Estate U S News

How To Make Oak Kitchen Cabinets Look Modern Without Painting The Diy Nuts

How To Update Your Kitchen Without Breaking The Bank

How To Re Oak Cabinets No Sanding Or Painting Simply Diy Home

How To Update A Kitchen With Wood Cabinets Without Painting Them Designed

How To Paint Kitchen Cabinets Without Sanding Or Priming

How To Do A Kitchen Makeover Cabinet Doors N More

Updating A Kitchen Without Removing Cabinets Four Generations

How To Remove Kitchen Cabinets Budget Dumpster

Tips Tricks To Paint Honey Oak Kitchen Cabinets Cottage Living And Style
Related Posts