How To Refresh Your Kitchen Cabinets: A Comprehensive Guide
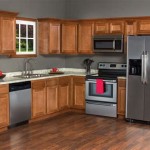
Kitchen cabinets often serve as the visual anchor of the space. Their appearance significantly impacts the overall aesthetic of the room. Over time, cabinets can become worn, stained, or simply outdated, diminishing the kitchen's appeal. Rather than undertaking a complete kitchen renovation, which can be costly and disruptive, several strategies exist to enhance the appearance of existing cabinets. These strategies range from simple cleaning and organization to more involved processes like repainting or refacing.
The feasibility of each method depends on the current condition of the cabinets, their material composition, and the desired outcome. Careful assessment and planning are crucial before commencing any project to ensure a successful and visually pleasing result. This article explores various methods to improve the look of kitchen cabinets, providing detailed guidance on preparation, execution, and material selection.
Deep Cleaning and Decluttering
The initial step in improving the appearance of kitchen cabinets involves a thorough cleaning and decluttering process. This basic step can often yield surprisingly positive results, removing accumulated grease, grime, and clutter that detract from the cabinets' visual appeal. Start by emptying the cabinets entirely, removing all contents, including dishes, cookware, and food items. This allows for unobstructed access to all surfaces, facilitating a more effective cleaning.
Next, assess the interior and exterior of the cabinets for any visible stains, spills, or food residue. Use a mild detergent mixed with warm water to wipe down all surfaces, paying particular attention to areas around handles and knobs, where grease tends to accumulate. For stubborn stains or sticky residue, a specialized kitchen cabinet cleaner may be necessary. Always test any cleaning product in an inconspicuous area first to ensure it does not damage the cabinet finish. Avoid using abrasive cleaners or scouring pads, as these can scratch or dull the surface.
Once the cabinets are clean, take the opportunity to declutter and organize the contents. Discard any expired food items or unnecessary kitchen gadgets. Group similar items together and consider using organizers like shelf dividers, pull-out baskets, or lazy Susans to maximize space and improve accessibility. Well-organized cabinets not only look better but also function more efficiently, contributing to an overall improved kitchen environment.
After cleaning and organizing the interior, focus on the exterior of the cabinets. Wipe down the doors and drawer fronts with a clean, damp cloth to remove any remaining dust or fingerprints. For cabinets with intricate detailing, use a soft brush to reach into crevices and remove any accumulated dirt. Finally, polish the hardware with a metal cleaner to restore its shine. This simple cleaning and decluttering process can significantly enhance the appearance of kitchen cabinets, making them look brighter and more inviting.
Repainting or Restaining Cabinets
Repainting or restaining kitchen cabinets offers a more dramatic transformation compared to simple cleaning. This option allows for a complete change in color or finish, updating the cabinets to reflect current design trends or personal preferences. However, this process requires careful preparation and execution to achieve a professional-looking result.
The first step is to thoroughly clean the cabinets, removing any grease, grime, or loose paint. Fill any holes or cracks with wood filler and sand the surfaces smooth. This creates a uniform base for the new paint or stain to adhere to. Sanding is crucial for proper adhesion and a smooth finish. Use a medium-grit sandpaper to remove any existing sheen and create a slightly roughened surface. Follow with a fine-grit sandpaper for a smoother final result. After sanding, wipe down the cabinets with a tack cloth to remove any remaining dust.
Next, apply a primer specifically designed for kitchen cabinets. Primer helps to seal the wood, prevent stains from bleeding through, and provide a better surface for the paint or stain to adhere to. Choose a primer that is compatible with the type of paint or stain you plan to use. Apply the primer in thin, even coats, allowing it to dry completely between coats. Once the primer is dry, lightly sand the surface again with fine-grit sandpaper to remove any imperfections.
For painting, choose a high-quality paint specifically formulated for kitchen cabinets. Oil-based paints offer excellent durability and a smooth, glossy finish, but they require more time to dry and can be more difficult to clean up. Latex-based paints are easier to use and clean up, but they may not be as durable. Apply the paint in thin, even coats, using a brush, roller, or sprayer. Allow each coat to dry completely before applying the next. Two or three coats may be necessary to achieve full coverage and a uniform color.
For staining, choose a stain that complements the existing wood grain and enhances its natural beauty. Apply the stain with a brush or cloth, following the manufacturer's instructions. Allow the stain to soak into the wood for the recommended time, then wipe off any excess stain. Apply a clear topcoat to protect the stained surface and provide a durable finish. Multiple coats of topcoat may be necessary to achieve the desired level of protection and sheen.
After painting or staining, allow the cabinets to dry completely before reattaching the hardware. Consider replacing the hardware with new knobs and pulls to further update the look of the cabinets. Reinstall the doors and drawers, ensuring they are properly aligned and function smoothly.
Refacing Kitchen Cabinets
Refacing kitchen cabinets involves replacing the existing cabinet doors and drawer fronts while keeping the cabinet boxes intact. This option offers a significant visual upgrade at a lower cost than replacing the entire cabinet system. Refacing is particularly suitable for cabinets with structurally sound boxes but outdated or damaged doors and drawer fronts.
The refacing process begins with selecting new doors and drawer fronts that complement the existing kitchen design and personal preferences. A wide range of materials, styles, and finishes are available, including wood, laminate, and thermofoil. Measure the existing doors and drawer fronts accurately to ensure a proper fit. Consider the style of the doors, such as raised panel, flat panel, or shaker style, as well as the finish, such as painted, stained, or glazed.
Once the new doors and drawer fronts are selected, the existing hardware is removed from the old doors and drawer fronts and set aside or replaced. The next step involves preparing the cabinet boxes for refacing. This includes cleaning the surfaces thoroughly and repairing any damage. Fill any holes or cracks with wood filler and sand the surfaces smooth. If the cabinet boxes are a different color or finish than the new doors and drawer fronts, they may need to be painted or stained to match.
After the cabinet boxes are prepared, the new doors and drawer fronts are installed. The doors are typically attached with new hinges, while the drawer fronts are attached with screws or adhesive. Ensure that the doors and drawer fronts are properly aligned and function smoothly. Adjust the hinges as necessary to achieve a consistent gap between the doors and drawer fronts.
The final step in the refacing process is to install new hardware, such as knobs, pulls, or handles. Choose hardware that complements the style of the new doors and drawer fronts and provides a comfortable grip. Reinstall any existing hardware that was set aside or opt for new hardware to further enhance the updated look of the cabinets. Refacing kitchen cabinets can dramatically transform the appearance of the kitchen without the expense or disruption of a full renovation.
Adding Decorative Elements
Beyond cleaning, painting, or refacing, incorporating decorative elements can greatly improve the look of kitchen cabinets. These additions provide visual interest and personalize the space, enhancing the overall aesthetic appeal without requiring extensive or expensive renovations.
One simple yet effective decorative element is the addition of under-cabinet lighting. This type of lighting illuminates the countertop surfaces, providing task lighting for food preparation and creating a warm and inviting ambiance. LED strip lights are a popular choice for under-cabinet lighting due to their energy efficiency, long lifespan, and ease of installation. They can be easily attached to the underside of the cabinets with adhesive backing and plugged into a nearby outlet.
Another decorative element to consider is adding decorative molding or trim to the cabinets. This can add architectural detail and visual interest to otherwise plain cabinets. Crown molding, base molding, and decorative trim can be used to enhance the overall look of the cabinets. Molding and trim can be attached with adhesive or nails and then painted or stained to match the cabinets.
Glass-front cabinets are another way to add visual interest and showcase decorative items. Replacing solid cabinet doors with glass doors allows you to display dishes, glassware, or decorative accessories. This can create a focal point in the kitchen and add a touch of elegance. Consider using frosted or textured glass to add privacy or to conceal items that are not visually appealing. Interior cabinet lighting can further enhance the display.
Open shelving is also an option to add visual interest and create a more open and airy feel in the kitchen. Replacing some of the upper cabinets with open shelves allows you to display decorative items, cookbooks, or plants. Open shelves can be made of wood, metal, or glass and can be customized to fit the style of the kitchen.
Finally, consider adding decorative hardware to the cabinets. Replacing the existing knobs and pulls with new, stylish hardware can instantly update the look of the cabinets. Choose hardware that complements the style of the cabinets and the overall kitchen design. A wide range of styles, materials, and finishes are available, allowing you to customize the look of your cabinets to suit your personal preferences.

25 Easy Ways To Update Kitchen Cabinets

How To Make Old Cabinets Look New With Paint

25 Easy Ways To Update Kitchen Cabinets

25 Easy Ways To Update Kitchen Cabinets

How To Update Your Kitchen Cabinets Without Replacing Them Real Estate U S News

How To Paint Kitchen Cabinets In 7 Simple Steps

Got My Kitchen Reviewed By An Interior Designer Design Tips

How To Have A Beautiful Kitchen On Budget

7 Ways To Make Your Kitchen Look Expensive Cabinetselect Com

Ask Maria Help My White Painted Kitchen Cabinets Look Bad Advice For Homeowners