How to Stain Your Kitchen Cabinets Darker
Updating kitchen cabinets offers a cost-effective alternative to a complete kitchen remodel. Staining cabinets darker can significantly transform the aesthetic of the space, creating a more modern, sophisticated, or dramatic look. The process, while achievable for many homeowners, requires careful planning, meticulous preparation, and a thorough understanding of the materials and techniques involved. This article provides a comprehensive guide on how to stain kitchen cabinets darker.
Assessing Existing Cabinets and Choosing the Right Stain
Before embarking on the staining process, a thorough assessment of the existing kitchen cabinets is crucial. The type of wood, the existing finish, and the overall condition of the cabinets will dictate the most appropriate approach and materials. Cabinets constructed from solid wood, such as oak, maple, or cherry, are ideal candidates for staining. Veneer cabinets, while stainable, require a more delicate approach due to the thin layer of real wood adhered to a less expensive substrate.
Identifying the existing finish is equally important. Cabinets may be coated with varnish, lacquer, polyurethane, or a combination of these. Determining the existing finish will inform the necessary preparation steps, particularly regarding sanding and stripping. It's often possible to test a small, inconspicuous area with different solvents to identify the existing finish. For example, lacquer thinner will dissolve lacquer finishes.
Choosing the right stain is a critical decision that directly impacts the final appearance of the cabinets. Oil-based stains typically offer deeper penetration and richer color compared to water-based stains. However, they also require longer drying times and emit stronger odors. Water-based stains are generally lower in volatile organic compounds (VOCs) and dry more quickly, making them a more environmentally friendly option. Gel stains are particularly useful for cabinets with non-porous surfaces or intricate detailing, as they sit on top of the surface and provide even coverage.
When selecting a stain color, consider testing it on a scrap piece of wood that matches the cabinet material. This allows for a realistic preview of the final color and ensures that the chosen stain will achieve the desired effect. It is also advisable to purchase a small can of the chosen stain and test it on an inconspicuous area of an existing cabinet before committing to the entire project. Multiple coats of stain will generally result in a darker, richer color, so experimentation with different application techniques is recommended.
Preparation: The Key to a Flawless Finish
Proper preparation is arguably the most important aspect of staining kitchen cabinets. Inadequate preparation can lead to uneven stain absorption, blotchy finishes, and poor adhesion. The preparation process typically involves removing the cabinets, cleaning, sanding, and applying a wood conditioner.
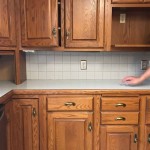
The first step is to remove all cabinet doors, drawers, and hardware. Labeling each door and drawer with its corresponding cabinet location is crucial for easy reassembly. Store the hardware in labeled bags to prevent loss or misplacement. Lay down drop cloths or plastic sheeting to protect the work area from dust, spills, and debris.
Next, thoroughly clean the cabinets to remove dirt, grease, and grime. A solution of warm water and a mild detergent, such as dish soap, is generally sufficient. For stubborn grease stains, a degreasing cleaner may be necessary. Rinse the cabinets with clean water and allow them to dry completely before proceeding to the next step.
Sanding is essential for creating a smooth, receptive surface for the stain. The type of sandpaper and the sanding technique will depend on the existing finish and the desired level of darkness. If the existing finish is intact and in good condition, a light sanding with 220-grit sandpaper may be sufficient to scuff the surface and create a better bond for the stain. However, if the existing finish is damaged or peeling, it may be necessary to strip it off entirely using a chemical stripper. Follow the manufacturer's instructions carefully when using chemical strippers, and always wear appropriate protective gear, including gloves and eye protection.
After stripping, sand the cabinets with progressively finer grits of sandpaper, starting with 120-grit to remove any remaining finish and imperfections, followed by 180-grit and finally 220-grit to create a smooth, even surface. Sand with the grain of the wood to avoid creating unsightly scratches. Vacuum up the sanding dust and wipe down the cabinets with a tack cloth to remove any remaining residue.
Applying a wood conditioner before staining can help to ensure even stain absorption, particularly on softwoods or woods with uneven grain patterns. Wood conditioner penetrates the wood pores and creates a more uniform surface, preventing the stain from absorbing too quickly in some areas and resulting in a blotchy finish. Apply the wood conditioner according to the manufacturer's instructions and allow it to dry completely before proceeding to the staining process.
Staining and Sealing the Cabinets
With the cabinets properly prepared, the staining process can begin. It is important to work in a well-ventilated area and to wear gloves and eye protection to prevent skin irritation and eye damage. Stir the stain thoroughly to ensure that the pigments are evenly distributed. Apply the stain with a brush, rag, or foam applicator, working in the direction of the wood grain. Avoid applying the stain too thickly, as this can lead to an uneven finish.
Allow the stain to penetrate the wood for the recommended amount of time, as specified by the manufacturer. The longer the stain is allowed to penetrate, the darker the final color will be. After the desired penetration time, wipe off the excess stain with a clean, lint-free rag. Be sure to remove all excess stain to prevent a sticky or tacky finish.
If a darker color is desired, apply a second coat of stain after the first coat has dried completely. Lightly sand the cabinets with 320-grit sandpaper between coats to create a smooth surface for the subsequent coat of stain. Allow each coat of stain to dry completely before applying the next.
Once the stain has dried completely, apply a clear topcoat to protect the stained surface and enhance its durability. Polyurethane is a popular choice for kitchen cabinets due to its durability and resistance to water, scratches, and chemicals. Apply the polyurethane with a brush, roller, or spray gun, following the manufacturer's instructions. Apply multiple thin coats of polyurethane, allowing each coat to dry completely before applying the next. Lightly sand the cabinets with 320-grit sandpaper between coats to create a smooth, even finish.
Allow the final coat of polyurethane to dry completely before reassembling the cabinets. Reattach the hardware and reinstall the doors and drawers. Carefully inspect the finished cabinets to ensure that the stain and topcoat are evenly applied and that there are no drips, runs, or other imperfections.
Following these careful steps will ensure a transformation of your kitchen cabinets to a richer, darker hue.

Staining Your Wood Cabinets Darker Young House Love

How To Stain Oak Cabinetry Tutorial The Kim Six Fix

How To Stain Wood Cabinets True Value

Diy Staining Oak Cabinets Eclectic Spark

5 Ideas How To Update Oak Or Wood Kitchen Cabinets Part 1 Staining

How To Refinish Wood Cabinets The Easy Way Love Remodeled

Staining Your Wood Cabinets Darker Young House Love

Test Staining Oak Cabinets Espresso Brown Merrypad

Pickled Oak Bathroom Vanity Before And After Gel Stain Staining Cabinets Kitchen Makeover Wood

Staining Oak Cabinets An Espresso Color Diy Tutorial Monica Benavidez
Related Posts